How to Create a PDF from HTML in Zapier Using APITemplate
By
APITemplate.io
TL;DR:
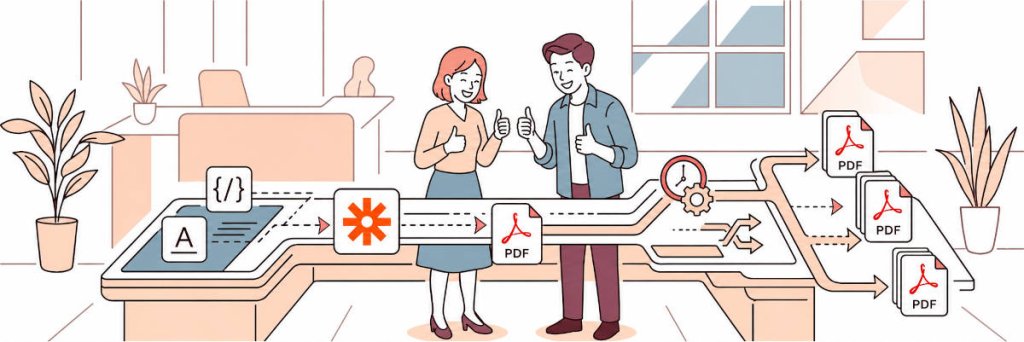
This guide shows you how to convert HTML to PDF using Zapier and APITemplate. You write your HTML, insert dynamic fields from your trigger app, and get a download ready PDF back, no coding required.
Add a Zapier trigger (Google Sheets, Airtable, Jotform, etc.)
Use the APITemplate action “Create PDF”
Pass your data to fill in the template
Upload the generated PDF to Google Drive
Creating contracts, invoices, and agreements by hand does not scale. As volume grows, manual PDF creation becomes a bottleneck. If you want to convert HTML to PDF using Zapier, APITemplate makes it simple. It connects to your data source, fills in your template, and returns a download URL you can use in subsequent steps.
This works well for invoices, service agreements, contracts, quotes, and order confirmations.
Besides template-based PDF generation (which this tutorial covers), APITemplate also offers an API to convert a website URL to PDF and an API to generate a PDF from custom HTML content. APITemplate supports both URL to PDF and HTML to PDF directly as Zapier actions. You can use Create PDF From URL when your content is available as a web page, or Create PDF From HTML when you want to pass custom HTML content from another Zapier step.
This gives you flexibility depending on whether you are working with reusable templates, live web pages, or raw HTML content.
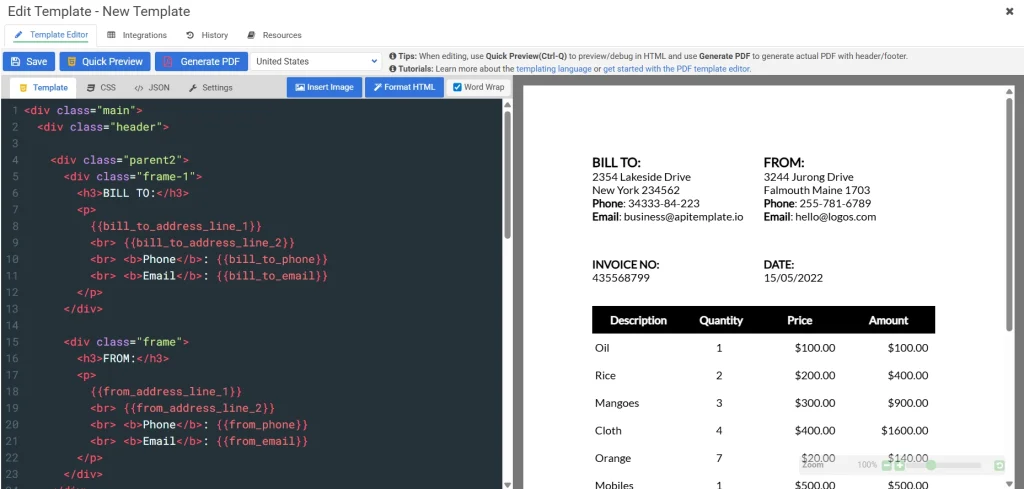
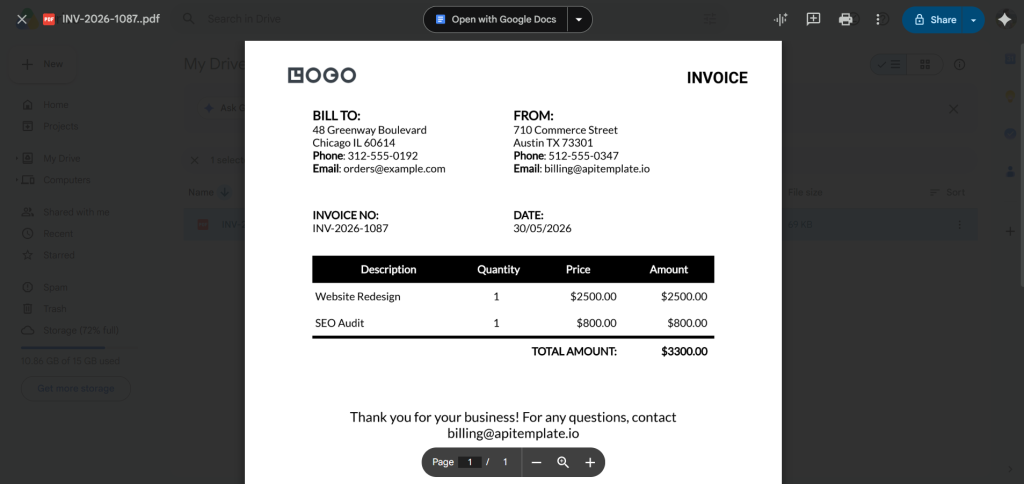
Log in to APITemplate and go to the Manage Templates tab. Click the New PDF Template button, and from the list of starter templates, select Sample invoice Template 1. This is a ready-made invoice template with its own HTML, CSS, and sample JSON already built in.
Here is what the template looks like when previewed in the editor:
The template uses variables like {{invoice_number}}, {{bill_to_address_line_1}}, {{from_email}}, etc. as placeholders. When you send data through Zapier, these placeholders get replaced with your actual values.
You do not need to modify anything in the template editor. The HTML and CSS will be used as-is. If you want to customize the layout later, you can open the template and edit the HTML or CSS to match your needs.
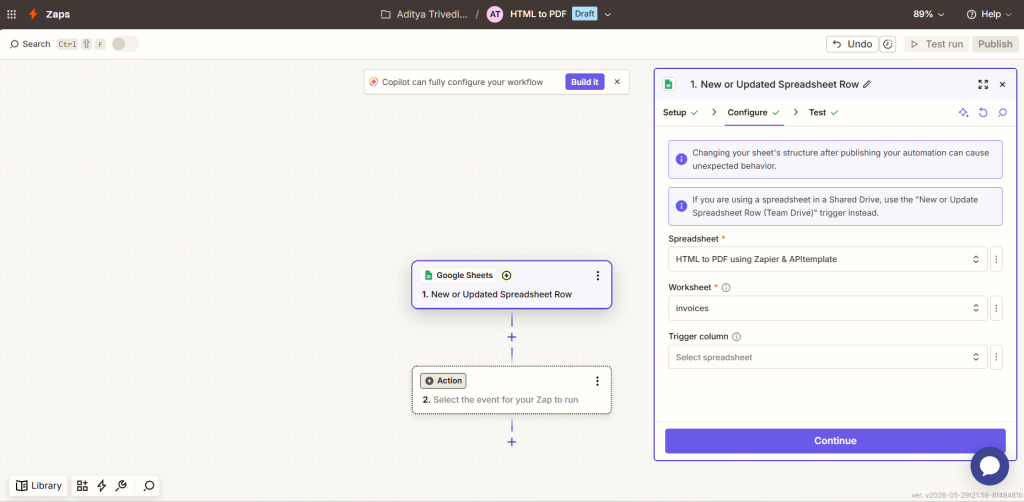
Step 2: Set Up Your Trigger in Zapier
For this tutorial we use Google Sheets – New Spreadsheet Row as the trigger. You can swap this for Airtable, Jotform, Typeform, or any other trigger.
Create a Google Sheet with two tabs:
Tab 1: invoices
Column
Example Value
invoice_number
INV-2026-1087
invoice_date
30/05/2026
bill_to_address_line_1
48 Greenway Boulevard
bill_to_address_line_2
Chicago IL 60614
bill_to_phone
312-555-0192
bill_to_email
orders@example.com
from_address_line_1
710 Commerce Street
from_address_line_2
Austin TX 73301
from_phone
512-555-0347
from_email
billing@apitemplate.io
footer_email
billing@apitemplate.io
Tab 2: line items
invoice_number
item_name
quantity
unit_price
total
INV-2026-1087
Website Redesign
1
2500
2500
INV-2026-1087
SEO Audit
1
800
800
Each row in the line items tab represents one item on the invoice, linked by invoice_number. You can add as many items as you need per invoice.
In Zapier, create a new Zap, select Google Sheets as the trigger, choose New Spreadsheet Row, connect your account, select your invoices sheet, and test to pull in a sample row.
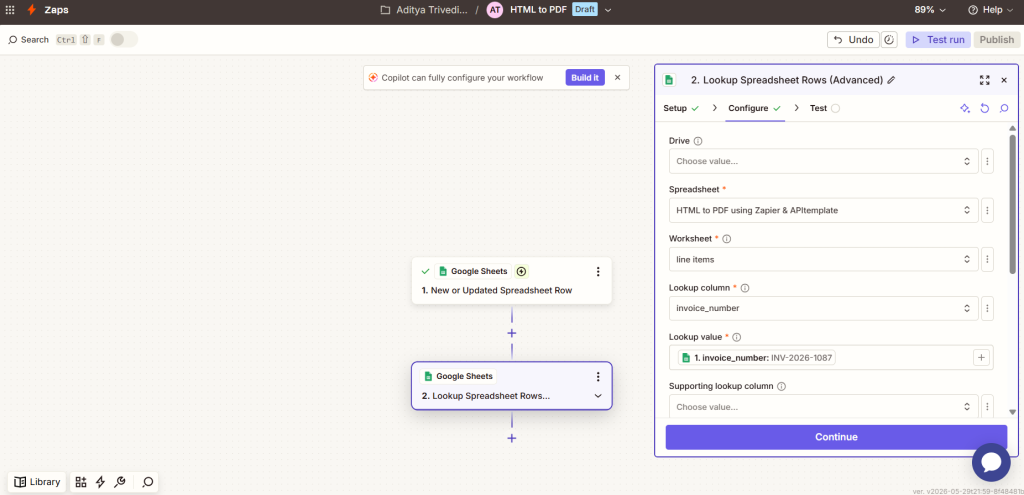
Step 3: Look Up the Line Items
Add a new step below your trigger.
Search for Google Sheets and select the action Lookup Spreadsheet Rows.
Select your spreadsheet and choose the line items tab.
For Lookup Column, select invoice_number.
For Lookup Value, map the invoice_number field from your trigger step.
This step finds all rows in the line items tab that match the current invoice number and returns them as output.
Step 4: Add the APITemplate Action and Map Your Data
Add a new step below the lookup step.
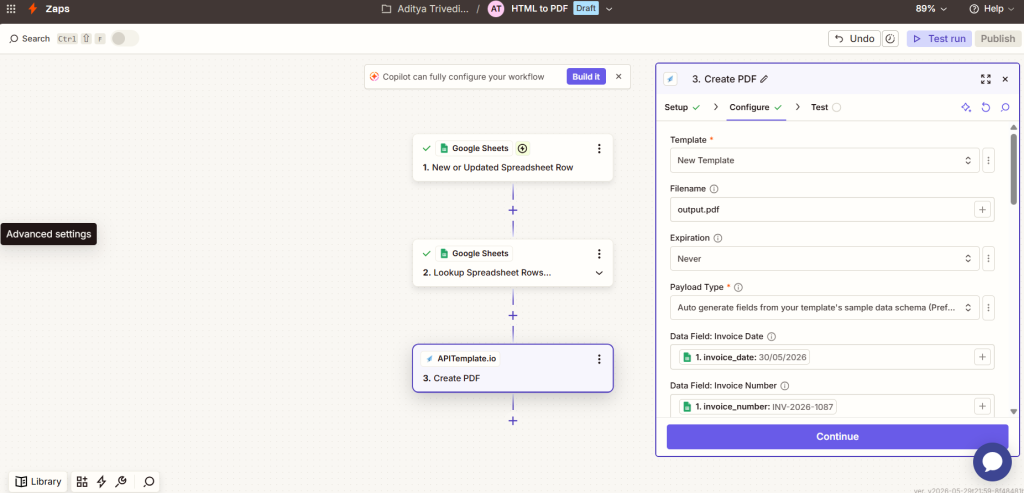
Search for APITemplate and select the action Create PDF.
Connect your APITemplate account using your API key (found under the API Integration tab in your APITemplate dashboard).
In the Template dropdown, select your template ID.
For Payload Type, select Auto generate fields from your template’s sample data schema.
This automatically creates input fields based on your template’s sample JSON. You will see fields for invoice_number, invoice_date, bill_to_address_line_1, and so on, including the items array fields.
6. Map each flat field to the corresponding value from your Google Sheets trigger (Step 1).
7. Map the Data items fields to the matching values from the Lookup step (Step 3).
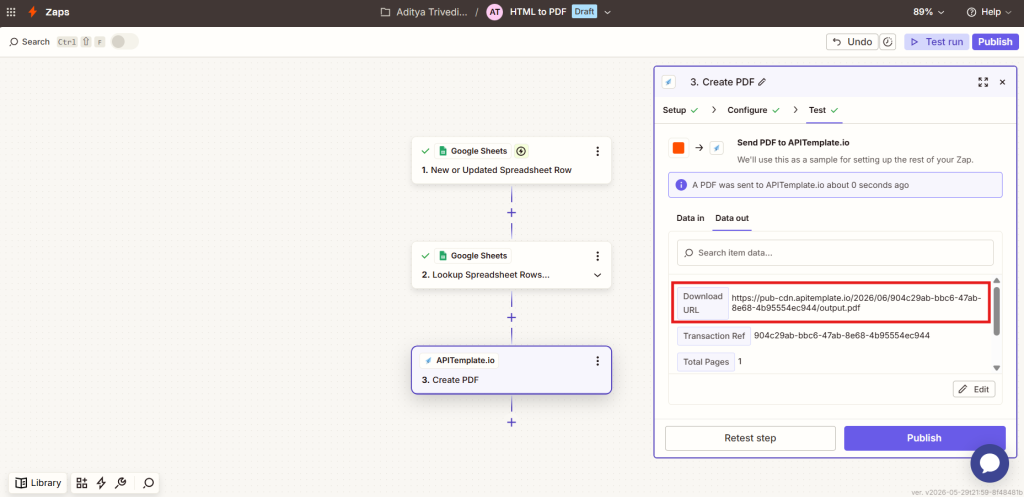
8. Click Continue and then Test step. A successful test returns a download_url, open it in your browser to verify the PDF.
Step 5: Upload the PDF to Google Drive
Add a new step below the APITemplate action.
Select Google Drive and choose the action Upload File.
Configure:
Folder: Pick your destination folder (e.g., “Invoices”).
File: Select the Download Url from the APITemplate step. Zapier will download the PDF from that URL and upload it.
File Name: Map the invoice_number field from your Google Sheets trigger.
File Extension: Type .pdf.
Test the step and confirm the PDF appears in your Google Drive folder.
Tip: If you do not see the Download Url field, test the APITemplate step first. Zapier needs a successful test to expose output fields.
Complete Workflow
Trigger: New Spreadsheet Row (Google Sheets – invoices tab)
Lookup: Lookup Spreadsheet Rows (Google Sheets – line items tab)
Action: APITemplate: Create PDF
Action: Google Drive: Upload File
Every new row automatically generates a PDF invoice and saves it to Drive.
Bonus: Convert URL to PDF in Zapier Video Tutorial
Want to convert an HTML page or website URL into a PDF in Zapier? In this video, we walk through how to use APITemplate.io to generate a PDF directly from a URL.
The tutorial covers the Create PDF From URL action, how to configure the basic settings, and how to use the generated PDF URL in the next steps of your Zap, such as sending it by email, uploading it to Google Drive, or saving it back to another app.
You can also check out the full APITemplate Zapier integration guide here:
Conclusion
With Zapier and APITemplate, any form submission or spreadsheet row can become a professionally formatted PDF automatically. Set up your template once, map your data fields, and let the automation handle the rest.
Can I convert HTML to PDF in Zapier without coding?
Yes. You can use Zapier together with APITemplate.io to automatically generate PDFs from HTML, templates, or URLs without writing code. Once the Zap is set up, APITemplate generates the PDF and returns a downloadable PDF URL that can be used in later Zapier steps.
How do I create a PDF from HTML in Zapier?
To create a PDF from HTML in Zapier, set up a Zapier trigger, add APITemplate as an action, and choose the PDF generation action that fits your workflow. You can generate a PDF from a reusable template, raw HTML content, or a web page URL.
What is the difference between Create PDF, Create PDF From HTML, and Create PDF From URL?
Create PDF is used for template-based PDF generation, where you design a reusable template in APITemplate and pass dynamic data from Zapier. Create PDF From HTML is used when you want to send raw HTML content directly. Create PDF From URL is used when the HTML document is available as a web page or website URL.
Can Zapier convert a website URL to PDF?
Yes. APITemplate supports a Create PDF From URL action in Zapier. This lets you pass a website URL or HTML page URL and convert it into a PDF automatically.
Can I generate a PDF from custom HTML in Zapier?
Yes. If your Zap contains custom HTML from another step, you can use APITemplate’s Create PDF From HTML action to convert that HTML content into a PDF.
Do I need to design a PDF template first?
Only if you are using the template-based Create PDF action. If your content already exists as raw HTML, you can use Create PDF From HTML. If your content is available as a web page, you can use Create PDF From URL.
Can I customize the PDF layout, margins, paper size, and orientation?
Yes. Depending on the APITemplate action you use, you can configure settings such as paper size, orientation, margins, background printing, headers, and footers.
What happens after APITemplate generates the PDF?
APITemplate returns a PDF URL in the Zapier step output. You can use that URL in the next step of your Zap, such as uploading the PDF to Google Drive, sending it by email, saving it to a CRM, or attaching it to another workflow.
APITemplate.io
Content creation doesn’t have to be hard. With our tool, you can generate stunning social media images, banners, and PDFs from ready-to-use templates: no coding required!
We use cookies on our website to give you the most relevant experience by remembering your preferences and repeat visits. By clicking “Accept All”, you consent to the use of ALL the cookies.