Airtable Integration
Airtable is a spreadsheet-database hybrid that many teams use to manage structured data — from event attendees and product catalogs to invoices and certificates. You can connect APITemplate.io with Airtable to automatically generate PDFs and images from your records.
What you can do
- Generate PDFs on demand — click a button in Airtable to create a PDF from any record
- Store results in Airtable — write the generated PDF back to an attachment field
- Bulk generation — loop through records to produce documents for every row in a table
How to connect
There are three ways to connect Airtable with APITemplate.io, depending on your preferred level of control.
Option 1: Through Zapier (no-code)
- Create a Zap with an Airtable trigger (e.g., "New Record" or "Updated Record")
- Add an APITemplate.io action (Create PDF or Create Image)
- Map Airtable fields to template variables
- Optionally write the generated file URL back to an Airtable attachment field
See the Zapier integration guide for detailed steps.
Option 2: Through Make.com (no-code)
- Create a Make.com scenario with an Airtable module
- Add the APITemplate.io module
- Map Airtable data to your template
- Store the result back in Airtable
See the Make.com integration guide for detailed steps.
Option 3: Airtable Scripting (low-code)
Use Airtable's built-in Scripting extension to call the APITemplate.io REST API directly from within your base. This gives you the most flexibility and keeps everything inside Airtable — no third-party automation platform needed.
The rest of this guide walks through Option 3 in detail.
Tutorial: Generate PDFs with the Airtable Scripting Extension
This tutorial sets up a workflow where clicking a button in Airtable generates a PDF from the current record using APITemplate.io and saves the result back to an attachment field.
Overview of the workflow
- Data is stored in an Airtable table (e.g., attendee names, company names, IDs)
- A button field triggers a script for the clicked record
- The script sends the record data to the APITemplate.io API to generate a PDF
- The generated PDF URL is written back to an attachment field in the same record
Step 1 — Create a PDF template in APITemplate.io
- Log in to app.apitemplate.io and navigate to Manage Templates
- Click New Template to create a new PDF template
- Choose either the HTML/CSS editor or the WYSIWYG editor similar to Microsoft Word
- Design your template with dynamic variables using the
{{variable_name}}syntax — for example,{{name}},{{company}},{{id}}

- Note your Template ID — you can find it on the Manage Templates page next to the template name
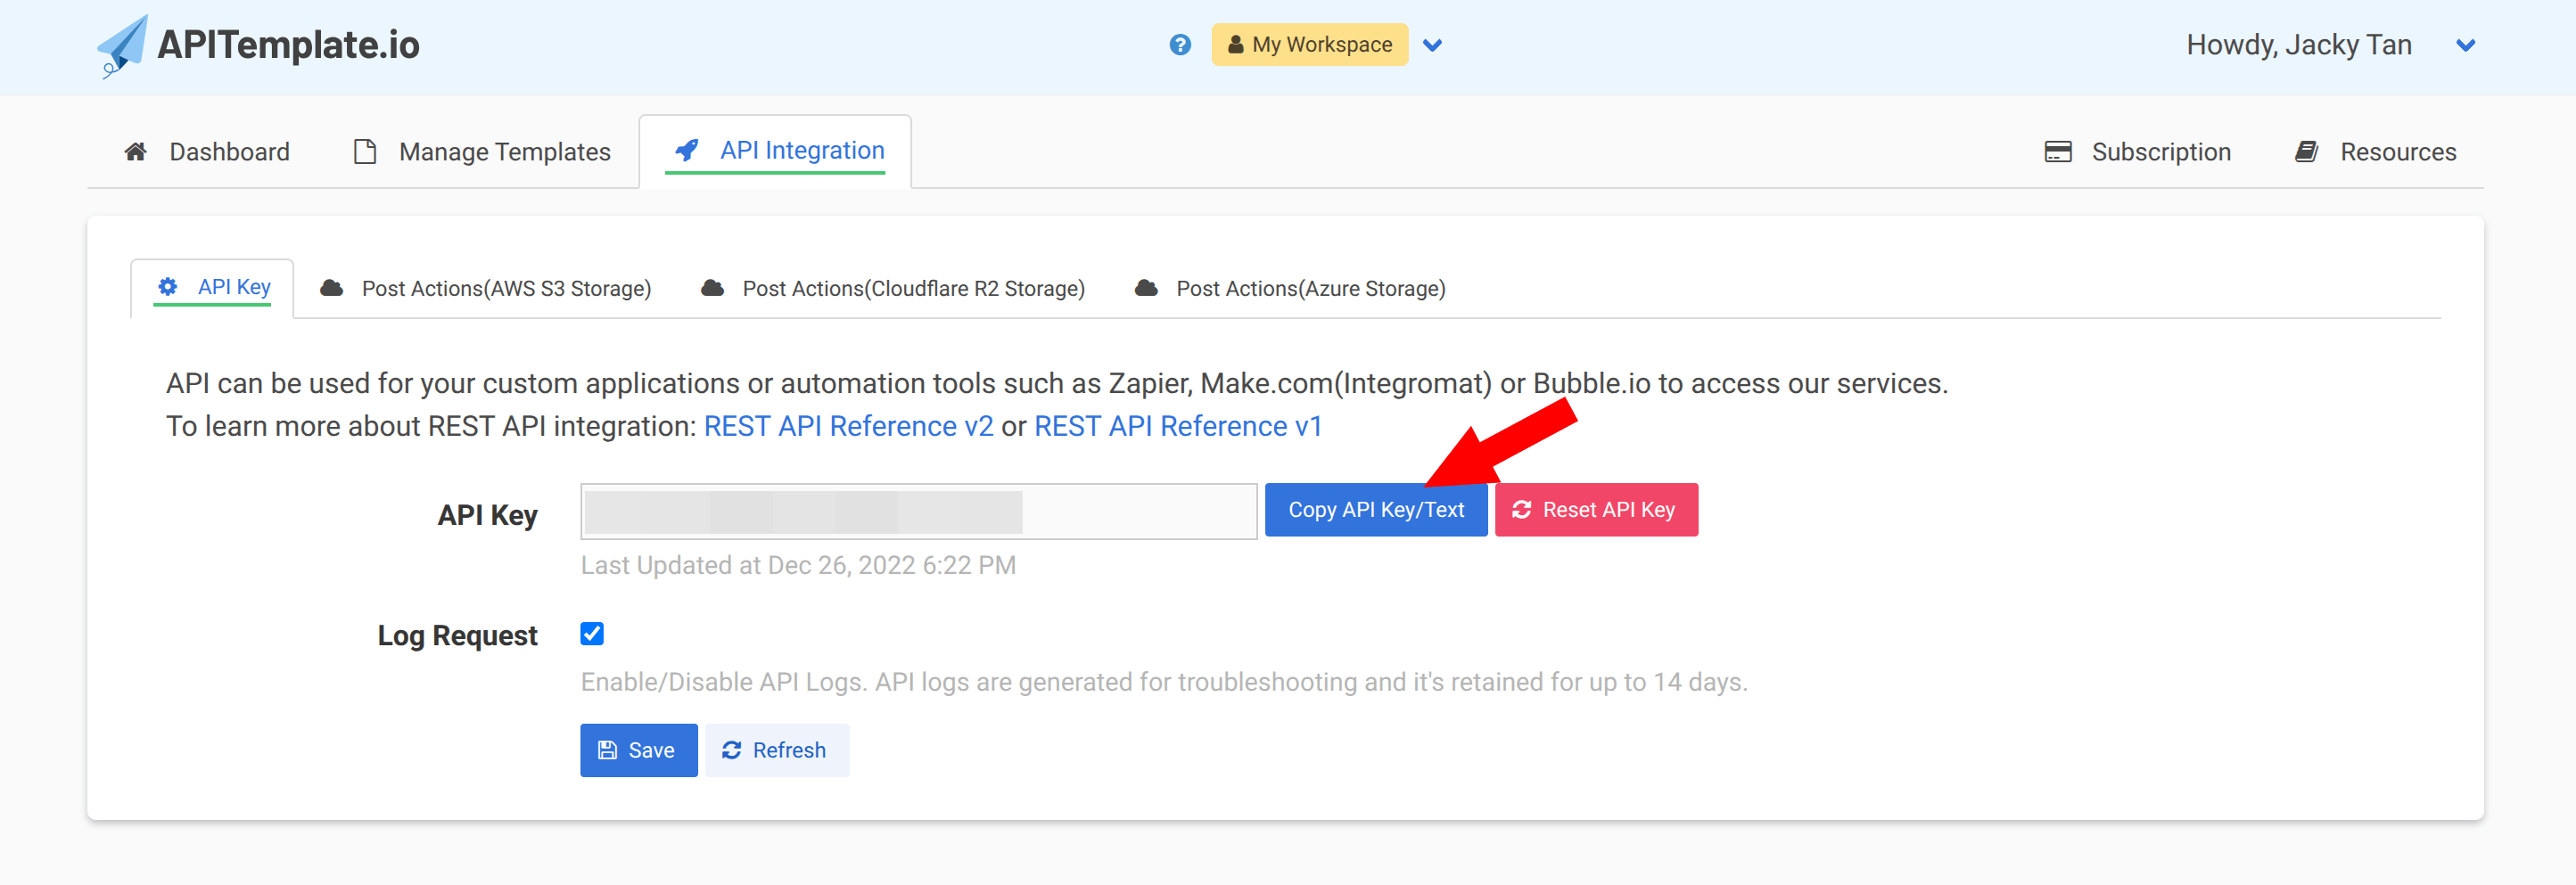
Step 2 — Copy your API key
- Navigate to the API Integration tab in your APITemplate.io account
- Copy your API key — you will need this for the Airtable script
Step 3 — Set up your Airtable table
Create a table in Airtable with the fields that correspond to the data in your template. For example, if you are generating event passes, your table might include:
| Field | Field Type | Purpose |
|---|---|---|
| Name | Single line | Attendee or recipient name |
| Company | Single line | Organization name |
| ID | Single line | Unique identifier |
| Image URL | URL | Profile photo or logo (if needed) |
| Generated PDF | Attachment | Stores the generated PDF |
| Generate | Button | Triggers the script (added in Step 4) |
Populate the table with your data — enter it manually, import from CSV, or collect it via an Airtable form.
Step 4 — Add a button field
Airtable's button field lets you trigger a script with a single click on any row.
- Add a new field to your table
- Change the field type to Button
- Give the button a label (e.g., "Generate PDF")
- Under the button action, select Run script
The button will appear as a clickable element on every row of your table.
Step 5 — Install the Scripting extension
If you haven't used the Scripting extension before:
- Open the Extensions panel in your Airtable base
- Click + Add an extension
- Search for Scripting and install it
Step 6 — Add the script
Copy the script below and paste it into the Scripting extension (or into the button's script editor). Update the variables at the top with your own API key, template ID, and field names.
For PDF generation (HTML/CSS template)
const API_KEY = "YOUR_API_KEY";
const TEMPLATE_ID = "YOUR_TEMPLATE_ID";
const OUTPUT_FILE = "output.pdf";

const AIRTABLE_TABLE = "Event Passes";
const AIRTABLE_PDF_FIELD = "Generated PDF";

let table = base.getTable(AIRTABLE_TABLE);
let record = await input.recordAsync("Select a record", table);

if (!record) {
    output.text("No record selected.");
} else {
    let payload = {
        template_id: TEMPLATE_ID,
        expiration: 5,
        output_file: OUTPUT_FILE,
        data: {
            name: record.getCellValueAsString("Name"),
            id: record.getCellValueAsString("ID"),
            company: record.getCellValueAsString("Company"),
            image_url: record.getCellValueAsString("Image URL")
        }
    };

    let response = await fetch("https://rest.apitemplate.io/v2/create-pdf", {
        method: "POST",
        body: JSON.stringify(payload),
        headers: {
            "Content-Type": "application/json",
            "X-API-KEY": API_KEY
        }
    });

    let result = await response.json();

    if (result.download_url) {
        let update = {};
        update[AIRTABLE_PDF_FIELD] = [
            { url: result.download_url, filename: OUTPUT_FILE }
        ];
        await table.updateRecordAsync(record.id, update);
        output.text(`PDF generated: ${result.download_url}`);
    } else {
        output.text(`Error: ${JSON.stringify(result)}`);
    }
}
For image generation
const API_KEY = "YOUR_API_KEY";
const TEMPLATE_ID = "YOUR_IMAGE_TEMPLATE_ID";

const AIRTABLE_TABLE = "Products";
const AIRTABLE_IMAGE_FIELD = "Generated Image";

let table = base.getTable(AIRTABLE_TABLE);
let record = await input.recordAsync("Select a record", table);

if (!record) {
    output.text("No record selected.");
} else {
    let payload = {
        overrides: [
            {
                name: "title",
                text: record.getCellValueAsString("Product Name")
            },
            {
                name: "price",
                text: record.getCellValueAsString("Price")
            },
            {
                name: "img_url",
                src: record.getCellValueAsString("Image URL")
            }
        ]
    };

    let response = await fetch(
        `https://rest.apitemplate.io/v2/create-image?template_id=${TEMPLATE_ID}`,
        {
            method: "POST",
            body: JSON.stringify(payload),
            headers: {
                "Content-Type": "application/json",
                "X-API-KEY": API_KEY
            }
        }
    );

    let result = await response.json();

    if (result.download_url) {
        let update = {};
        update[AIRTABLE_IMAGE_FIELD] = [
            { url: result.download_url, filename: "generated.png" }
        ];
        await table.updateRecordAsync(record.id, update);
        output.text(`Image generated: ${result.download_url}`);
    } else {
        output.text(`Error: ${JSON.stringify(result)}`);
    }
}
API_KEY— your API key from the API Integration pageTEMPLATE_ID— the template ID from the Manage Templates pageAIRTABLE_TABLE— the name of your Airtable tableAIRTABLE_PDF_FIELD/AIRTABLE_IMAGE_FIELD— the attachment field where the generated file will be storeddata(PDF) /overrides(image) — map these keys to your template's dynamic variables, usingrecord.getCellValueAsString("Field Name")to pull values from Airtable
Step 7 — Run the script
There are two ways to run the script:
- From the Scripting extension — click Run. You will be prompted to select a record.
- From a button field — click the button on any row. The script runs automatically with that record, skipping the selection prompt.
After the script completes, the generated PDF (or image) appears as a thumbnail in the attachment field. Click the thumbnail to view the full document.
Bulk generation
To generate documents for every record in a table, modify the script to loop through all records instead of prompting for a single one:
const API_KEY = "YOUR_API_KEY";
const TEMPLATE_ID = "YOUR_TEMPLATE_ID";

const AIRTABLE_TABLE = "Event Passes";
const AIRTABLE_PDF_FIELD = "Generated PDF";

let table = base.getTable(AIRTABLE_TABLE);
let query = await table.selectRecordsAsync({ fields: table.fields });

for (let record of query.records) {
    let existing = record.getCellValue(AIRTABLE_PDF_FIELD);
    if (existing && existing.length > 0) {
        continue; // skip records that already have a PDF
    }

    let payload = {
        template_id: TEMPLATE_ID,
        expiration: 5,
        data: {
            name: record.getCellValueAsString("Name"),
            id: record.getCellValueAsString("ID"),
            company: record.getCellValueAsString("Company")
        }
    };

    let response = await fetch("https://rest.apitemplate.io/v2/create-pdf", {
        method: "POST",
        body: JSON.stringify(payload),
        headers: {
            "Content-Type": "application/json",
            "X-API-KEY": API_KEY
        }
    });

    let result = await response.json();

    if (result.download_url) {
        let update = {};
        update[AIRTABLE_PDF_FIELD] = [
            { url: result.download_url, filename: `${record.getCellValueAsString("Name")}.pdf` }
        ];
        await table.updateRecordAsync(record.id, update);
        output.text(`Generated PDF for ${record.getCellValueAsString("Name")}`);
    } else {
        output.text(`Error for ${record.getCellValueAsString("Name")}: ${JSON.stringify(result)}`);
    }
}

output.text("Bulk generation complete.");
When generating documents in bulk, be mindful of your API plan's rate limits. For large tables, consider adding a short delay between requests or processing records in batches.
Use cases
- Event passes — generate personalized PDF badges or passes for attendees stored in Airtable
- Invoices — create invoices from order records and store them alongside the order data
- Certificates — produce certificates for a list of course completers or award recipients
- Product catalogs — generate product images with prices and descriptions for e-commerce
- Contracts & agreements — populate legal templates with client data from Airtable records
- Shipping labels — create labels from order and address information
Tips
- Use the button field approach for on-demand, row-by-row generation — it's the most intuitive for non-technical users
- Use the bulk script approach for batch processing large tables
- Store the
download_urlin a URL field as well if you need a clickable link in addition to the attachment - Combine with Airtable automations to trigger generation when a record enters a specific view or when a checkbox is ticked
- Add a QR code to your template (using APITemplate.io's built-in QR code support) for verifiable event passes or tickets