TL;DR
This guide shows you how to automate PDF generation by connecting n8n with APITemplate. You design a template once, send JSON data through an n8n workflow, and get a ready to share PDF back, no manual formatting required.
- Design a reusable PDF template
- Connect n8n to APITemplate using HTTP Request node (V2 API, recommended)
- Trigger PDF generation from webhooks, schedules, or app events
- Deliver PDFs via email, cloud storage, or webhook response
Creating invoices, reports, certificates, and contracts by hand is slow and error prone. As volume grows, manual PDF creation simply does not scale.
n8n (pronounced “nodemation”) is an open-source, low-code workflow automation platform with 400+ integrations. It lets you visually connect APIs, databases, and SaaS tools into automated workflows – self-hosted or on n8n Cloud.
APITemplate is a PDF generation API that produces documents dynamically from reusable templates. You design templates with a WYSIWYG editor or custom HTML/CSS, then populate them with JSON data via the REST API.
To see how this works in a real workflow, watch the tutorial below. You’ll learn how n8n captures the data and sends it to APITemplate to generate PDFs automatically.
Step 1: Create a PDF Template in APITemplate
Before we start with the tutorial, if you would love to watch a video, here’s one.
If you would like to read it over, keep reading it over.
- Sign up, and you get 50 free credits to test the API.
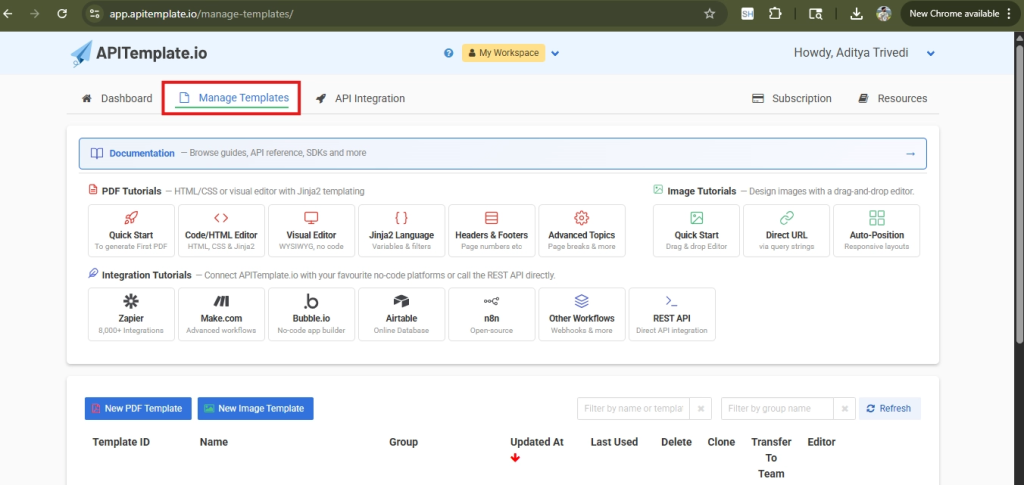
- Once logged in, you’ll see three tabs at the top: Dashboard, Manage Templates, and API Integration. Click the Manage Templates tab.
- Click the red New PDF Template button at the bottom left of the page. A “Create a new template” form will open with four sections:
- Name your template – Enter a name (e.g., “Invoice Template”).
- Select a template editor – Choose Create PDF with HTML (for full HTML/CSS control)
- Select a starter template – Pick “HTML Templating Basics” for a blank slate from the list .
- Click the green + Create button at the bottom.
- You’ll now be inside the HTML Editor. You’ll notice two tabs at the top: HTML and CSS. The HTML tab is for your markup and template variables, while the CSS tab is for your styles. Add template variables – these are placeholders in your HTML that get replaced with real data when the PDF is generated. For example,
{{ invoice_number }}will be replaced with an actual invoice number like “INV-1001” when you send data to the API.- Use
{{ variable_name }}for simple text values - Use
{% for item in items %}...{% endfor %}to loop over a list (e.g., line items in an invoice)
- Use
The editor has separate HTML, CSS, and JSON tabs. Replace the existing starter code in each tab with the following, clear the HTML tab and paste the HTML below, switch to the CSS tab, clear it, and paste the CSS, then switch to the JSON tab, clear it, and paste the JSON.
HTML tab:
  <div class="header">
    <h1>Invoice</h1>
    <p>Invoice #: {{ invoice_number }}</p>
  </div>
  <div class="customer-details">
    <strong>Bill To:</strong> {{ customer_name }}
  </div>
  <table class="items-table">
    <thead>
      <tr><th>Description</th><th>Quantity</th><th>Price</th><th>Amount</th></tr>
    </thead>
    <tbody>
      {% for item in items %}
      <tr>
        <td>{{ item.description | default("") }}</td>
        <td>{{ item.quantity | default(0) }}</td>
        <td>${{ "%.2f" | format(item.price | default(0)) }}</td>
        <td>${{ "%.2f" | format(item.amount | default(0)) }}</td>
      </tr>
      {% endfor %}
    </tbody>
  </table>

  <div class="total-section">
    Total: ${{ "%.2f" | format(total | default(0)) }}
  </div>

  <div class="footer">
    Thank you for your business!
  </div>
CSS tab:
<style>
    body { font-family: Arial, sans-serif; margin: 40px; color: #000000; background-color: #ffffff; }
    .header { text-align: center; border-bottom: 2px solid #555; padding-bottom: 10px; margin-bottom: 30px; }
    .header h1 { margin: 0; font-size: 28px; }
    .customer-details { margin-bottom: 20px; font-size: 16px; }
    .items-table { width: 100%; border-collapse: collapse; margin-bottom: 20px; }
    .items-table th, .items-table td { border: 1px solid #bbb; padding: 8px; text-align: left; }
    .items-table th { background-color: #f5f5f5; }
    .total-section { text-align: right; font-size: 18px; font-weight: bold; margin-top: 20px; }
    .footer { margin-top: 40px; text-align: center; font-size: 12px; color: #777; }
 </style>
JSON tab:
{
"invoice_number": "INV-2026-001",
"customer_name": "Acme Corporation",
"items": [
{
"description": "Website Design",
"quantity": 1,
"price": 1200.00,
"amount": 1200.00
},
{
"description": "Hosting Service",
"quantity": 12,
"price": 25.00,
"amount": 300.00
},
{
"description": "Maintenance Support",
"quantity": 5,
"price": 80.00,
"amount": 400.00
}
],
"total": 1900.00
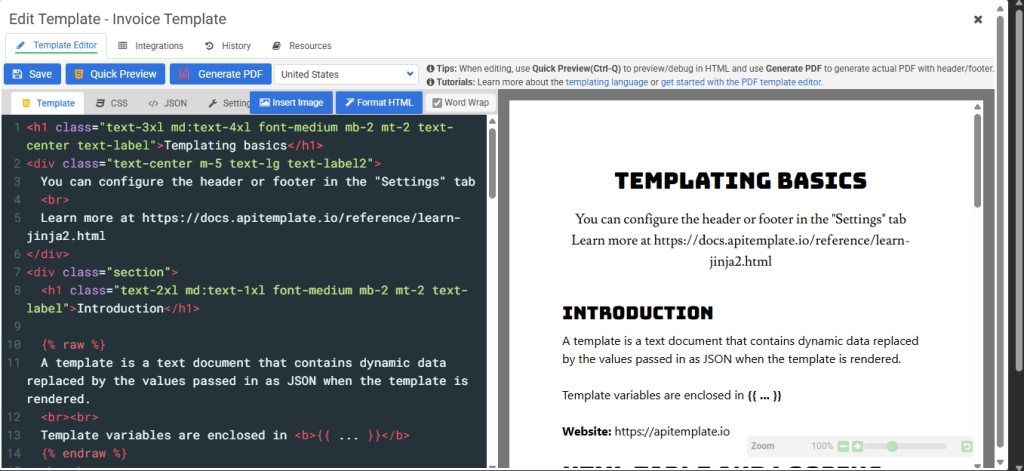
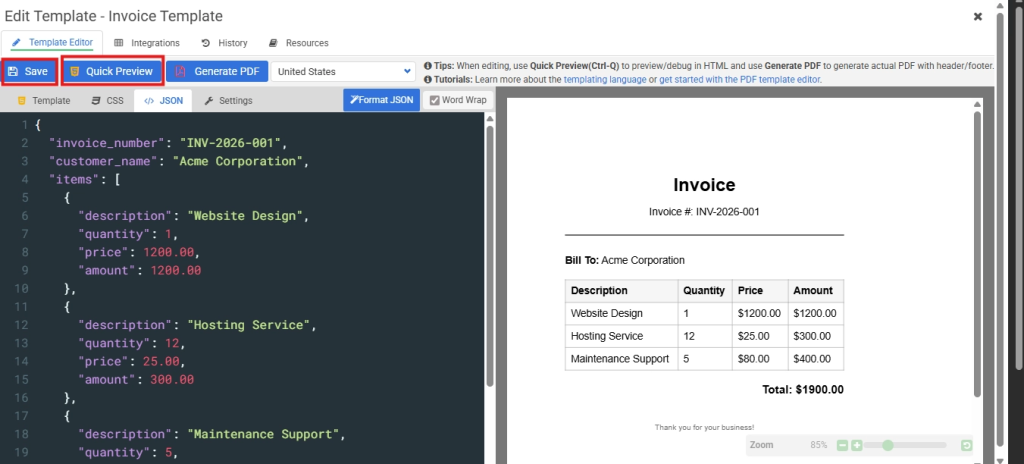
}5. Once your template is ready, click Save and Quick Preview.
The HTML Editor after pasting the invoice template and saving code on the left, live preview on the right.
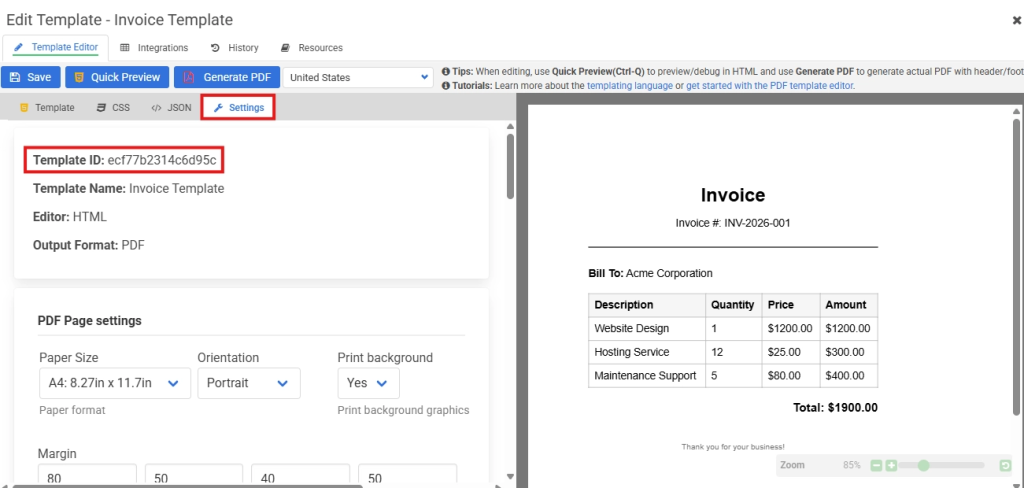
6. To find your Template ID: open the template and look at the template settings panel, you’ll see an ID like td_abc123xyz. Copy this; you’ll need it later.
The template settings panel showing the Template ID you need to copy.
7. To find your API Key: click the API Integration tab at the top of the page. Your API key is displayed there. Copy it and keep it safe – treat it like a password.
What just happened? You created a reusable PDF template. Every time you send JSON data to the API with this template’s ID, APITemplate automatically generates a PDF with your data filled in.
Step 2: Set Up n8n
Before building any workflow, you need to set up n8n and create a new workflow.
- If you don’t have an n8n instance yet:
- n8n Cloud – Sign up at n8n and you’ll get a hosted editor ready to use.
- Self-hosted – Follow the n8n installation guide to run it on your own server.
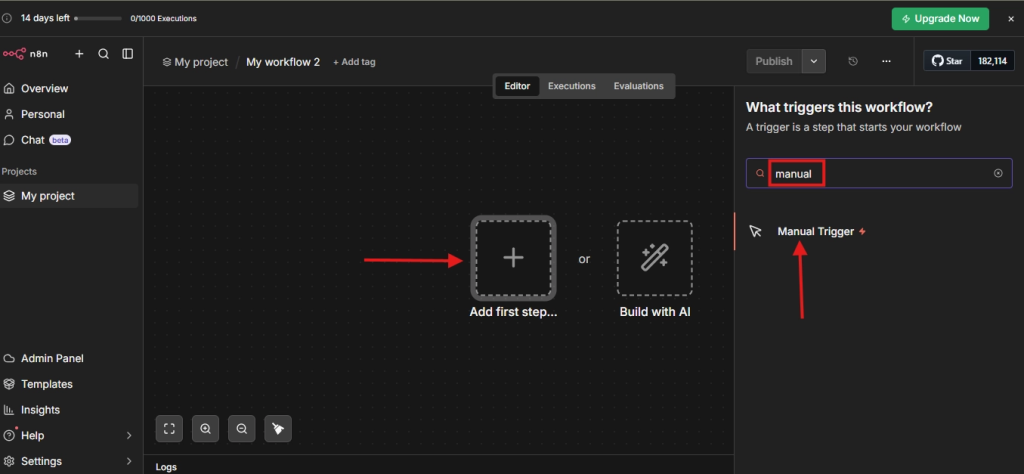
- After signing in, click Start from scratch. You’ll land on the workflow editor canvas, a blank canvas with two options in the center: Add first step and Build with AI.
Ready to Generate PDFs at Scale?Join developers and teams using APITemplate.io.Start Free Now Explore Templates
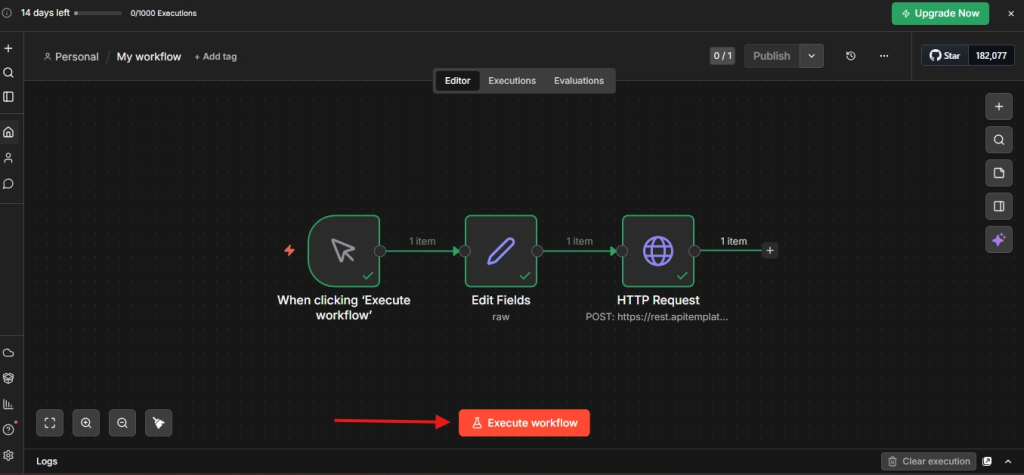
Step 3: Build the Workflow in n8n
A workflow in this is a sequence of connected nodes. Each node performs one action, fetching data, transforming it, calling an API, sending an email, etc. You’ll connect them left to right on a visual canvas.
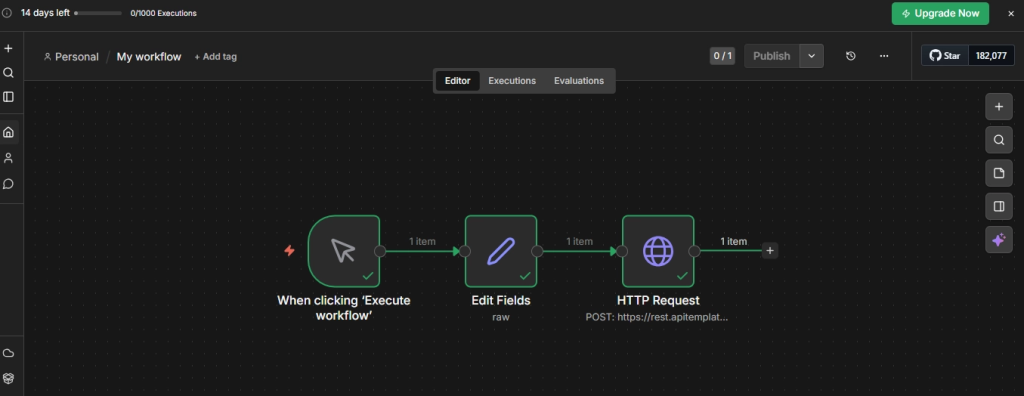
The completed workflow on the canvas. We will build our workflow from scratch later in this tutorial.
i. Add a Trigger Node
Every workflow starts with a trigger, the event that kicks off the entire process.
- On the workflow editor canvas, click the Add first step box in the center (or the + button in the top right corner).
- Search for Manual Trigger and click to add it.
ii. Collect and Prepare Data
The next node prepares the JSON data that fills in your template variables. In a real workflow, this data could come from any source, a Google Sheet, a database query, a CRM API, a form submission, etc. For this tutorial, we used an Edit Fields node to pass the JSON directly.
For this tutorial, we’ll use an Edit Fields node to pass the JSON directly so you can see results immediately:
- Click the + button to the right of the “When clicking ‘Execute workflow’” node.
- Search for Edit Fields(Set) and add it. This node lets you define static key-value pairs. It will appear on the canvas as “Edit Fields”.
- In the Edit Fields node, switch to raw mode (JSON) and paste the JSON below as test data.
Example JSON payload (matches the invoice template from Step 1):
{
  "invoice_number": "INV-1001",
  "customer_name": "Jane Doe",
  "items": [
    { "description": "Widget A", "quantity": 2, "price": 25.00, "amount": 50.00 },
    { "description": "Widget B", "quantity": 1, "price": 45.00, "amount": 45.00 }
  ],
  "total": 95.00
}
iii. Generate the PDF
Now connect an HTTP Request node that sends your data to APITemplate and gets a PDF url back. If you’re looking for another real-world workflow, you can also learn how to automate job application forms with n8n using dynamic PDF generation and automated document delivery. See the API reference for all available parameters.
- Click the + button to the right of the Edit Fields node.
- Search for HTTP Request and add it.
- Configure the node step by step:
- Method: Select POST
- URL: Enter
https://rest.apitemplate.io/v2/create-pdf - Authentication: Select Generic Credential Type
- Generic Auth Type: Select Header Auth
- Header Auth Credential: If you haven’t created one yet, click Set up credential and set:
- Name:
X-API-KEY - Value: Your API key from Step 1
- Click on ‘Save’.
- Name:
- Send Query Parameters: Toggle ON, then add a parameter:
- Send Body: Toggle ON
- Body Content Type: Select JSON
- Specify Body: Select Using JSON. Click the Expression tab (the small toggle above the text field) and enter:
{{ JSON.stringify($json) }}- The response will include a
download_urlfield, this is the link to your generated PDF.
Note: It also has a built-in APITemplate node that uses the older API. It works, but the HTTP Request approach above gives you access to the latest features.
The completed workflow on the n8n canvas: When clicking ‘Execute workflow’ -> Edit Fields -> HTTP Request.
Shortcut: Copyable n8n node JSON, instead of configuring manually, you can copy the JSON below and paste it directly into the canvas (Ctrl+V on the canvas):
{
  "nodes": [
    {
      "parameters": {
        "method": "POST",
        "url": "https://rest.apitemplate.io/v2/create-pdf",
        "authentication": "genericCredentialType",
        "genericAuthType": "httpHeaderAuth",
        "sendQuery": true,
        "queryParameters": {
          "parameters": [
            {
              "name": "template_id",
              "value": "YOUR_TEMPLATE_ID"
            }
          ]
        },
        "sendBody": true,
        "specifyBody": "json",
        "jsonBody": "={{ JSON.stringify($json) }}",
        "options": {}
      },
      "type": "n8n-nodes-base.httpRequest",
      "typeVersion": 4.2,
      "position": [
        -340,
        -100
      ],
      "id": "0ced6f1a-276c-4af5-b40f-aac5387b5174",
      "name": "HTTP Request",
      "credentials": {
        "httpHeaderAuth": {
          "id": "",
          "name": "Header Auth account"
        }
      }
    }
  ],
  "connections": {},
  "pinData": {},
  "meta": {
    "instanceId": ""
  }
}
After pasting, you still need to do two things:
- Set up the Header Auth credential: Click on the HTTP Request node, then under Authentication click Set up credential and set Name to
X-API-KEYand Value to your actual API key from Step 1. Click Save. - Replace the placeholder data: Change
YOUR_TEMPLATE_IDto your own Template ID from Step 1, and update the JSON body with your own template data if needed.
iv. Download or Share the PDF
At this point, your workflow generates a PDF and returns a download_url. You can stop here and just copy the URL from the execution output – or add another node to deliver the PDF automatically:
- Gmail / SMTP Node – Email the PDF as an attachment to your customer
- Google Drive / Dropbox / S3 – Upload the file to cloud storage for archiving
- Webhook Response – Return the download link directly to a front-end application that triggered the workflow
- Notion / Airtable – Log the PDF URL and metadata for internal recordkeeping
To add any of these: click the + button to the right of the HTTP Request node, search for the service (e.g., “Gmail”), and configure it with the download_url from the previous node’s output.
Step 4: Test Your Workflow
- Make sure all your nodes are connected left to right: When clicking ‘Execute workflow’ -> Edit Fields -> HTTP Request (and optionally a delivery node).
- Click the red Execute workflow button at the bottom center of the canvas.
- n8n will run each node in sequence. You’ll see a green checkmark and “1 item” on each connection when a node completes successfully.
- Click on the HTTP Request node and look for the
download_urlfield in the output panel on the right.
The HTTP Request node’s output panel showing the download_url field in the API response.
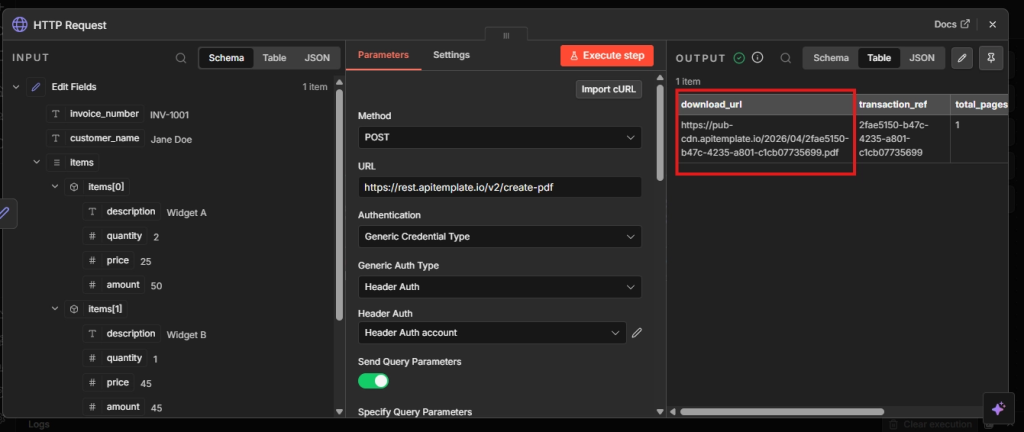
5. Copy that URL and open it in your browser, you should see your generated PDF with all the template variables filled in with your test data.
The generated PDF opened in a browser tab, with the URL visible in the address bar.

Something not working? Check these common issues: – 401 Unauthorized – Your API key is incorrect or missing. Double-check the credentials. – 400 Bad Request – Your Template ID is wrong, or your JSON data doesn’t match the template variables. – Empty PDF – The JSON keys don’t match the variable names in your template (e.g.,customer_name vs customerName).
Advanced Tips
- Async generation – For large documents, add a
webhook_urlparameter to your request. APITemplate will notify your n8n webhook once the PDF is ready, preventing timeouts. - Debugging – Use n8n’s Manual Executions to test nodes live, Pin Data to simulate results without re-fetching, and Error Handling branches to catch API failures.
- Version control – Use n8n environment variables to manage template IDs across environments. Keep backups of your templates for rollback and team collaboration.
✔ Works with API & no-code workflows
✔ No rendering issues
Conclusion
With n8n and APITemplate, you design a template once and generate PDFs automatically – no manual formatting needed. Start with a manual trigger, then layer on scheduling, webhooks, and cloud delivery as your needs grow. This API can be integrated into several areas, be it in HR, Finance & Accounting, or even Logistics. And there are multiple use cases as well. You can read more about the use cases for different sectors here as well.
Ready to get started? Sign up for APITemplate and build your first n8n workflow today.
Additional Resources
How to Create a PDF with Zapier and APITemplate.io
How to Automate PDF Generation in Make.com with APITemplate
Top PDF Generation APIs for 2026: A Developer’s Guide
Frequently Asked Questions
How do I generate PDF documents with n8n?
You can generate PDF documents with n8n by sending JSON data from your workflow to APITemplate using the HTTP Request node. APITemplate then renders the data into a reusable PDF template and returns a download URL for the generated PDF.
What is the best way to connect n8n to APITemplate?
The best way to connect n8n to APITemplate is by using the HTTP Request node with the APITemplate PDF Generation API. This gives you more flexibility and lets you use the latest API features for automated PDF generation.
Can I automate invoice PDF generation with n8n?
Yes. You can automate invoice PDF generation with n8n by preparing invoice data in JSON format and sending it to APITemplate. This workflow is useful for automatically creating invoices, receipts, reports, and other business documents.
Does APITemplate support JSON to PDF generation?
Yes. APITemplate is a JSON to PDF API that lets you create PDF documents from structured JSON data. You can map fields like customer name, invoice number, items, totals, and dates directly into your PDF template.
Can I use HTML templates for PDF generation in APITemplate?
Yes. APITemplate supports HTML and CSS templates for PDF generation. You can design your own PDF layout, add dynamic variables, and generate professional documents automatically from n8n workflows.
What can I do with the generated PDF in n8n?
After generating the PDF, you can use the download URL in n8n to send the file by email, upload it to cloud storage, attach it to CRM records, or continue processing it in your automation workflow.