APITemplate is a powerful API-based tool that gives you the greatest flexibility when generating PDFs and Images. It offers reusable templates that may be customized according to your needs, or even better, if you feel the need to design your template, it gives you the power to do just that.
It makes it easy for you to integrate with no-code or low-code platforms like Zapier, Make.com, bubble.io, Rest API, and more, creating support for dynamic components. In addition, it supports the WYSIWYG editor for PDF template creation and editing.
This tutorial focuses on the features of the editor and tips for PDF generation, so let’s get right to it, shall we?
1. Why use the WYSIWYG visual editor?
The abbreviation stands for “What You See Is What You Get” or Wizzee-Wig as a lot of people like to call it, frankly, you may pronounce it however you like. It is an editing software that enables you to see (like the name implies) and edit content in a form similar to how it would look on PDFs or even web pages, meaning you get exactly what you want.
One of the best things about this editor is that you do not need to have coding skills to make changes to your documents, and it supports custom CSS.
For example, if you’re trying to edit the content that would be displayed on a webpage, you can use the editor without having to deal with HTML and see the results right away.
2. How to create a PDF template with the Visual Editor
APItemplate.io allows you to create PDF templates quickly using the WYSIWYG Visual editor. Let’s see how we can do this in approximately 3-5 minutes.
Step 1: Sign in/Register an APITemplate account: If you have a registered APITemplate account, then you can skip this step, but if you don’t, go to APItemplate and click on Sign Up at the top of the page, follow the necessary details required to create your account, you don’t need to include your credit card details, the only catch here is you need to verify your email address, so I suggest you use a valid email when signing up.
Step 2: Go to “Manage Templates”: After your registration is complete, you would be automatically directed to your dashboard. There’s already a welcome tip that teaches you how to create templates, if you missed it, all you need to do is click on Manage Templates, on this page, you can choose to create a New Image Template or a New PDF Template. In this case, we would be selecting the New PDF Template.
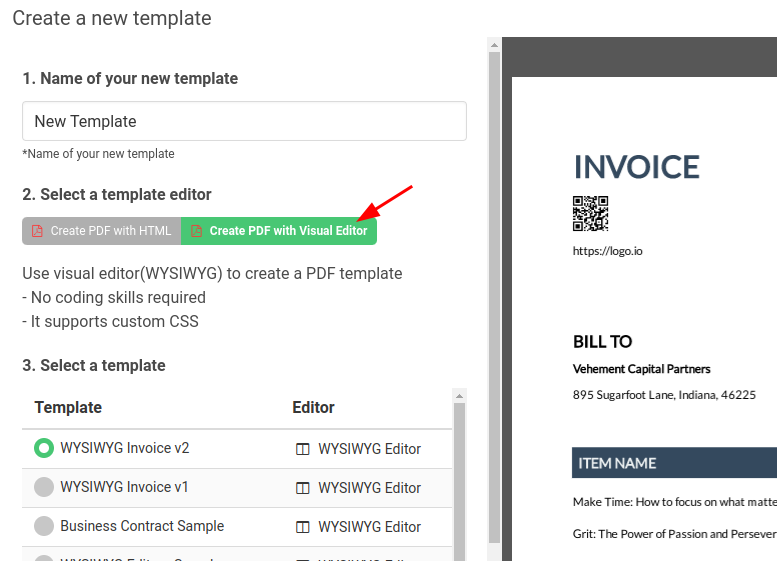
Step 3: Click on “New PDF template”: When you select New PDF template, you would be directed to a “Create a new template” page similar to the screenshot below. You would need to do three things:
- Give your template a name: You can choose a name for your template or leave the default name if you like
- Select a template editor: In the dialog select “Create PDF with visual editor”
- Select a template: I would be using the WYSIWYG Invoice v2 template
Step 4. Click on the ‘Create’ button: After selecting a template for the visual editor, click on the create button to generate the template.
3. The UI of the template editor
After creating your template, you are most likely going to be referred back to your Manage Templates page. Here, you should see the new template created, that is, the Template ID, Name, Updated At, etc. Let’s click on the Edit button at the bottom right to make changes to our template using the visual editor.
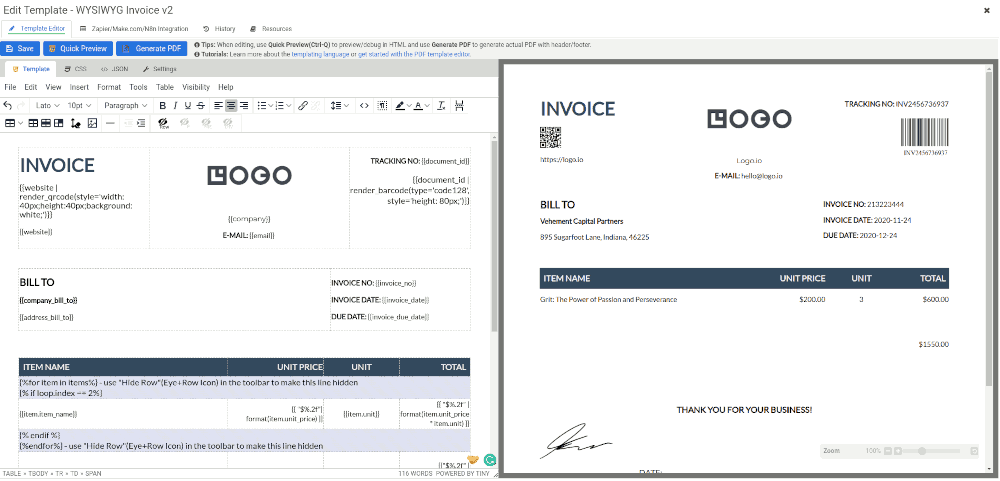
On the left is the editor area where we would be making use of the available commands to make changes to our template and on the right is the preview area where we would be seeing the changes applied to our template. Let’s quickly run through the interface, shall we?
The followings are the tabs in the template editor: Template, CSS, JSON and settings. We are going to touch on them in details:
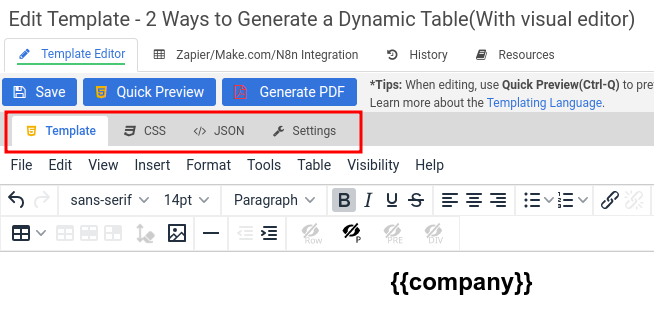
3.1 Template Tab
This is the editor for designing the layout. It’s similar to Microsoft word with all the basic format features, the awesome thing about this editor is that it’s reusable and works with Jinja2 for dynamic data. It includes some buttons like:
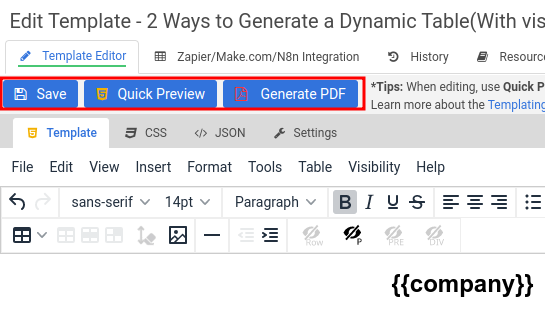
- Save – You can instantly save the changes made to the template.
- Quick Preview – You can preview the created template in HTML, the only catch here is it doesn’t render header/ footer or page numbers. It can also be used for debugging. The sample data in the sample tab is used for the dynamic data.
- Generate PDF – This button renders the full PDF with header/footer and will cost 0.5 credits to generate.
I’d go into detail on how to create PDF in the Working with the Visual template editor section. So, please stick with me!
3.2 CSS Tab
CSS is an acronym for Cascading Style Sheet. This CSS is a very powerful styling tool for making changes to your user interface. It gives you the power to make changes to the color, font type, font color, and font size amongst many other things you can do with your fonts.
You could also add paragraphs to your sentences and in some cases animations to your interface giving it a very catchy feel.
3.3 JSON Tab
JSON is an acronym for JavaScript Object Notation. The JSON is a format for structuring data. It handles different data types like string, array, boolean, number, and object. Here’s a quick guide to what these data type reference:
- Array: A range of values. Can be an associative array, that is, an array where the indexes are replaced by keys.
- Boolean: true or false.
- Number: A numeric value.
- Object: An associative array of key/value pairs.
- String: These are characters joined together to form a word.
The following is a sample JSON object
{
    "var_array": [ 1,2,3 ],
    "var_bool": true,
    "var_number": 999,
    "var_obj": {
        "name": "Kira",
        "age": 12
    },
    "var_string": "This is a string"
}
The great thing about JSON is that it appears in a friendly readable format even for novices with no knowledge of JSON. The main reason why we need JSON is to find a way to transmit data back and forth from the client to the server. It uses a key-value pair format where the key is usually in the form of strings and the value can be any other data type like boolean or string, array, etc.
The JSON data in this tab is sample data for preview. When generating a PDF, you can edit the JSON data to send your dynamic data.
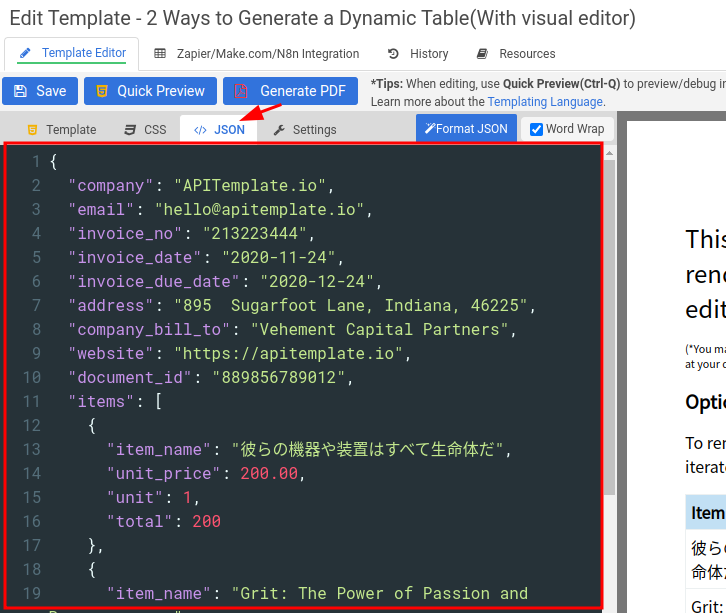
The “items” key is an example of an associative array, as this index serves as a range of key/value pairs.
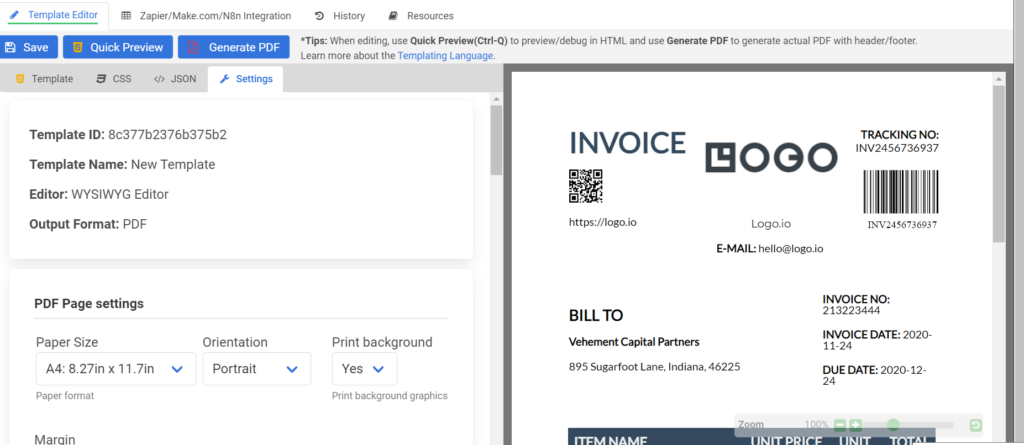
3.4 Settings Tab
The settings tab allows you to configure the paper size, margin, header, and footer of your PDF template. It gives you the flexibility to choose not only the paper size but also, the way you choose to print it (orientation).
You can also specify the margin top, bottom, left, and right of your choice, choose to display a header and footer, or better still, customize your own header/footer. It supports HTML, CSS, and Jinja 2 which I would be going into in the next section.
4. Working with the Visual template editor
4.1 Generate dynamic content with JINJA2
Jinja is a user-friendly templating language for designers that is easy to use. APITemplate.io employs Jinja2 as its templating language. It can be used in combination with HTML to produce PDF documents and render dynamic templates.
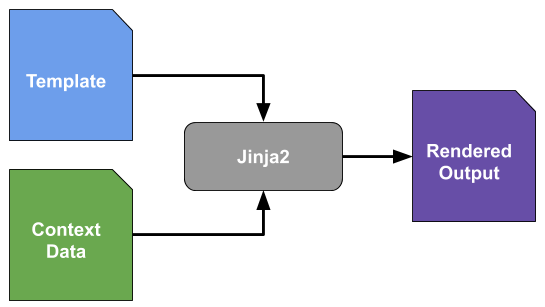
Jinja2 is dependent on two sources which are template and dynamic context data(JSON).
The delimiters
Jinja employs some delimiters such as:
{% … %} is used for writing core knowledge code statements.
{{ … }} is used for printing variables/expressions to the template output.
{# … #} represents comments used for code explanation.
Variables
In programming, a variable is a data element that receives values from the user while the program is running and produces values based on the current context. For example, in the Jinja2 template, we want to print out this statement
The product is {{product}}.Here, the {{product}} represents a variable that can be defined in your JSON data like this:
{
    "product": "APITemplate"
}
The output:
The product is APITemplate.To learn more about other topics such as formatting and filters about Jinja2, click here
4.2 Hiding expressions or elements
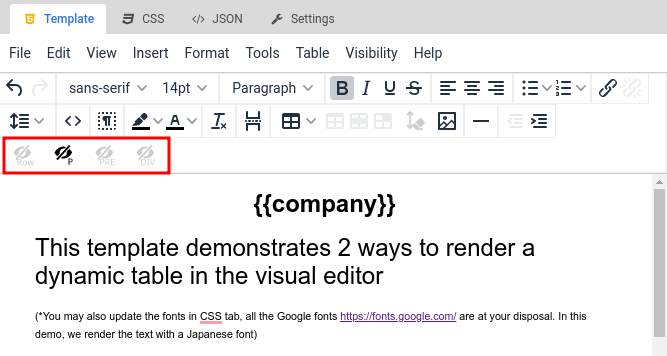
There are certain tools in the visual editor that can help you hide expressions when previewing your PDF. These tools are located in the last row of your toolbar using the Eye Icon.
- Hide Table Row: This hides the current table row when previewing or rendering the PDF.
- Hide Paragraph: This hides the current paragraph when previewing or rendering the PDF.
- Hide PRE: This hides the current PRE block when previewing or rendering the PDF.
- Hide DIV: This hides the current DIV block when previewing or rendering the PDF.
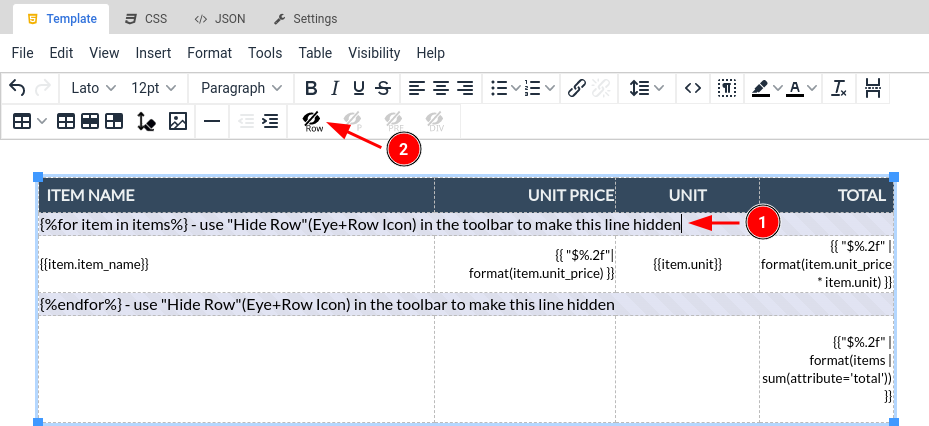
4.3 How to repeat line items with foreach
You can repeat line items in your table using the foreach loop to generate items. This is used for creating documents like invoices, packing slips, business documents, etc.
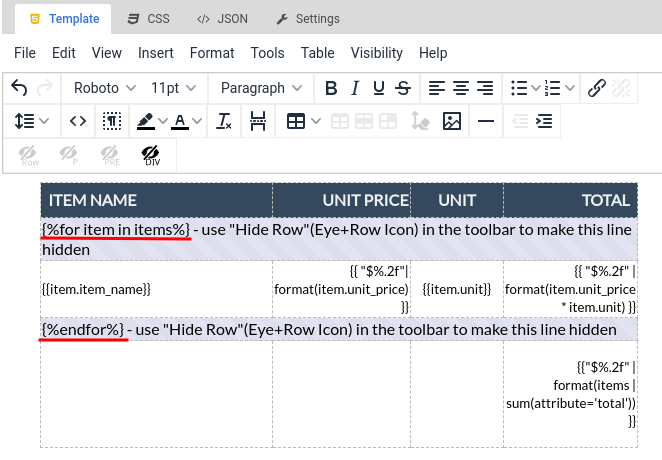
Basic foreach … endfor
The variable {%for item in items%} generates each item represented in your JSON data as an array. This helps you save time from manually repeating each line item.
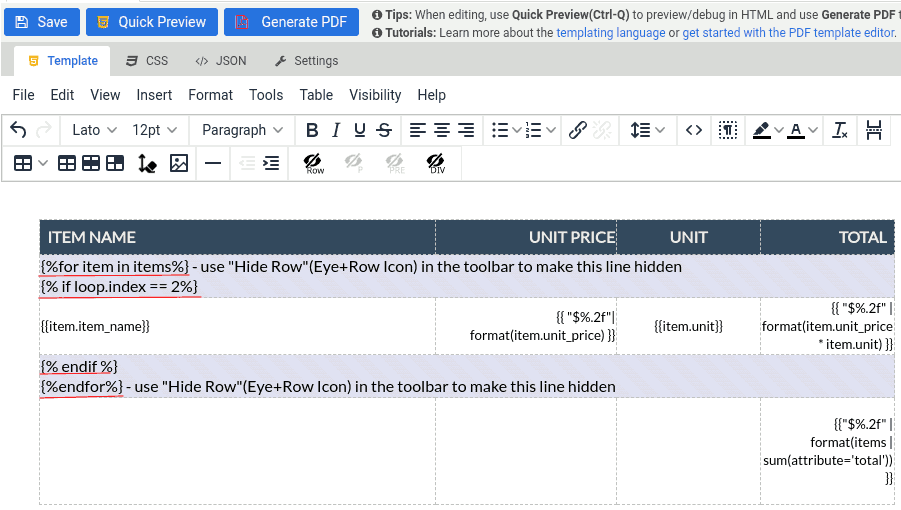
Combining foreach and if
You can also employ foreach and if to filter rows
{% for var in JSONfield %} and {% if <condition> %}
The following is to combine foreach ... endfor and if ... endif. The if statement is to show the second row only.
The {% for %} statement is used to repeat a specific set of statements a certain number of times. It iterates over elements in a dictionary, list, tuple, or string variable.
The {% if <condition> %} and {% endif %} are used to determine whether a variable is false, has an empty value, or is perfectly defined.
When evaluating multiple conditions in Jinja2, the {% if % } statement is frequently used in conjunction with the {% elif % } and { % else % } statements. Every if statement must end with the {% endif %} statement.
Hide rows that occupied space
The expressions usually take up space in the table, therefore you can use the Hide Row icon which I previously mentioned to hide the row in the rendered PDF.
4.4 Other features of the editor
Shortcuts: The editor provides handy shortcut methods that make it easy for you to navigate quickly. It makes use of keyboard commands like:
| Heading 1 | Shift + Alt + 1 | ||
| Heading 2 | Shift + Alt + 2 | ||
| Heading 3 | Shift + Alt + 3 | ||
| Heading 4 | Shift + Alt + 4 | ||
| Heading 5 | Shift + Alt + 5 | ||
| Heading 6 | Shift + Alt + 6 | ||
| Paragraph | Shift + Alt + 7 | ||
| Div | Shift + Alt + 8 | ||
| Address | Shift + Alt + 9 | ||
| Open help dialog | Alt + 0 |
There are other shortcut commands that weren’t mentioned, please find the rest in the “help” section of the toolbar. This saves you a lot of time in efficiently getting your work done.
UI keyboard navigation: The menubar, toolbar, sidebar, and footer of the editor’s external user interface are all keyboard-navigable elements. As a result, there are several techniques to enable keyboard navigation:
- Alt + F9 (Windows) or ⌥F9 (macOS) will focus the menubar
- Alt + F10 (Windows) or ⌥F9 (macOS) to focus the toolbar
- Alt + F11 (Windows) or ⌥F11 (macOS) to focus the footer
This will highlight the focus in a gray background with an underline.
Built-in Functions in toolbar: It has some built plugins to help make your work sophisticated to achieve your desired result. Some of these plugins are:

- Bold, Italic, Underline, and Strike for text highlighting.
- Text alignment options: To format your PDF documents according to your needs.
- Bulletin: To help structure your documents.
- Links: Allows for easy attachment of external sources.
- Line height: Allows for setting the distance between texts.
- View code: View source code.
- Table: Allows you to insert tables into your template.
- Horizontal Rule: Allows you to easily insert a horizontal rule into your template.
- Page Break: Allows you to easily insert a page break.
- Insert images: Allows for easy insertion of images to your template.
There are other functions in the menu bar

5. Conclusion
The WYSIWYG visual editor is adaptable and comes with several built-in plugins to speed up your work. Even if you have no coding skills, the editor gives you the ability to accelerate the PDF generation process.
APITemplate offers a visual editor that is appealing and easy to understand. Additionally, it makes it simple to navigate the template by providing keyboard shortcuts.
✔ Works with API & no-code workflows
✔ No rendering issues