TL;DR:
What This Blog Covers:
How to automate image generation using Zapier, Google Sheets, and APITemplate.io without writing any code.
Key Points:
- Automatically generate images when new data is added to Google Sheets
- Use Zapier to connect Google Sheets with APITemplate.io
- Create reusable templates for dynamic image generation
- Map spreadsheet data to template variables using key-value pairs
- Generate product images, banners, and social media visuals at scale
- Save time and eliminate manual design work
Best For:
Marketers, e-commerce sellers, and non-technical users who want to automate image creation without coding.
Creating content consistently for marketing is time-consuming and looking for a developer to automate the workflows is costly.
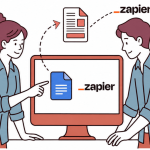
Zapier is a no-code solution to this problem. It allows you to connect and send information between apps to dynamically generate images. The best thing is – You don’t hire developers to code the workflow for you.
With APITemplate.io, it’s easy to integrate with low-code platforms such as Zapier and Make.com (formerly Integromat) to automate your workflow. You can also generate automated images with Make.com just like Zapier and automate your banner generation or social media posting.
In this tutorial, we are going to automate the process of image generation: To create custom product images based on a predefined template and a product listing.
The Zap workflow consists of a trigger and one action. Whenever a row is updated or added to your Google sheets, the Zap is triggered. The Zap automatically creates a new image from the product information.
What is an Image Generation API?
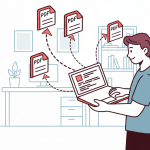
APITemaplte.io Image Generation API lets you generate your desired images automatically with the help of a REST API (Application Programming Interface). It is the process of generating new images from predefined templates and data. You can auto-generate images from JSON data by using highly re-usable templates.
REST API works with most programming languages, such as Python, Node.js, C# and etc.
The integration with REST API requires coding skills. However, we integrate with Zapier, Make.com, and N8n, so you don’t need to compose a single line of code for your workflows by using these no-code platforms.
The use-cases of our Image generation API are banner generation, creating event passes, generating social media images and etc.
5 Easy Steps to Automate Image Generation
In this tutorial, we’re going to show you step-by-step exactly how to connect the followings apps
- Google Sheets and
- APITemplate.io
- with Zapier
and generate automated images for your business.
You can create your own custom Zap on the dashboard of Zapier or optionally choose to connect your apps with the already created integration of Google Sheets + APITemplate.io. No matter what you choose, the process and end result will be the same.
However, we’re going to choose to create a custom Zap on the dashboard of Zapier.
For your convenience, the automated image generation process is divided into the following five easy steps.
Step 1: Sign up accounts – Zapier, Google sheets & APITemplate.io
First of all, you have to sign up for all of the 3 accounts, including Zapier, which you’re going to use to generate unique images from any text.
Sign up for Zapier by providing your work email, first name, and last name. Then choose your password. You will receive a welcome email from Zapier, and you’re ready to go.
Then sign up for APITemplate.io and provide all the required information. You will receive a verification email from APITemplate.io. Click on the given link in the email and your account verification is done.
You probably have a Google Docs account already, and if not, then make one with just an email.
Step 2: Make a Google Sheets spreadsheet and an APITemplate.io template
The second step is to prepare the data in Google Sheets.
As you have already signed up for your accounts, create a spreadsheet in Google Sheets according to the kind of banner generation you want.
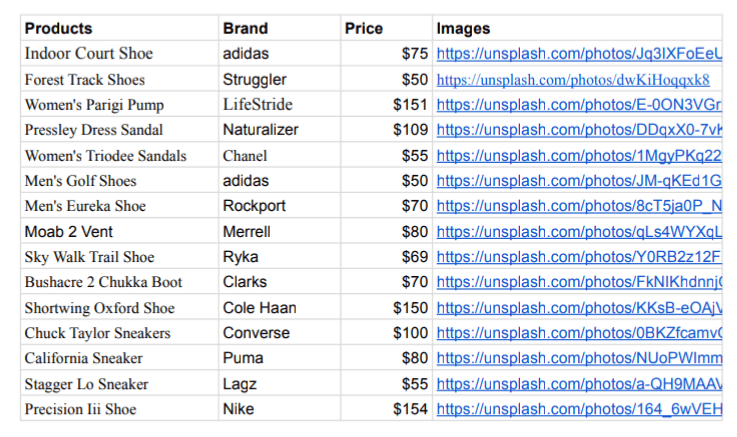
One of the use-cases is to automate image generation for your e-commerce business. The first step is to create a product list of shoes with information and images. This spreadsheet will act as a trigger for the data to image generator API in Zapier.
Next, create a template in APITemplate.io on the Manage Templates page. Click on the New Image Template and then follow these 3 steps.
• Choose a name for your new template.
• Select a template editor.
• Select a template from the categories.
• Click on the “Create” button.
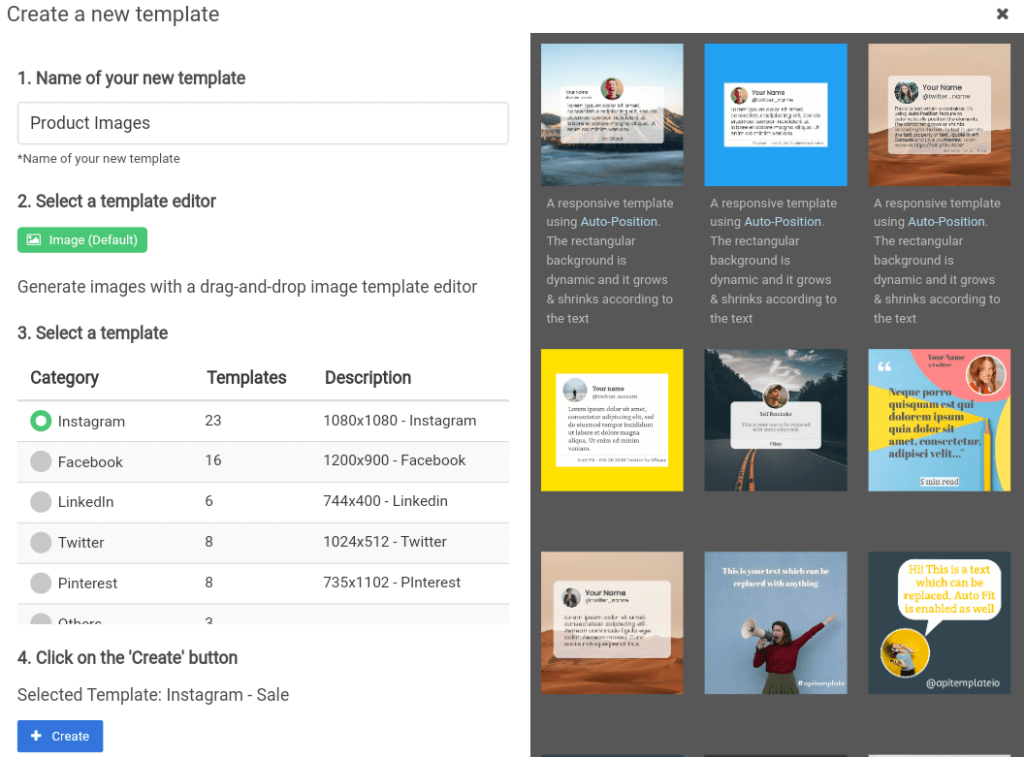
Now, you will see your template appears on the Manage Template page. Then, click on the Launch image editor under the editor section of your template, and there you can edit your template.
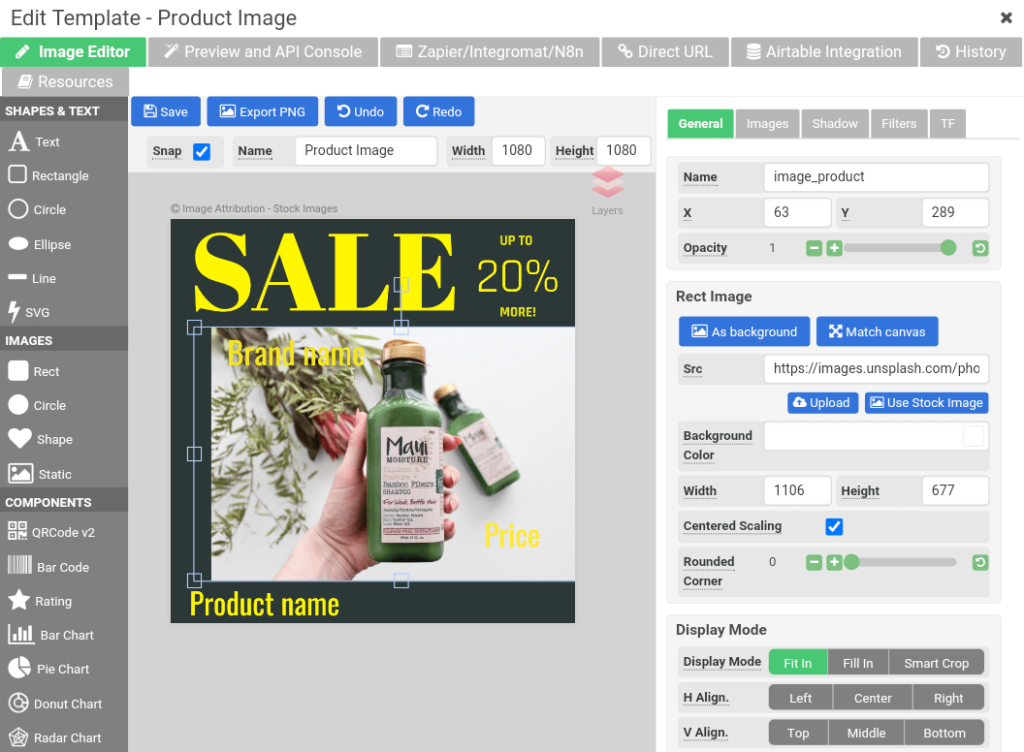
Image Editor
In the editor, on left is the object panel, while on the right side (General) is the property panel where you can change the settings of a component. The middle region is the layout area. Layers of the image template can also be seen and edited there.
The following is the image template for our product image. There are three texts for the brand name, price, and product name. You may change the fonts and colors while keeping the other details intact. Edit the template to suit your product or theme.
Preview and API Console
To preview, click on the Preview and API Console tab. Then, click on the Generate JSON Data for Common Properties, which generates the common properties that can be used for REST API and you probably don’t need this for this tutorial. The important tab is Zapier/Intergromat/N8n tab, which will be introduced in the next step.
Then head back to the Image Editor tab, and click on the Save button to save the changes.
Now, you’ve got a spreadsheet and an image template ready to use for your image generation.
Step 3: Connect the apps in Zapier
In the third step, you’ll choose to create your own Zap.
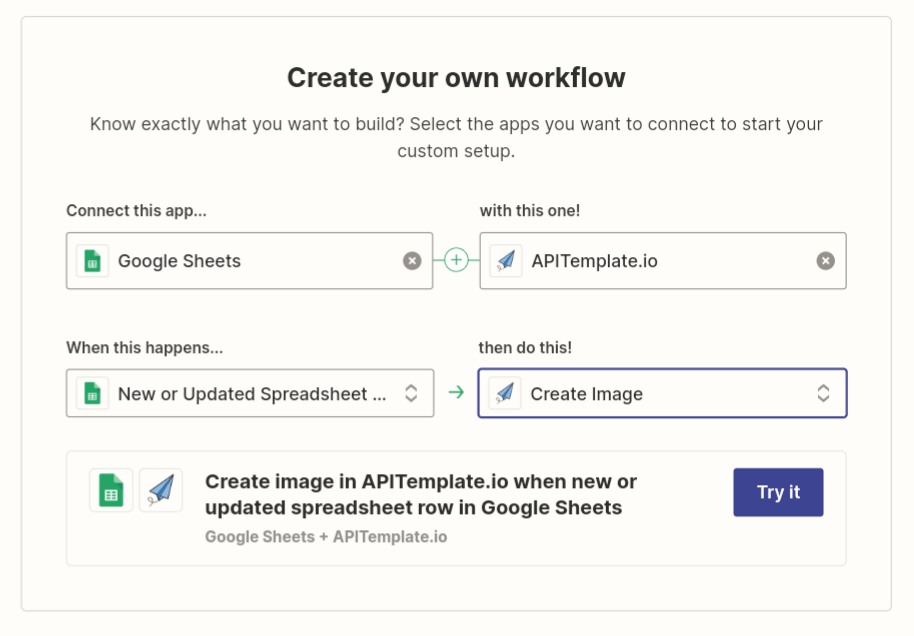
On the dashboard of Zapier, connect the Google Sheets app to the APITemplate.io app.
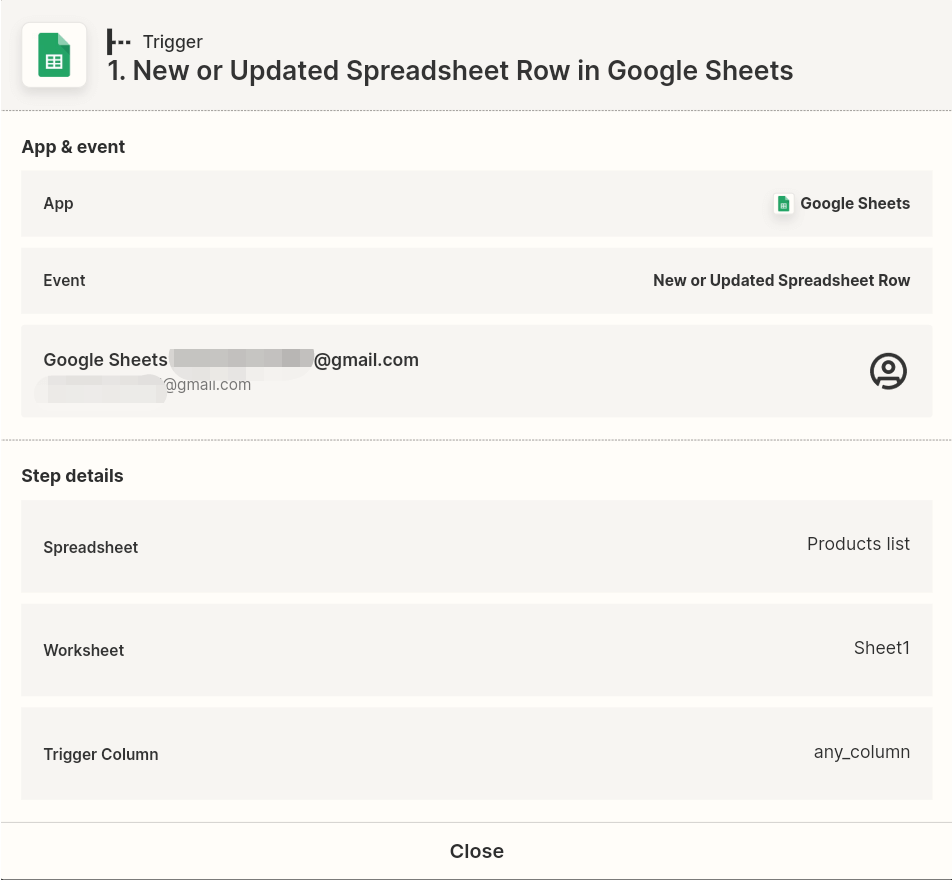
Then, choose the trigger (when this happens) and action (then do this). A trigger basically initiates the process, and the end result is the action. The trigger we chose here is “New or updated spreadsheet row in Google Sheets” and the action is “Create image”.
As the following label implies, a combination of trigger and action is capable of
“Create an image in APITemplate.io when new or updated spreadsheet row in Google Sheets”.
You may select your trigger and action according to your purpose, whether you want to use Zapier to generate images or PDFs.
Next, connect your Google Sheets and APITemplate.io accounts with Zapier to set up the Zap.
Connect your Google Sheets account with Zapier by providing your Gmail address, while to connect your APITemplate.io account with Zapier, you have to provide your API key.
** You can find your API key under the API integration tab on your APITemplate.io account.
Step 4: Set up the Zap
This is the main step for automating the product images. It includes setting further details for the trigger and action.
Trigger
After Google Sheets account is connected with Zapier, and selecting the event. Select the spreadsheet, worksheet, and the trigger column.
Action
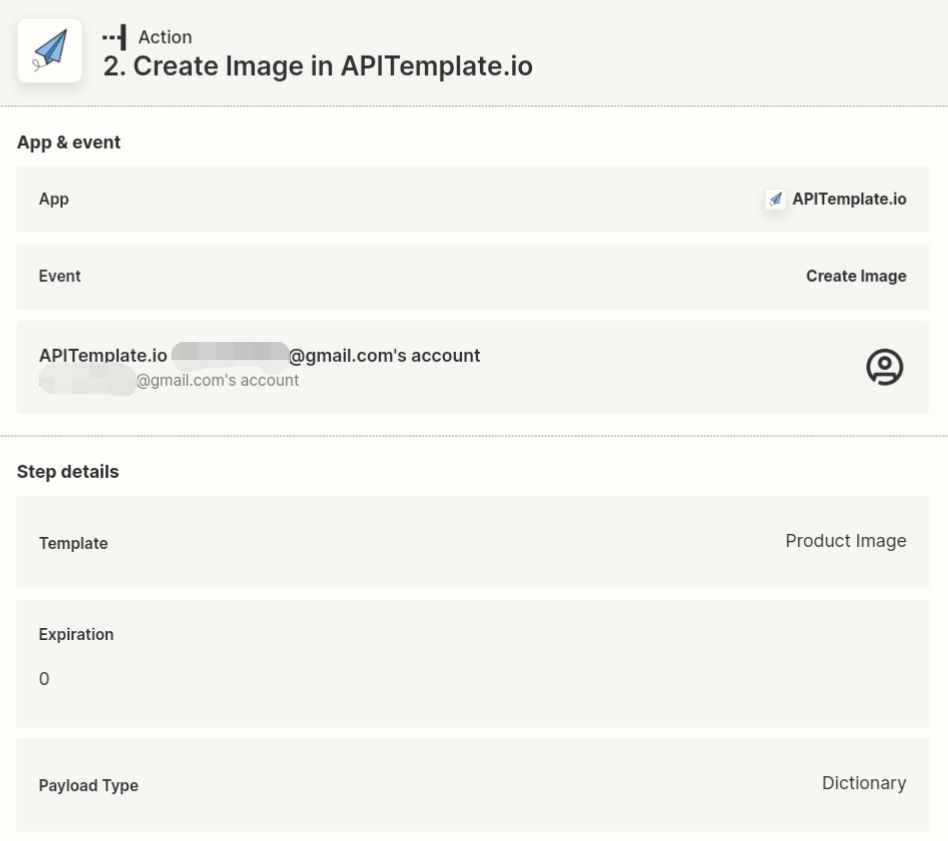
Then, connect your APITemplate.io account with Zapier and select the event Create Image. Choose the template, expiration, and payload type.
The following are payload types for the data.
*Note: There are basically two types of payload data.
(a) Dictionary Payload Data
Dictionary is a set of simple key-value pairs for flat-structured JSON.
(b) JSON Payload Data
JSON payload data is used to store and represent hierarchical data that is complex.
You can use either a dictionary (flat-structured JSON, key-value pairs) or JSON data as a payload.
In this tutorial, we are going to use Dictionary(Key-value-pairs) for the Payload Type.
To obtain the properties to be overridden in the product template, launch the Image Editor in APITemplate.io. Navigate to the Zapier/Integromat/N8n tab and Copy the properties of visual elements which you want to change.
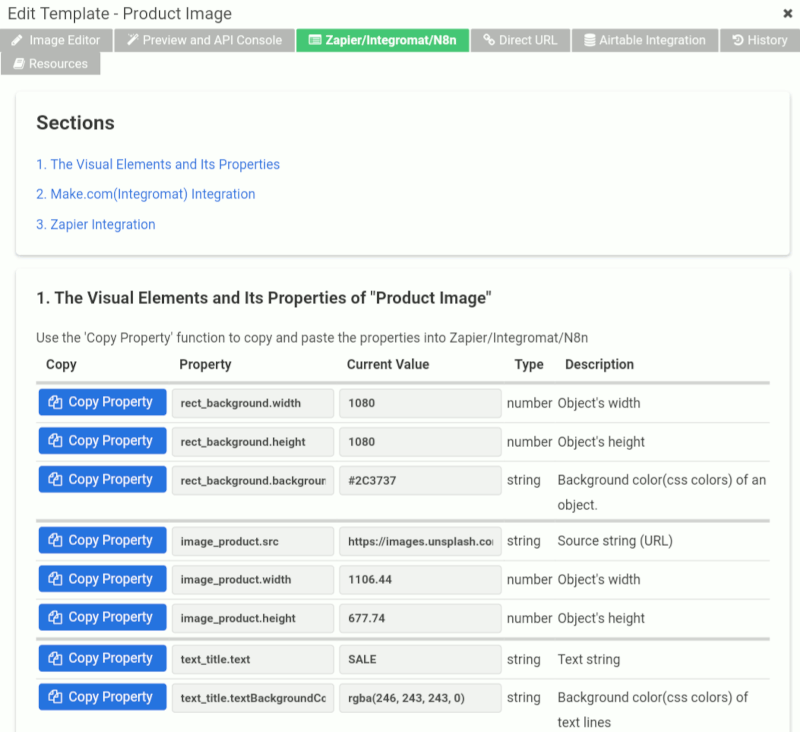
Now, paste the properties into the table in Zapier as keys, and then map the fields to the data of Google sheets.

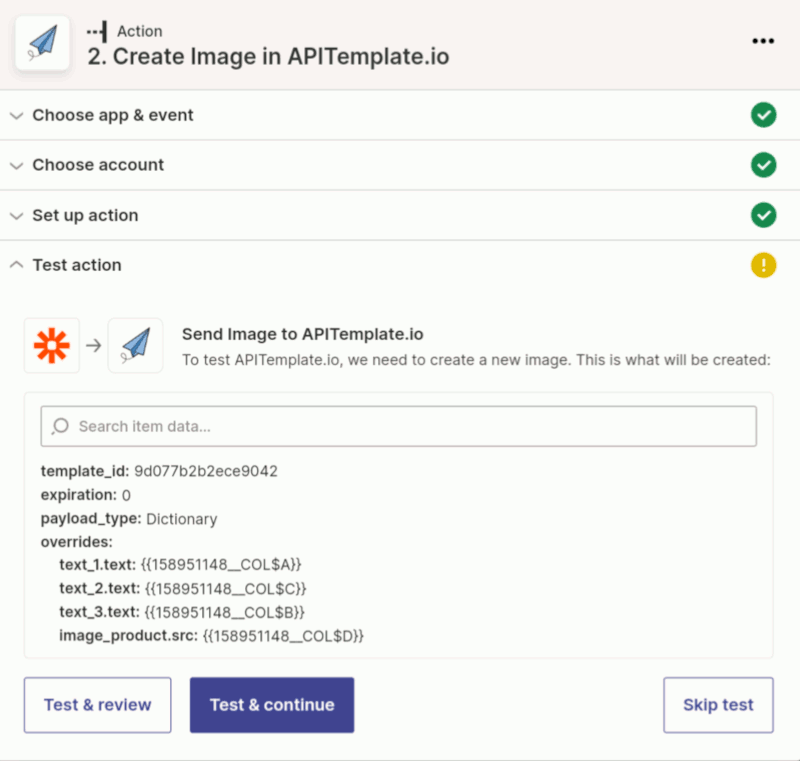
Step 5: Test the Action for Workflow
Before publishing your Zap, click on the Test & Review under the Test Action section to run the workflow, and an image will be generated with APITemplate.io.
The following is the generated product image with APITemplate.io image generation API.

Conclusion
By linking your apps with Zapier, it’s easy to automate the workflows and automatically generate images.
What’s next for the tutorial? You can probably upload the generated images to social media websites like Instagram, Facebook, or Shopify.
Our Social Media Images generation API and Zapier are the best tool in your arsenal for content creation and marketing automation, and it’s perfect for banner generation for your e-commerce business!
Sign-up now and use our free image generation API.