TL;DR
- Retool is a low-code platform for building internal apps using drag-and-drop components
- APITemplate’s PDF generation API lets you create PDF invoices programmatically from templates
- You’ll store invoice data in a PostgreSQL database and connect it to Retool
- A REST API resource in Retool sends the data as JSON to APITemplate
- APITemplate returns a PDF URL which you display inside the Retool app
- A button component triggers the entire invoice generation flow in one click
In the tech world, no-code and low-code tools have been gaining momentum due to their ability to expedite tasks. Today, we’re focusing on an exceptionally efficient low-code tool that simplifies the app development process.
So, what is Retool? It’s a unique low-code platform that stands out from others in the field. Retool empowers businesses to create applications, whether they are straightforward or complex, at an accelerated pace using its built-in drag-and-drop tools.
What sets it apart is its remarkable ability to seamlessly integrate with external no-code or low-code tools. You can use it to craft applications such as admin panels, customized solutions, or dashboards tailored for various industries, including healthcare, logistics, education, and even PDF generation.

Like most other low-code platforms, having a basic understanding of coding is beneficial before diving in. Low-code platforms are primarily geared toward developers, as previously discussed in our article.
It employs programming tools like JavaScript and database tools such as PostgreSQL for data storage. Additionally, it leverages APIs, making it easy to connect with external tools.
APITemplate offers HTML to PDF conversion services, URL to PDF and PDF generation API.
In this article, we’ll explore the advantages of using it and guide you through the process of integrating it with external platforms like APITemplate to generate PDF invoices.
Let’s get started!
1. Create PDF Template With APITemplate
APITemplate is a user-friendly platform built to simplify the process of automatically generating PDFs and images. It offers a range of pre-designed templates and ready-to-use data to facilitate the creation of new images and PDFs. APITemplate also excels in its ability to seamlessly integrate with third-party tools like Retool, making it a powerful ally in workflow automation.
Generating PDF invoices with APITemplate is a straightforward task that eliminates the challenges associated with manual invoice creation. Here are the steps to create PDF invoices using APITemplate:
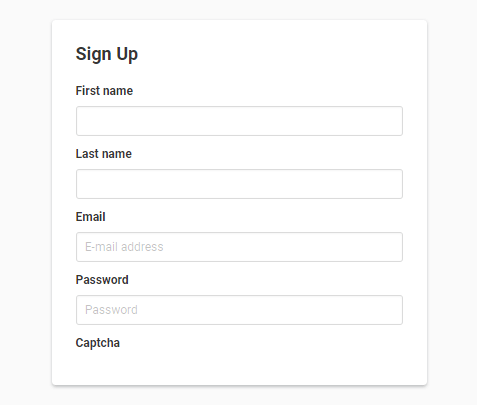
Step 1: Sign up for an APITemplate account: If you’re already part of the APITemplate family (have a registered account), feel free to proceed to the next step. However, if you’re not yet a part of us, simply head over to apitemplate.io and click on the inviting “Sign Up” button located prominently at the top of our website.
To complete the registration process, just follow the guidance provided in the instructions. You can opt for a free account, which grants you unrestricted access to our array of pre-designed templates without ever needing to input your credit card details.
You can also decide to enhance your experience by opting for a paid plan which comes loaded with premium features ready to take your creativity to new heights.
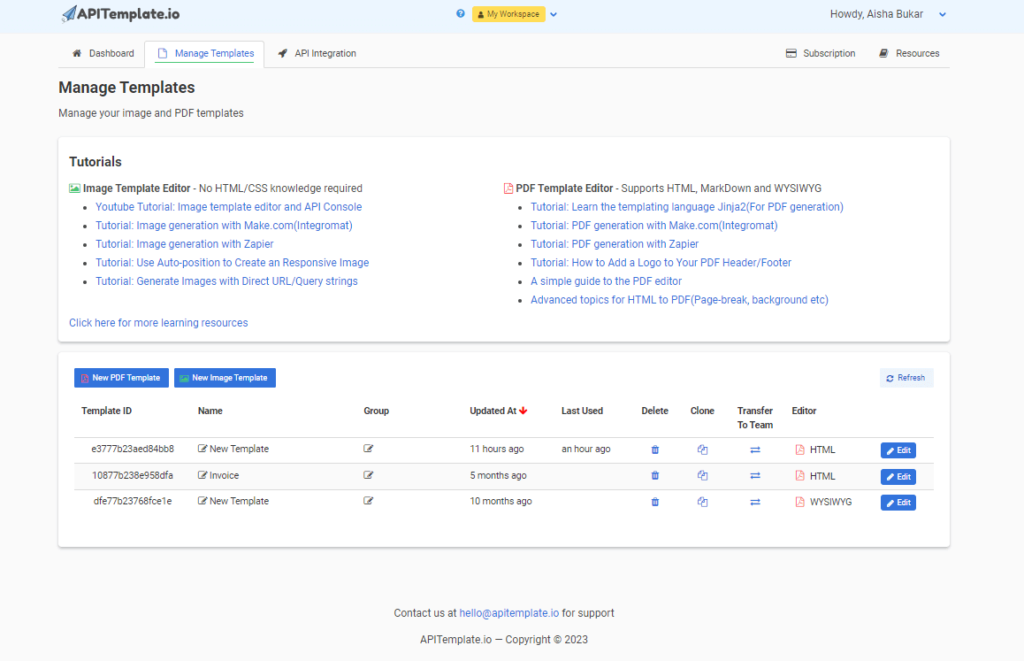
Step 2. Login to your APITemplate account: After signing up, the next step is to log in to your APITemplate account with your registered details. Immediately after logging in, you will be directed to your dashboard.
The dashboard shows you an overview of your account, current subscriptions, and usage of the platform, among other details. It also shows you the new features available on the platform, additional offers, support, and documentation on how to get started. Amazing isn’t it?

Step 3. Creating a PDF Invoice: On your dashboard, you’ll find a noticeable “Manage Templates” navigation bar. Click on it to access a page where you can view all the pre-designed templates. This “Manage Templates” page also includes documentation to assist you in using our PDF/Image template editor if you require any guidance.
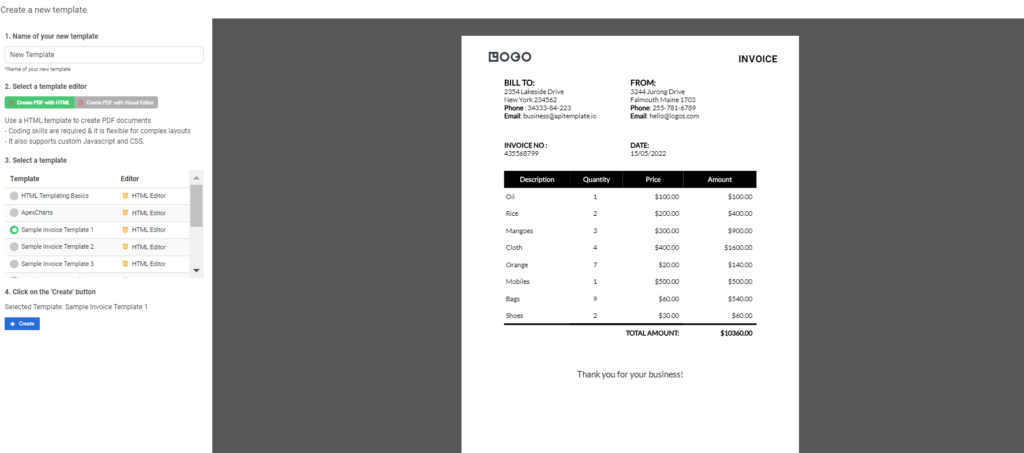
Now, let’s refocus on the primary objective of this step, which is to create a PDF invoice. Navigate to and click on the “New PDF Template” button. On this page, you’ll find a selection of templates ready for use. We’ll proceed with four simple steps:
- i. Name your template: Give your template a preferred name of your choice or leave the default name if you like.
- ii. Select a template editor: In this step, you have the option to create the PDF using HTML if you’re comfortable with coding and desire a more complex design. However, if coding isn’t your forte and you prefer a straightforward approach, you can select the “Create PDF with visual editor.” This is a WYSIWYG (What You See Is What You Get) editor supported by APITemplate. If you’re not familiar with this editor, you can refer to our existing tutorial for guidance. For the purpose of this tutorial, we will proceed with the “Create PDF with HTML template editor.”
- iii. Select a Template: For this tutorial, I will be selecting the ‘Sample Invoice Template 1’
- iv. Create a template: Click on the Create button to complete the PDF invoice creation process.
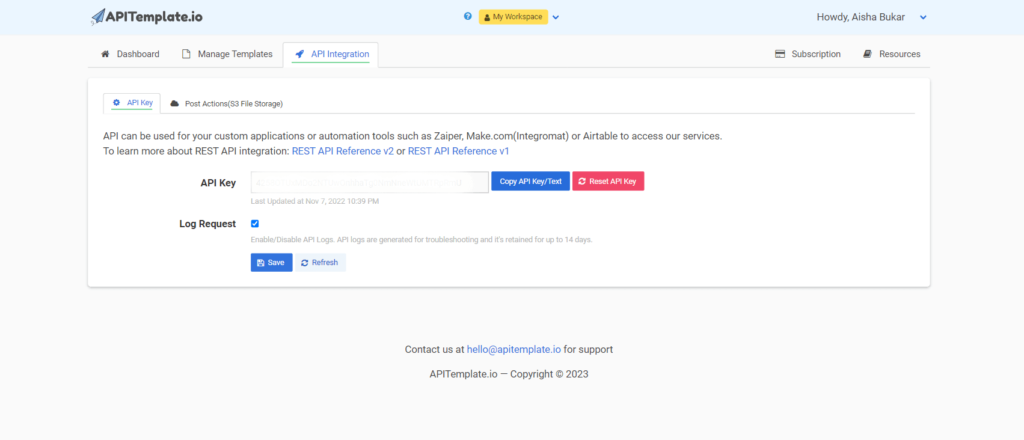
Step 4. Get API Key: The API key will come in handy when we are integrating the PDF invoice with Retool, this is why it’s important for us to copy it. Click on the API Integration navigation bar at the top of the page, then copy this key to your clipboard.
2. Connect Retool with APITemplate
The next phase is to visit the retool website on your browser, if you have an existing account, feel free to proceed to step 2,, but if you don’t, here are the steps required to get started with the low-code platform:
Step 1: On the homepage, you’ll typically locate the “Sign In” button right at the top. When you click on this button, you will be redirected to a page where the “Sign Up” button is visible at the top of the page. You will be asked to input essential details such as your name, email address, password, and related information.
It is important to ensure the use of a valid email address, one to which you have immediate access, as email verification may be necessary. Additionally, it is advisable to select a strong password. To activate your account, click the confirmation link in your email.
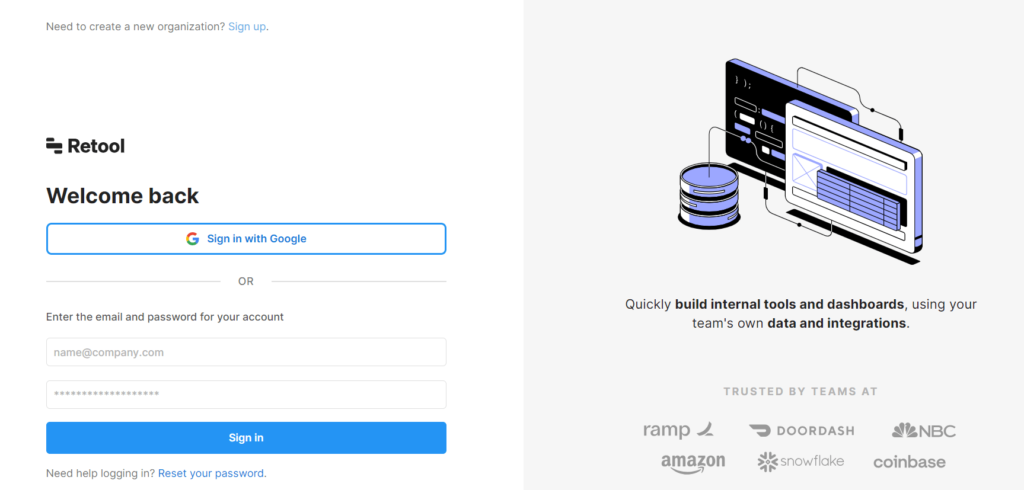
Step 2: To log in, go to retool, and click on the “Sign In” button located at the top of the home page. Provide your registered email address and password, and click on the “Log In” button to access your account.
In this, you typically organize your tools and applications into “Apps.” These Apps represent different projects or use cases. Retool also offers a range of building blocks or components (e.g., tables, forms, charts) that you can drag and drop onto your app’s canvas, typically used to design the user interface for your tools.
2.1: Configure REST APIs in retool
To configure REST APIs in Retool, navigate to your toolbar and locate the “Resources” option. Once found, click on it. Within the “Resources” section, at the top-right corner, you will notice a button labeled Create new, click on this button.
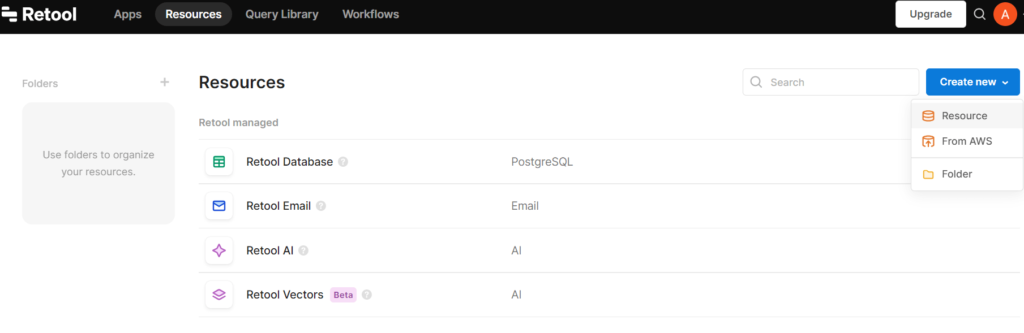
Now, you will be presented with a menu that allows you to select the type of resource you want to create. Choose “REST API” from the list of available options. After selecting “REST API,” you will be directed to a configuration page. On this page, you need to perform several key steps.
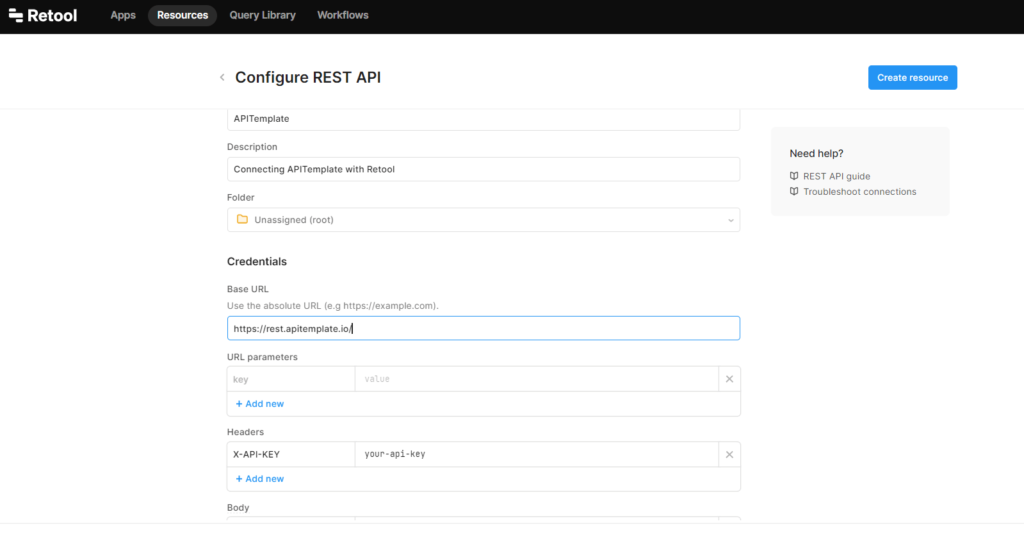
Step 1. Choose a resource name: Choose a suitable name for your resource and leave the root folder blank for now. I named mine APITemplate.
Step 2. Add your base URL: The next step is to specify a base URL for the API. The base URL for APITemplate is “https://rest.apitemplate.io/”
Step 3. Configure Headers: Add a header name and the API key, which we copied from the APITemplate’s API Integration section. I used “X-API-KEY” as the header name. This simply serves as an additional source of information for each API call we make which can help us identify potential issues with the API.
Step 4. Create resource: Once you’ve completed the above steps, click on the “create resource” button to save your configurations. After clicking “create resource,” you may receive a prompt suggesting the creation of an app. At this point, simply ignore this prompt and click “go back to resources.”
(You can find out more about our REST API at our API Reference)
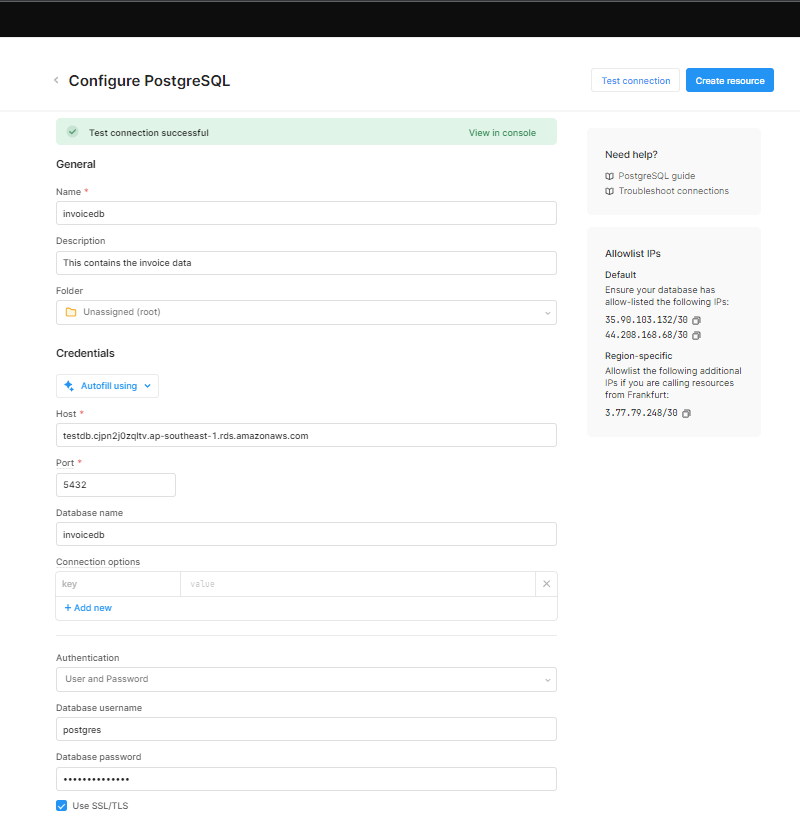
2.2: Configure PostgreSQL in Retool
In order to store data from our PDF invoices, it’s necessary for us to set up and configure a database. To configure the PostgreSQL database, go to your toolbar and click on “Resources”. At the top-right corner, you’ll notice a button labeled “Create new.” Click on it, just as you did when creating the REST-API resource.
Next, choose a resource type from the database list. In this case, select “PostgreSQL database.” This action will redirect you to a page where you can configure the database. On this page, you should perform the following tasks:
Step 1. Choose a name: You are required to choose a name for the resource that would be used when creating queries in the editor.
Step 2. Add your host: Add a database host to your connection details. It is essential to use a host that is valid.
Step 3. Add database name: The database name must be an existing database created alongside your host.
Step 4. Choose an authentication method: You have the option to choose an authentication method. For this tutorial, we will stick with the User and Password authentication by adding a valid database username and password.
Step 5. Use SSL/TLS: Enable SSL(Secure Socket Layer) and TLS(Transport Layer Security) before testing the connection.
Step 6. Test Connection: Click on the test connection button at the top of the page to ensure all connection details are accurate and work perfectly well.
Step 7. Create resource: The last action you need to take is to click the “Create resource” button, which you’ll find at the top of the page. Afterward, click on “go back to resources.” Please do not create an app yet, we will cover that shortly.
3. Build Your PDF Invoice App in Retool
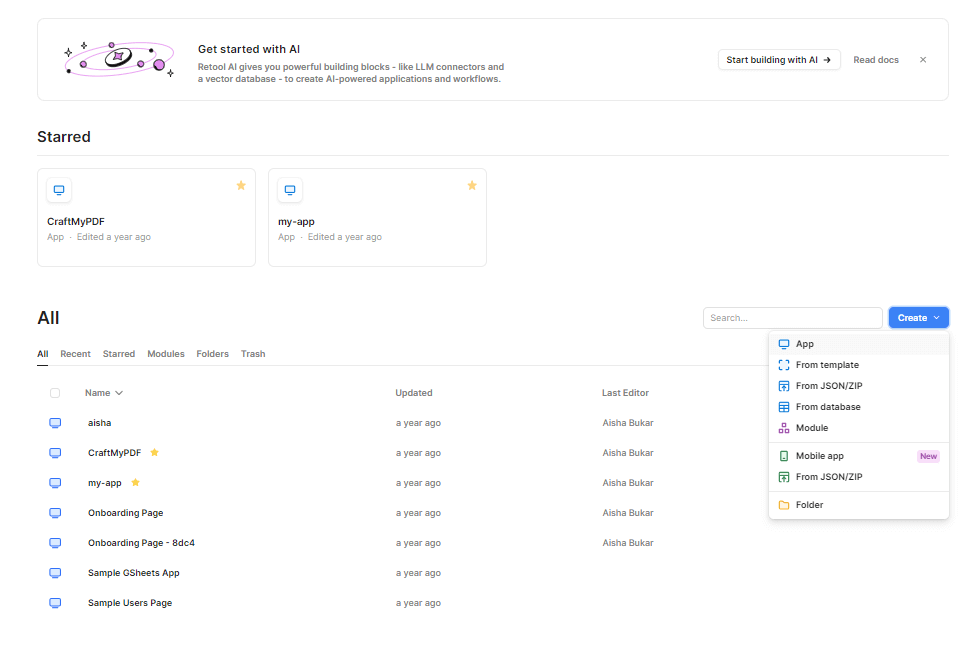
In order to fully take advantage of the interface, we need to create an app. To do this, go back to Apps by clicking on the Apps icon visible at the top of the page. In the bottom right corner, locate and click the “Create new” button. Then, choose “App” to create a new application and provide a name of your choice. You will be redirected to an interface where you can design your workflow.
3.1: Configure query
Once the app has been created, the next step is to make changes to the app by configuring a query for the invoice data. Here are the following tasks required for configuring our invoice data:
Step 1. On the top left corner, hover on the third button which has the code icon, and click on it.
Step 2. The next step is to click on the + icon to add a query, then choose resource query to add a resource to the app.
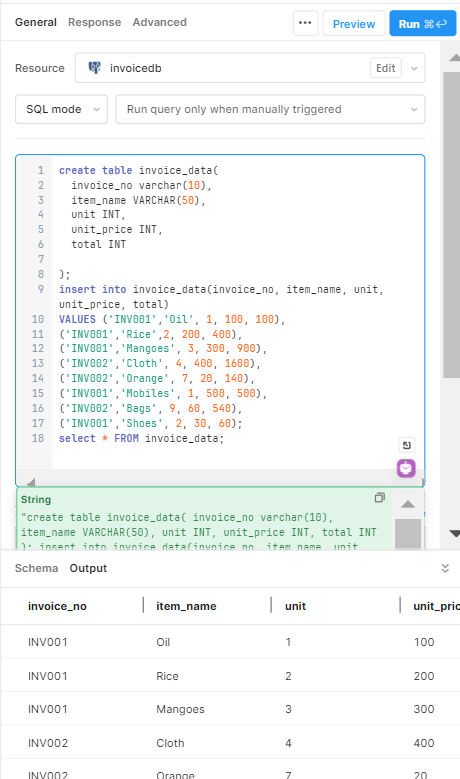
Step 3. Select the Resource name by locating the PostgreSQL database resource that was previously created with the name ‘invoicedb’, then select it.
Step 4. Rename your query by clicking on the three-dotted (…) icon which is located beside the query name in the top left corner. I renamed mine to invoice_query
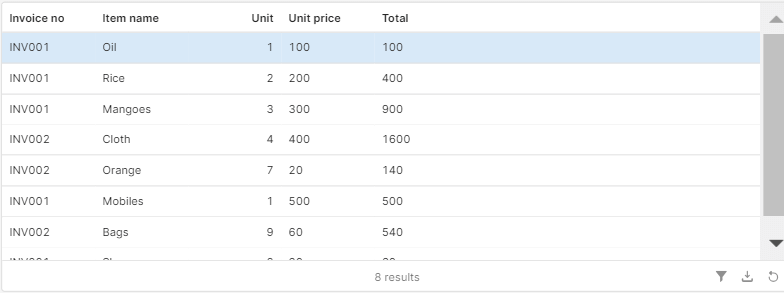
Step 5. We need to create an invoice table for our invoice data and pass in some values. To do this, in your query interface, copy and paste the following SQL command;
create table invoice_data(
    invoice_no varchar(10),
    item_name VARCHAR(50),
    unit INT,
    unit_price INT,
    total INT

);
insert into invoice_data(invoice_no, item_name, unit, unit_price, total)
VALUES ('INV001','Oil', 1, 100, 100),
('INV001','Rice',2, 200, 400),
('INV001','Mangoes', 3, 300, 900),
('INV002','Cloth', 4, 400, 1600),
('INV002','Orange', 7, 20, 140),
('INV001','Mobiles', 1, 500, 500),
('INV002','Bags', 9, 60, 540),
('INV001','Shoes', 2, 30, 60);
select * FROM invoice_data;
Step 6. Save and run the command to make sure everything works well.
3.2: Configure table component
Once our invoice query data has been configured properly, we can then proceed to configure a table component for the invoice data by utilizing the drag-and-drop component readily available in the editor. Here are the steps required:
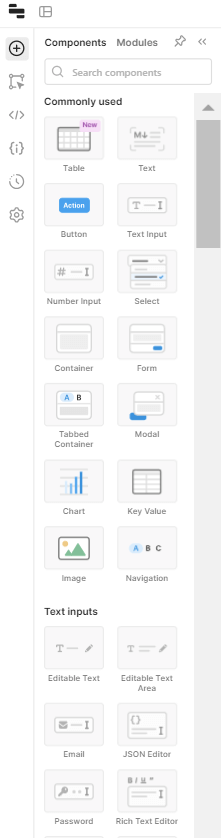
Step 1. Click on the Add (+) icon located at the top left corner of the App to display the components available in Retool. Some of the available components are tables, charts, images, buttons, etc.
Step 2. Drag a table component to the Apps interface. This will automatically store the PostgreSQL query we created for the invoice data in our table component.
Step 3. Rename the table component to your preferred word by right-clicking on the table component interface. This is optional.
3.3: Configure query for invoice header
We need to find a way to pass in the data required for our invoice header. Let’s start by configuring a query for the invoice header, here is how this works:
Step 1. On the top left corner, hover on the third button which has the code icon, and click on it.
Step 2. The next step is to click on the + icon to add a query, then choose resource query to add a resource to the app.
Step 3. Select the Resource name by locating the PostgreSQL database resource that was previously created with the name ‘invoicedb’, then select it.
Step 4. Rename your query by hovering on the query name located at the top left corner, then click on the three-dotted (…) icon which is located beside the query name. I renamed mine to invoice_query. This is an optional choice.
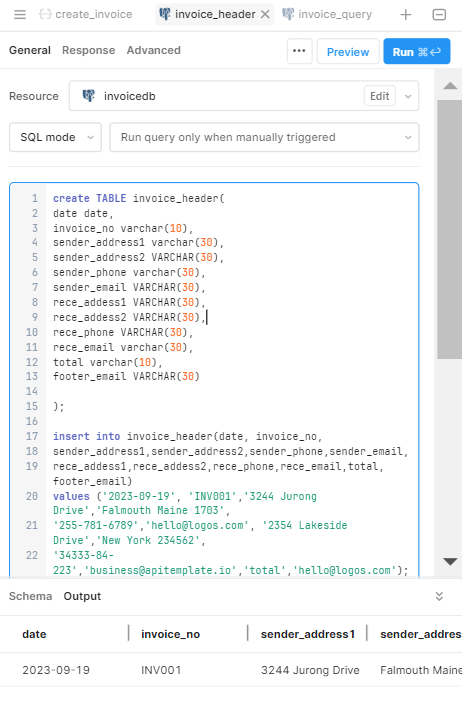
Step 5. To pass data to our invoice header, copy and paste the following SQL command in your query interface;
create TABLE invoice_header(
date date,
invoice_no varchar(10),
sender_address1 varchar(30),
sender_address2 VARCHAR(30),
sender_phone varchar(30),
sender_email VARCHAR(30),
rece_addess1 VARCHAR(30),
rece_addess2 VARCHAR(30),
rece_phone VARCHAR(30),
rece_email varchar(30),
total varchar(10),
footer_email VARCHAR(30)
);
insert into invoice_header(date, invoice_no,
sender_address1,sender_address2,sender_phone,sender_email,
rece_addess1,rece_addess2,rece_phone,rece_email,total, footer_email)
values ('2023-09-19', 'INV001','3244 Jurong Drive','Falmouth Maine 1703',
'255-781-6789','hello@logos.com', '2354 Lakeside Drive','New York 234562',
'34333-84-223','business@apitemplate.io','total','hello@logos.com');
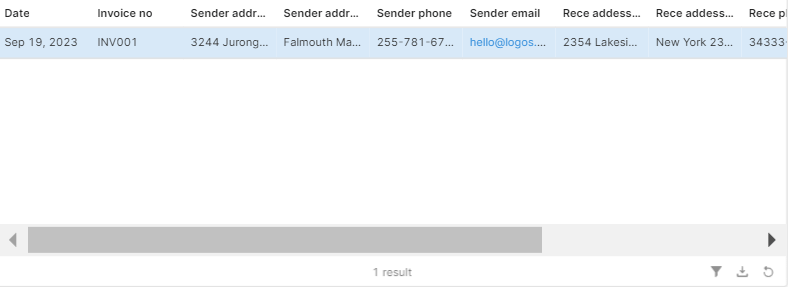
select * FROM invoice_header;
Step 6. Save and run the command to make sure it runs perfectly well.
3.4: Configure table component for invoice header
After configuring the query for the invoice header and everything works well, the next step is to configure a table component for these data using retool’s drag and drop component. Below are the steps:
Step 1. Click on the Add (+) icon located at the top left corner of the App to display the components available in Retool.
Step 2. Drag a table component to the Apps interface. This will automatically store the PostgreSQL query we created for the invoice data in our table component.
Step 3. Rename the table component to your preferred word by right-clicking on the table component interface. This is optional.
3.5: Connect JSON data and send API
To be able to connect our invoice data to the PDF invoice we generated earlier, we would need to manually create and connect this JSON data along with APITemplate’s REST API to pass in the invoice data. Below are the steps required:
Step 1. On the top left corner, hover on the third button which has the code icon, and click on it.
Step 2. The next step is to click on the + icon to add a query, then choose resource query to add a resource to the app.
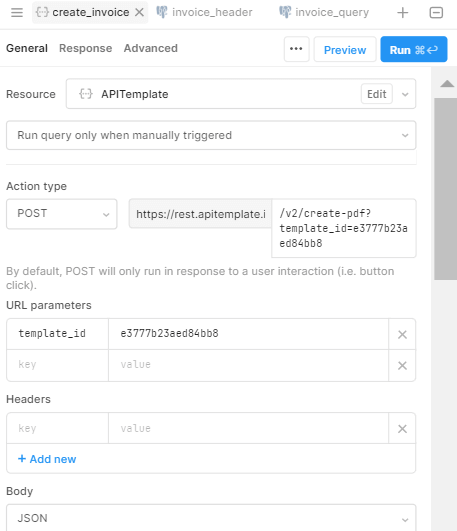
Step 3. Select the Resource name by choosing the REST API we created earlier, which is called APITemplate
Step 4. Rename the query to your preferred word. I renamed mine to create_invoice
Step 5. Change the action type to POST because we are trying to pass in data to the PDF invoice.
Step 6. Pass in the endpoint to create a PDF file with the JSON data using APITemplate’s REST API in the action field, which is /v2/create-pdf . For more details on APITemplate’s REST APIs, please visit the official documentation.
Step 7. In the URL parameter, pass in the TemplateID from your APITemplate Manage Templates page. The key would be “template_id” and the value would be the ID of the template created.
Step 8. Make sure the Body parameter is set to JSON. Pass in the parameters as key-value pairs. Here is an example of how the JSON data should be written and passed.
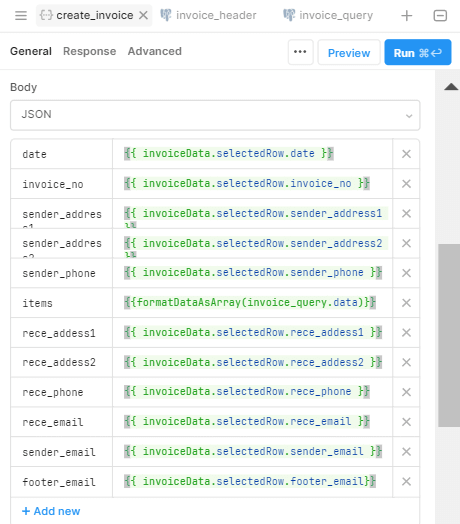
Notice how I used the previously created invoice query data to populate our items data array. This was achieved through the JSON format known as formatDataAsArray. Retool offers two data conversion methods: formatDataAsArray and formatDataAsObject. When using formatDataAsArray, each key corresponds to a column name that references an array of column values. This results in the data being displayed as an array of objects.
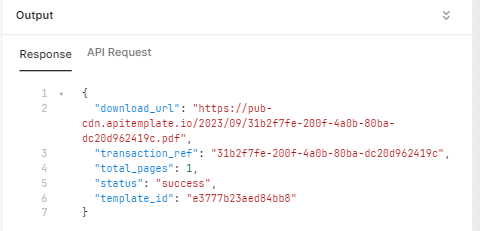
Step 9. Save and run the command to make sure everything works. You should get a response that sends a link to view the PDF invoice.
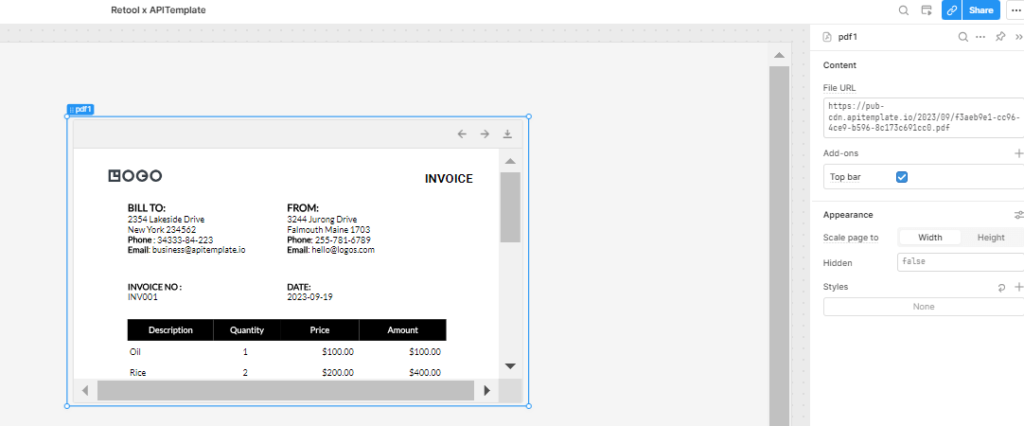
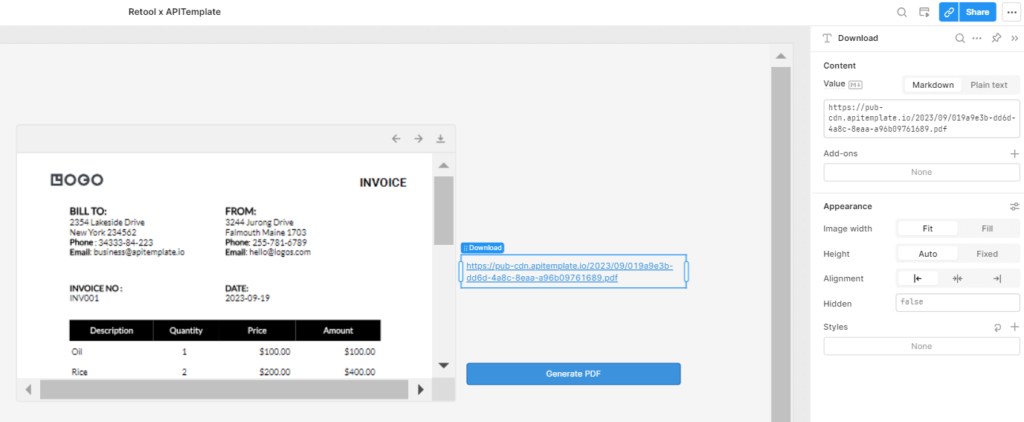
3.6: Add a component to view the generated PDF
To make things more sophisticated, we need to find a way to be able to view the generated PDF invoice directly from our App. Here’s all you need to do:
Step 1. Click on the Add (+) icon located at the top left corner of the App to display the components available.
Step 2. Using the search button located at the top of the components, search for PDF
Step 3. Drag the PDF component to the Apps interface
Step 4. To replace the file URL in the PDF interface, follow these steps:
- i. Begin by right-clicking on the PDF component.
- ii. Next, locate the file URL, usually situated in the top-right corner of the interface.
- iii. Replace the existing file URL with the newly generated URL obtained from the REST API.
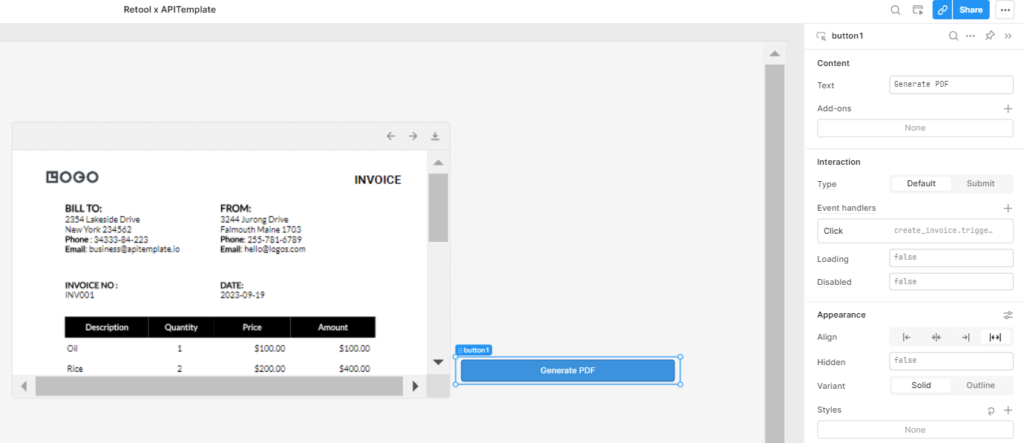
3.7: Add a button for PDF invoice
It would be nice to also have a button that would trigger the creation of our PDF invoice instead of having to manually run the query. Here’s what you need to do:
Step 1. Click on the Add (+) icon located at the top left corner of the App to display the components.
Step 2. Drag the Button component to the App’s interface.
Step 3. To trigger the button, do this:
- i. Right-click on the button component.
- ii. Rename the button text to your preferred name
- iii. Go to event handlers, then query, and select the REST API query, which we named create_invoice to trigger the button.
Step 4. Test the button to be sure it works.
3.8: Add text URL for the PDF invoice
We can also decide to add a text URL to easily download the generated PDF invoice. Here’s how this works:
Step 1. Click on the Add (+) icon located at the top left corner of the App to display the components.
Step 2. Drag the Text component to the App’s interface.
Step 3. Replace the URL using the following steps:
- i. Right-click on the text component
- ii. Next, locate the text URL, usually situated in the top-right corner of the interface.
- iii. Replace the existing text URL with the generated PDF invoice URL obtained from the REST API.
Step 4. Test to make sure it works.
4. Conclusion
Generating PDF invoices with our PDF generation API using Retool and APITemplate is a straightforward and highly customizable process. This article provides a step-by-step guide to help you create and customize PDF templates, connect them with your data sources, and generate professional-looking invoices.
The combination of Retool’s user-friendly low-code platform and APITemplate’s robust features ensures that both technical and non-technical users can efficiently generate PDF invoices. Whether you’re a small business owner or a developer, this integration can help you streamline your invoicing process.
Start creating your PDFs automatically today by signing up for a free account with us.