Have you ever wanted to generate a PDF with JavaScript(or Node.js)? It’s actually quite easy to do with the help of Puppeteer.
In this article, we’ll show you 7 tips for generating PDFs with Puppeteer. The tips include performance optimization for Puppeteer, setting the background color for PDF, using custom fonts for your PDFs, etc.
Puppeteer is a Node library that provides a high-level API to control headless Chrome or Chromium.

It can also be configured to use full (non-headless) Chrome or Chromium. Puppeteer runs on Windows, macOS, and Linux.
Puppeteer can be used for various purposes, such as:
- Generating screenshots and PDFs of web pages: You can use Puppeteer to programmatically take screenshots and generate PDFs of web pages. For example, you can use it to take a screenshot of a landing page and generate a PDF of the same. Puppeteer is also used for converting HTML to PDF.
- Automating form submission: You can use Puppeteer to automatically fill and submit forms on web pages. For example, you can use it to sign up for a newsletter or register for an event on a website.
- Testing web pages: You can use Puppeteer to test web pages for functionality and correctness. For example, you can use it to check if a button on a web page works as expected.
- Crawling websites and extracting data: You can use Puppeteer to crawl websites and extract data from them. For example, you can use it to crawl a product catalog and extract the prices and product descriptions.
Puppeteer can also be used in serverless environments such as AWS Lambda or Google Cloud Function. This is because Puppeteer is headless, which means that it does not need a graphical user interface (GUI) to run. In this article, we also show you a few tips on how to improve the performance of your AWS Lambda functions.
The followings are the 7 tips of generating PDFs with Puppeteer:
1. Performance Tuning For Faster Puppeteer
Puppeteer provides a high-level API to control headless Chrome or Chromium. However, you may want to consider some performance tuning options to make sure your PDFs are generated as quickly as possible.
You can use some of the following options to tune Puppeteer’s performance:
1.1 Disable Unused Features
When you generate a PDF with Puppeteer, you can use the default parameters and settings.
However, using the default settings can actually slow down the PDF generation process, because even if they are not using some of the features, the browser process will still load them into memory. So, it’s best to use only the necessary features and disable those unused features.
For example, the following Puppeteer options are to disable some of the unused features such as speech-api or mute-audio when generating a PDF:
const puppeteer = require('puppeteer');

  const browser = await puppeteer.launch({
  headless: true,
  args: [   '--disable-features=IsolateOrigins',
            '--disable-site-isolation-trials',
            '--autoplay-policy=user-gesture-required',
            '--disable-background-networking',
            '--disable-background-timer-throttling',
            '--disable-backgrounding-occluded-windows',
            '--disable-breakpad',
            '--disable-client-side-phishing-detection',
            '--disable-component-update',
            '--disable-default-apps',
            '--disable-dev-shm-usage',
            '--disable-domain-reliability',
            '--disable-extensions',
            '--disable-features=AudioServiceOutOfProcess',
            '--disable-hang-monitor',
            '--disable-ipc-flooding-protection',
            '--disable-notifications',
            '--disable-offer-store-unmasked-wallet-cards',
            '--disable-popup-blocking',
            '--disable-print-preview',
            '--disable-prompt-on-repost',
            '--disable-renderer-backgrounding',
            '--disable-setuid-sandbox',
            '--disable-speech-api',
            '--disable-sync',
            '--hide-scrollbars',
            '--ignore-gpu-blacklist',
            '--metrics-recording-only',
            '--mute-audio',
            '--no-default-browser-check',
            '--no-first-run',
            '--no-pings',
            '--no-sandbox',
            '--no-zygote',
            '--password-store=basic',
            '--use-gl=swiftshader',
            '--use-mock-keychain']
})
You may find out the Puppeteer troubleshooting guide at here
and also the full list of Chromium Command Line Switches
1.2 Cache Resources in a Folder
When you launch Chrome or Chromium, it will create a user data directory. This directory is used to store data such as your browsing history, bookmarks, downloaded assets and so on.
The default setting will launch a new instance of Chrome or Chromium with a fresh user data directory. This will prevent the PDF generation process from becoming slow over time.
If you’re going to generate a lot of PDFs with Puppeteer and it requires the download of external resources, it’s best to use the userDataDir setting.
Setting the userDataDir allows all the downloaded assets to be stored in a fixed directory, and reusable resources such as HTML, CSS, and images will be reused for the next Puppetter instances.
To set the userDataDir setting, simply pass in the path to the desired directory when launching Puppeteer:
const puppeteer = require('puppeteer');

const browser = await puppeteer.launch({
  userDataDir: './tmp'
});
Puppeteer will then create a new directory called tmp in the current working directory and use it as the user data directory.
1.3 Generate PDF When it’s Ready
To shorten the PDF generation, you want to generate the PDF as soon as the page is loaded or the page is ready.
There are a few techniques to determine whether the page is ready for PDF generation.
Technique 1: Determine the page load state
The first technique is to use the heuristic event networkidle0 and networkidle2 to determine the page load state. The parameter networkidle2 is to detect if there are no more than 2 network connections within 500 ms.
await page.goto(url, { waitUntil: 'networkidle2' });If you want to be certain, the following line is to wait until when there are no network connections at all within 500 ms.
await page.goto(url, { waitUntil: 'networkidle0' });Technique 2: Wait for DOM or an element to be ready
You may also wait until the DOMContentLoaded event is fired.
await page.goto(url, { waitUntil: 'domcontentloaded' });The following snippet is to wait until a DOM element is ready then start creating the PDF.
await page.waitForSelector('.container');Technique 3: Wait for a signal from your own custom Javascript
In some cases, you want to be able to wait for your startup script to finish. What you could do is wait for the global variable to be set to a certain value in Node.js by your own custom Java script in the webpage.
The following is a snippet to wait for 2 seconds for a global variable window.readyForGeneration to be set to true.
let waitFor=(stat, timeoutTime = 5000) =>{
    return new Promise((resolve, reject) => {
        const timeout = setTimeout(() => reject({ message: 'timeout' }), timeoutTime)
        const resolveWithTimeout = (res) => {
            clearTimeout(timeout)
            resolve(res)
        }
        const rejectWithTimeout = (err) => {
            clearTimeout(timeout)
            reject(err)
        }
        page.evaluateHandle(stat).then(resolveWithTimeout).catch(rejectWithTimeout)
    })
}

await waitFor('document.fonts.ready', 2000); //Wait for the fonts ready
await waitFor('window.readyForGeneration===true', 2000); //Wait for a signal from your javascript
1.4 Prewarm your Serverless Functions
If you are looking for a cost-effectively way to generate PDFs, serverless is the way to go. However, one of the shortcomings of Serverless is cold starts.
According to AWS, the invocation of AWS Lambda goes thru a few stages: it includes downloading the code from AWS S3 and creating an environment with the right memory, CPU, and runtime for the code, and finally initialization of the code. This process will take up to a few milliseconds up to a few seconds and All of these introduce latency and impact the performance of your PDF generation.
To overcome it, prewarm your AWS Lambda with Lambda Warmer.
When a serverless function finishes, it will not get terminated immediately and will be reused for the next invocation. The good thing is – you just need to pay for a little or nothing to keep it warm. Prewarming is a technique in which you invoke the function regularly at an interval(5 minutes) to keep the container warm to shorten the warmup process.
The following is a snippet to pre-warm your AWS Lambda function for PDF generation. It can drastically improve the response time by a few seconds(1-3 seconds) based on our experience.
const warmer = require('lambda-warmer');
const chromium = require('chrome-aws-lambda');

exports.handler = async (_event, context, callback) => {
    try{

        if (await warmer(_event)){

            let browser_warm = await chromium.puppeteer.launch({
                args: ['--disable-web-security',
                        '--disable-features=IsolateOrigins',
                        '--disable-site-isolation-trials'].concat(chromium.args),
                //defaultViewport: chromium.defaultViewport,
                executablePath: await chromium.executablePath,
                headless: chromium.headless,
                ignoreHTTPSErrors: true,
            });

            let page_warm = await browser_warm.newPage();
            await browser_warm.close();
            return 'warmed';
        }
 ....
2. Reduce PDF Size with gs(Ghostscript)
Puppeteer is a great tool for generating PDFs from web pages. However, the PDFs generated by Puppeteer can be quite large in file size, due to the fact that Puppeteer by default embeds the original images into the PDF at their full resolution.
Resampling the images in the PDF can greatly reduce the file size. The following is a Node.js snippet to resample the images for a PDF:
function resamplePDF(source_pdf, output_file, res){
		let gsOptions = ['-sDEVICE=pdfwrite','-dNOPAUSE' ,'-dQUIET' ,'-dBATCH'];
		gsOptions = gsOptions.concat(
		            ['-dDetectDuplicateImages=true',
		            '-dDownsampleColorImages=true',
								'-dDownsampleGrayImages=true',
								'-dDownsampleMonoImages=true',
		            `-dColorImageResolution=${res}`,
		            `-dGrayImageResolution=${res}`,
		            `-dMonoImageResolution=${res}`
		            ]);

		gsOptions = gsOptions.concat([`-sOutputFile=${output_file}`, source_pdf]);
		return executeCommand("/opt/bin/gs", gsOptions);
}

function executeCommand(cmd, parameters) {
    var spawnSync = require('child_process').spawnSync;
    var result = spawnSync(cmd, parameters, {
      cwd: process.cwd(),
      env: process.env,
      stdio: 'pipe',
      encoding: 'utf-8'
    });
		return result.stderr? false: true;
}
This snippet uses the gs(Ghostscript) command-line tool to resample the images in the PDF, and can be easily incorporated into a Puppeteer script. Simply pass in the source PDF, the output PDF, and the desired resolution, and gs will take care of the rest.
Below is the working code that you can use to test this out.
const puppeteer = require('puppeteer');
const gs = require('gs');

(async () => {
	const browser = await puppeteer.launch();
	const page = await browser.newPage();
	await page.goto('http://example.com', {waitUntil: 'networkidle2'});

	// Generate PDF at default resolution
	const pdf = await page.pdf({format: 'A4'});

  // Write PDF to file
  fs.writeFileSync('default.pdf', pdf);

  // Resample PDF using gs
  gs.resamplePDF('default.pdf', 'resampled.pdf', 72);

  // Write resampled PDF to file
  fs.writeFileSync('resampled.pdf', pdf);

	await browser.close();
})();
As you can see, this code simply generates a PDF of the Google homepage at the default resolution and then uses gs to resample the PDF at 72 DPI. The resulting PDF is much smaller in file size, while still retaining all the important information.
So if you’re looking to generate smaller PDFs with Puppeteer, gs is definitely worth considering.
Find out more about the detailed parameters of Ghostscript(gs) command-line at here
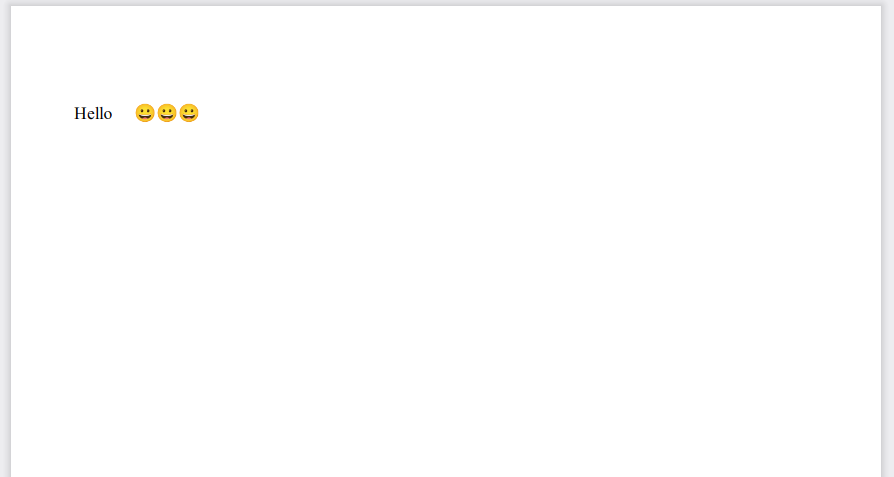
3. Use Emojis in PDF with Puppeteer
One of the best things about Puppeteer is that it makes it easy to use emojis in your PDFs. To do this, you’ll need to use Noto Color Emoji. Noto Color Emoji is a font family that supports emojis. You can download it for free from the Google Fonts website.
Once you have Noto Color Emoji installed, you can use it in your PDF like this:
<html>
<header>
   <style>
	@font-face {
		font-family: 'Noto Color Emoji';
		src: url(https://raw.githack.com/googlefonts/noto-emoji/main/fonts/NotoColorEmoji.ttf);
	}

	body {
		font-family: 'Noto Color Emoji';
	}
  </style>
</header>
<body>
     <span> Hello 😀😀😀</span>
</body>
</html>
After that, you can generate your PDF with Puppeteer and the emoji will be included.
const puppeteer = require('puppeteer');

(async () => {
  const browser = await puppeteer.launch();
  const page = await browser.newPage();
  await page.goto("PATH_TO_YOUR_HTML_FILE");

  await page.pdf({
    path: 'emoji.pdf',
    format: 'A4',
    landscape: true
  });

  await browser.close();

})();
The following is the output:
4. Handle Lazy Loading Pages
If you’re trying to generate a PDF of a page that lazy loads content (like an infinite scroll), you may run into issues. This is because Puppeteer only renders the visible content of a page. To get around this, you can scroll to the bottom of the page before generating the PDF.
You can do this with the following code:
const puppeteer = require('puppeteer');

function waitingTime (ms) {
    return new Promise(resolve => setTimeout(() => resolve(), ms));
  }

(async () => {
  const browser = await puppeteer.launch();
  const page = await browser.newPage();
  await page.goto("YOUR_URL", {waitUntil: 'networkidle2'});

  // Set the viewport before scrolling
  await page.setViewport({ width: 1366, height: 768});

  // Get the height of the page after navigating to it.
  // This strategy to calculate height doesn't work always though.
  const bodyHandle = await page.$('body');
  const { height } = await bodyHandle.boundingBox();
  await bodyHandle.dispose();

  // Scroll viewport by viewport, allow the content to load
  const calculatedVh = page.viewport().height;
  let vhIncrease = 0;
  while (vhIncrease + calculatedVh < height) {
    // Here we pass the calculated viewport height to the context
    // of the page and we scroll by that amount
    await page.evaluate(_calculatedVh => {
      window.scrollBy(0, _calculatedVh);
    }, calculatedVh);
    await waitFor(300);
    vhIncrease = vhIncrease + calculatedVh;
  }

  // Setting the viewport to the full height might reveal extra elements
  await page.setViewport({ width: 1366, height: calculatedVh});

  // Wait for a little bit more
  await waitingTime(1000);

  // Scroll back to the top of the page by using evaluate again.
  await page.evaluate(_ => {
    window.scrollTo(0, 0);
  });

  await page.pdf({
    path: 'data.pdf',
    format: 'A4',
    landscape: true
  });

  await browser.close();

})();
In the above code, we first launch a browser and create a new page. Then we navigate to the page we want to generate a PDF of. After that, we scroll to the bottom of the page. This is important because Puppeteer only renders the visible content of a page. By scrolling to the bottom, we force all lazy-loaded content to be rendered.
Finally, we generate the PDF and close the browser.
5. Set the Background Color of a PDF
You can set the background color of the PDF by using the printBackground option. This option has to be set to TRUE, for example:
const puppeteer = require('puppeteer');

(async () => {
  const browser = await puppeteer.launch();
  const page = await browser.newPage();
  await page.goto("PATH_TO_YOUR_HTML_FILE");

  await page.pdf({
    path: 'output.pdf',
    format: 'A4',
    landscape: true,
    printBackground: true
  });

  await browser.close();

})();
The followings are the ways to make the background in green color
Option 1: Set the Body CSS Style
The simplest way is to set the background of the HTML body
<html>
<head>
   <style>
     body {
        background-color: #FF0000 !important;
     }
   </style>
</head>
   <body>
      <div class="full-background"> </div>
      This is a page with green color background
   </body>
</html>
Option 2: Use a fixed DIV
You may achieve the same by using a fixed DIV and setting the background of the DIV
<html>
<head>
   <style>
	.full-background {
		position: fixed;
		background-color: green;
		top: 0;
		left: 0;
		right: 0;
		bottom: 0;
               z-index: -1;
	}
   </style>
</head>
   <body>
      <div class="full-background"> </div>
      This is a page with green color background
   </body>
</html>
6. Set the Background Color(Header & Footer)
If you want to set the background color for the header and footer of your PDF, you need to use the -webkit-print-color-adjust CSS property.
webkit-print-color-adjust: exact; The exact value tells the browser to honor all color values in the PDF. If you omit this property, the background color of the header and footer will not show up.
Now you can run Puppeteer and generate a PDF with the header and footer colors set:
const puppeteer = require('puppeteer');

(async () => {
    const browser = await puppeteer.launch();
    const page = await browser.newPage();
    await page.goto("PATH_TO_YOUR_HTML_FILE");

    let headerFooterTemplate = `<style>
        html {
            -webkit-print-color-adjust: exact;
        }
        </style>

        <style>
            #header, #footer { padding: 0 !important; }
        </style>

        <table class="mytable" style="background-color: green">
        <tr>
            <td style="text-align:left; width:50%!important;"  class="myfont">
            <span class="date"></span>
            </td>
            <td style="text-align:right; width:50%!important;" class="myfont">
                <span class="pageNumber"></span> of <span class="totalPages"></span>
            </td>
        </tr>
        </table>`;

    await page.pdf({
        path: 'output.pdf',
        format: 'A4',
        landscape: true,
        printBackground: true,
        headerTemplate: headerFooterTemplate,
        footerTemplate: headerFooterTemplate,
    });

    await browser.close();

})();
7. Use Custom Fonts with Puppeteer
Custom fonts are a great way to add personality and style to your web pages. Unfortunately, they can be a bit of a pain to work with. Puppeteer, a headless browser library, can make this process a lot easier.
There are two techniques for using custom fonts with Puppeteer.
Option 1: Use web fonts in CSS
The first way is to use web fonts in CSS. This can be easily accomplished with the CSS property “font-face”.
Below is the CSS code for using the “Roboto” font from Google Fonts.
@font-face {
  font-family: 'Roboto';
  font-style: normal;
  font-weight: 400;
  src: local('Roboto'), local('Roboto-Regular'), url(<https://fonts.gstatic.com/s/roboto/v18/KFOmCnqEu92Fr1Mu7GxKOzY.woff2>) format('woff2');
  unicode-range: U+0000-00FF, U+0131, U+0152-0153, U+02C6, U+02DA, U+02DC, U+2000-206F, U+2074, U+20AC, U+2212, U+2215;
}
To use this font in your Puppeteer code, you’ll need to add it to the page’s CSS. You can do this with the addStyleTag function.
await page.addStyleTag({path: 'path/to/roboto.css'});However, the header and footer generated by Puppeteer do not support Webfonts. In this case, the second technique would be more appropriate.
Option 2: Set the fonts locally for Puppeteer (Linux/AWS Lambda)
The second technique is to set the default font for Puppeteer using a local font. If the browser does not find appropriate fonts, the text will not be rendered correctly (square blocks).
To make sure all the texts render correctly, setting a system default font for the browser to fall back is important. This technique is good for the frequently used fonts – there is no need to download them from remote sites and store them locally.
It is recommended to use a font for the default font that supports most of the languages like Arial Unicode. To do this, first, the environment variable of fonts.conf needs to be set in your Node.js. This can be done as follows:
process.env.FONTCONFIG_FILE='/var/task/fonts.conf';Then, create fonts.conf. The ‘dir’ property should point to your font directory. Put all your default fonts in the ‘dir’ folder.
<?xml version="1.0"?>
<!DOCTYPE fontconfig SYSTEM "fonts.dtd">
<fontconfig>
<dir>/var/task/fonts/</dir>
<cachedir>/tmp/fonts-cache/</cachedir>
<config></config>
<dir>/tmp/user-fonts/</dir>
</fontconfig>
This will ensure that all texts are rendered correctly when using Puppeteer. Note that this only works for the Linux environment, especially in a serverless environment like AWS Lambda which does not have a wide selection of fonts.
Conclusion
In this article, we discussed the 7 tips for generating PDFs with Puppeteer. Hope you found these tips helpful.
APITemplate.io offers PDF generation API and Image generation API. If you are using Puppeteer and hosting the services yourself, you may register an account and try out our API services.