A practical guide for HTML to PDF conversion using serverless architecture-from running headless browsers in Lambda to using lightweight PDF generation API services for production workloads.
If you’ve ever built a web application that needs to generate invoices, reports, or certificates using HTML to PDF conversion, you know the drill. First, someone says “we just need to export this as a PDF”-and suddenly you’re down a rabbit hole of rendering engines, memory limits, and deployment headaches. What sounds like a weekend project often turns into weeks of troubleshooting.
What “Serverless PDF Generation” Actually Means
It means creating documents without babysitting servers. In other words, there are no EC2 instances to patch, no dedicated PDF servers eating money while idle. Simply put, you write a function, it runs when needed, and you move on with your life.
The appeal is obvious: you only pay for what you use. For example, generate 10 PDFs today, 10,000 tomorrow-your infrastructure handles it automatically. Whether you’re using a PDF generator API or running your own rendering engine, serverless scales with your demand. As a result, there’s no capacity planning, no over-provisioning “just in case.”
Common Use Cases
In practice, you’ll find serverless PDF generation powering a variety of real-world scenarios:
- Invoices and receipts – For instance, e-commerce platforms generating order confirmations and billing documents
- Reports and analytics – Similarly, dashboards that let users export data visualizations as downloadable reports
- Certificates and credentials – Additionally, online courses issuing completion certificates, or HR systems generating employment letters
- Contracts and legal documents – Furthermore, applications that populate templates with user data and produce signed agreements
- Tickets and boarding passes – Finally, event management systems creating personalized entry passes
Why AWS Lambda Is Often the First Choice
When developers think serverless, AWS Lambda is usually the first service that comes to mind-and for good reason. Specifically, Lambda offers a generous free tier (1 million requests per month), integrates seamlessly with other AWS services like S3 and API Gateway, and supports multiple runtimes including Python, Node.js, and custom containers.
For PDF generation specifically, Lambda’s ability to scale automatically makes it attractive. Therefore, you don’t need to worry about provisioning enough servers during peak hours or paying for idle capacity during quiet periods. Essentially, the function simply runs when triggered and stops when done.
That said, Lambda does come with constraints that matter for PDF generation-memory limits, execution timeouts, and deployment package sizes. Throughout this guide, we’ll explore these challenges and look at how to work around them.
2. Popular Approaches for HTML to PDF in AWS Lambda
Before we get into code, let’s first look at what options are actually out there for HTML to PDF conversion. However, spoiler: there’s no perfect solution, just trade-offs you need to understand.
Overview of Available Options
Headless Chromium (Puppeteer / Playwright)
The most powerful approach involves running a headless browser-essentially Chrome or Chromium without a visible window-inside your Lambda function. Basically, you feed it HTML and CSS, and then the browser renders the content exactly as it would appear on screen, before finally exporting it as a PDF.
Puppeteer is a Node.js library developed by the Chrome team that provides a high-level API to control headless Chrome. Similarly, Playwright, created by Microsoft, offers similar functionality but additionally supports multiple browsers (Chromium, Firefox, and WebKit).
The main advantage here is rendering fidelity. Because you’re using a real browser engine, your PDFs will look exactly like your web pages-complete with custom fonts, CSS Grid layouts, and even JavaScript-generated content.
Key packages you’ll encounter:
puppeteer-core– First, the Puppeteer library without bundled Chromiumchrome-aws-lambda– Second, a Lambda-optimized Chromium binary (though now deprecated in favor of@sparticuz/chromium)
PDF Generation API Services
Alternatively, instead of running the document creation logic yourself, you can offload the work to a dedicated API service. In this case, you send your HTML or template data via an HTTP request, and the service returns a PDF.
Services like APITemplate handle all the complexity of running browsers and managing infrastructure. Essentially, a good API abstracts away the headaches-you just make API calls and receive professionally rendered documents.
3. Understanding Headless Chromium in AWS Lambda (Beginner-Friendly)
If you’ve never worked with headless browsers before, don’t worry. Essentially, this section covers the basics so you’re not flying blind when we get to the code.
What Is Headless Chromium?
Chromium is basically the open-source engine that powers Google Chrome. “Headless” simply means running it without any visible window-no GUI, no toolbar, nothing you can see. In essence, it’s a full browser running in the background, doing whatever your code tells it to do.
So why would anyone want a browser you can’t see? The answer is automation. Headless browsers are perfect for:
- First, render web pages programmatically
- Second, execute JavaScript on those pages
- Third, take screenshots or generate PDFs
- Additionally, scrape content from dynamic websites
- Finally, run automated tests
For PDF generation, the key capability is rendering. Specifically, Chromium’s rendering engine interprets your HTML and CSS exactly as a user would see it in their browser, and then converts that visual representation into a PDF document.
Why Chromium Works So Well for HTML to PDF Conversion
The reason developers reach for headless Chromium when they need high-quality HTML to PDF conversion is simple: it’s the same engine that renders web pages.
Consider the alternatives. In contrast, many PDF libraries use their own HTML parsers and rendering engines, which means they support only a subset of CSS features. Want flexbox? Maybe. CSS Grid? Probably not. Custom web fonts? Hit or miss.
However, with Chromium, you get full support for modern web standards because you’re literally using a web browser. Therefore, if it looks right in Chrome, it will look right in your PDF.
High-Level Lambda Requirements
Here’s the thing-running Chromium in Lambda isn’t as simple as npm install and go. In fact, Lambda has constraints, and Chromium pushes against all of them:
Memory: First, Chromium is memory-hungry. You’ll want to allocate at least 1024 MB to your Lambda function, though 1536 MB to 2048 MB is often recommended for reliable performance. Additionally, more memory also means more CPU power in Lambda’s pricing model.
Timeout: Additionally, launching a browser, loading content, and rendering a PDF takes time. A 3-second timeout won’t cut it. Plan for at least 30 seconds, and consider going higher if you’re generating complex documents.
Deployment Size: Finally, this is where things get tricky. Chromium binaries are large-around 250 MB uncompressed. Lambda has strict limits:
- First, 50 MB zipped for direct uploads
- Second, 250 MB uncompressed for the function itself
- Third, 250 MB additional for Lambda Layers
Consequently, you’ll need to use Lambda Layers or container images to fit Chromium into these constraints. Packages like @sparticuz/chromium provide compressed binaries that decompress at runtime.
4. HTML to PDF Architecture: AWS Lambda + Headless Chromium
Now, let’s map out how all the pieces fit together when you’re generating PDFs with Lambda and Chromium.
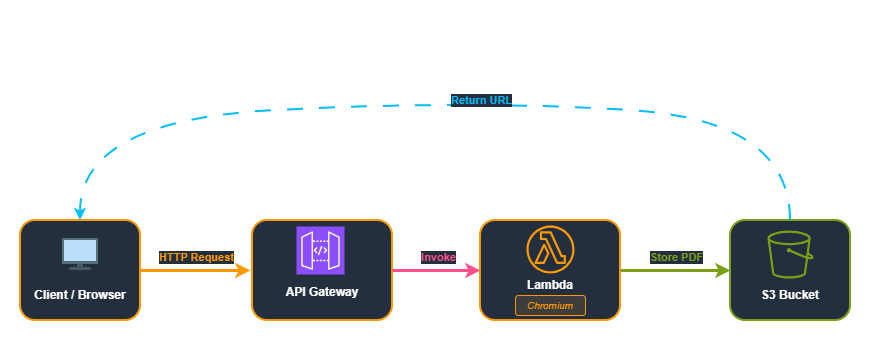
This diagram shows the complete request flow: a client sends a request to API Gateway, which triggers a Lambda function running Chromium to generate the PDF, stores it in S3, and returns the download URL.
Simple Flow Explanation
- API Gateway receives the request – First, a client (web app, mobile app, or backend service) sends an HTTP request with the data needed for the PDF
- Lambda function triggers – Then, API Gateway invokes your Lambda function, passing along the request data
- Chromium launches – Next, your function starts a headless Chromium instance
- HTML renders – Subsequently, Chromium loads your HTML template with the provided data
- PDF exports – After that, Chromium’s PDF API converts the rendered page to a PDF file
- Lambda uploads to S3 – Then, the PDF is saved to S3 for later retrieval
- Lambda returns signed URL – Finally, client receives a secure, time-limited download link
What Happens When a Request Comes In
Let’s walk through a concrete example. Say you’re building an invoice system. When a user clicks “Download Invoice” in your web app, here’s what happens.
First, your frontend sends a POST request to your API endpoint with the invoice data:
{
  "invoiceNumber": "INV-2024-001",
  "customerName": "Acme Corp",
  "items": [
    { "description": "Widget A", "quantity": 5, "price": 19.99 },
    { "description": "Widget B", "quantity": 2, "price": 49.99 }
  ],
  "total": 199.93
}
Then, your Lambda function receives this data, injects it into an HTML template, launches Chromium, renders the page, and generates a PDF. The whole process typically takes 3-10 seconds, depending on complexity and whether the Lambda instance is warm or cold.
Where HTML and CSS Fit In
Notably, your PDF’s appearance is entirely controlled by HTML and CSS-the same technologies you use for web pages. This is one of the biggest advantages of the Chromium approach.
For example, you create an HTML template with placeholders for dynamic data:
<!DOCTYPE html>
<html>
<head>
  <style>
    body { font-family: 'Helvetica', sans-serif; padding: 40px; }
    .header { border-bottom: 2px solid #333; margin-bottom: 20px; }
    .invoice-number { color: #666; font-size: 14px; }
    table { width: 100%; border-collapse: collapse; }
    th, td { padding: 12px; text-align: left; border-bottom: 1px solid #ddd; }
  </style>
</head>
<body>
  <div class="header">
    <h1>Invoice</h1>
    <p class="invoice-number">{{invoiceNumber}}</p>
  </div>
  <!-- More template content -->
</body>
</html>
Subsequently, your Lambda function replaces the placeholders with actual data before feeding the HTML to Chromium. This HTML to PDF workflow is at the heart of browser-based document generation.
5. Step-by-Step: HTML to PDF Using Chromium in Lambda (Node.js)
Now let’s build a complete, production-ready PDF generator using Node.js, Puppeteer, and headless Chromium. Specifically, this implementation generates styled invoices from JSON data, uploads PDFs to S3, and returns secure download links.
Overview of the Workflow
Our implementation will:
- First, accept JSON data (invoice details) via API Gateway
- Then, build a styled HTML invoice from the data
- Next, launch headless Chromium and render the HTML
- After that, generate a PDF and upload it to S3
- Finally, return a pre-signed download URL
Project Structure
lambda-pdf-generator/
- index.js                <- Main Lambda code
- node_modules/           <- All dependencies (Puppeteer, Chromium, AWS SDK)
- package.json
- package-lock.json
Step 1: Initialize the Project and Install Dependencies
First, create a new directory and initialize the project:
mkdir lambda-pdf-generator
cd lambda-pdf-generator
npm init -y
Next, install the required packages:
# Puppeteer and Chromium for PDF generation
npm install puppeteer-core @sparticuz/chromium

# AWS SDK v3 for S3 operations
npm install @aws-sdk/client-s3 @aws-sdk/s3-request-presigner
Step 2: Create the Lambda Function Code
index.js:
const chromium = require("@sparticuz/chromium");
const puppeteer = require("puppeteer-core");

// AWS S3 SDK v3
const {
  S3Client,
  PutObjectCommand,
  GetObjectCommand
} = require("@aws-sdk/client-s3");
const { getSignedUrl } = require("@aws-sdk/s3-request-presigner");

// Create S3 client
const s3Client = new S3Client({ region: "us-east-1" }); // change region if needed

function generateInvoiceHTML(data) {
  // Compute total from items if not provided
  const totalValue = data.total !== undefined
    ? data.total
    : data.items.reduce((sum, item) => sum + (item.quantity * item.price), 0);

  // Format total with 2 decimals
  const formattedTotal = totalValue.toFixed(2);

  let template = `
  <!DOCTYPE html>
  <html>
  <head>
    <meta charset="UTF-8">
    <title>Invoice -${data.invoiceNumber}</title>
    <style>
      body { font-family: Arial, sans-serif; margin: 40px; color: #333; }
      .header { text-align: center; border-bottom: 2px solid #555; padding-bottom: 10px; margin-bottom: 30px; }
      .header h1 { margin: 0; font-size: 28px; }
      .header p { font-size: 14px; margin: 4px 0; color: #555; }
      .customer-details { margin-bottom: 20px; font-size: 16px; }
      .items-table { width: 100%; border-collapse: collapse; margin-bottom: 20px; }
      .items-table th, .items-table td { border: 1px solid #bbb; padding: 8px; text-align: left; font-size: 14px; }
      .items-table th { background-color: #f5f5f5; }
      .total-section { text-align: right; font-size: 18px; font-weight: bold; margin-top: 20px; }
      .footer { margin-top: 40px; text-align: center; font-size: 12px; color: #777; border-top: 1px solid #ddd; padding-top: 10px; }
    </style>
  </head>
  <body>
    <div class="header">
      <h1>Invoice</h1>
      <p>Invoice #:${data.invoiceNumber}</p>
    </div>

    <div class="customer-details">
      <strong>Bill To:</strong>${data.customerName}
    </div>

    <table class="items-table">
      <thead>
        <tr>
          <th>Description</th>
          <th>Quantity</th>
          <th>Price</th>
          <th>Amount</th>
        </tr>
      </thead>
      <tbody>
${data.items.map(item => {
          const amount = (item.quantity * item.price).toFixed(2);
          return `
            <tr>
              <td>${item.description}</td>
              <td>${item.quantity}</td>
              <td>$${item.price.toFixed(2)}</td>
              <td>$${amount}</td>
            </tr>
          `;
        }).join("")}
      </tbody>
    </table>

    <div class="total-section">
      Total: $${formattedTotal}
    </div>

    <div class="footer">
      Thank you for your business!
    </div>
  </body>
  </html>
  `;

  return template;
}

exports.handler = async (event) => {
  let browser = null;

  try {
    // Launch Puppeteer
    browser = await puppeteer.launch({
      args: chromium.args,
      defaultViewport: chromium.defaultViewport,
      executablePath: await chromium.executablePath(),
      headless: chromium.headless,
      ignoreHTTPSErrors: true,
    });

    const page = await browser.newPage();

    // Read HTML from request
    const body = JSON.parse(event.body || "{}");

    let html;

    if (body.invoiceNumber && body.items) {
    html = generateInvoiceHTML(body);
    } else if (body.html) {
    html = body.html;
    } else {
    html = "<h1>No HTML provided</h1>";
    }

    await page.setContent(html, {
      waitUntil: ["domcontentloaded", "networkidle0", "load"],
    });

    // Generate PDF buffer
    const pdfBuffer = await page.pdf({
      format: "A4",
      printBackground: true,
    });

    // Close browser
    await browser.close();
    browser = null;

    // Create a unique S3 key
    const timestamp = Date.now();
    const s3Key = `pdf-${timestamp}.pdf`;

    // Upload PDF to S3
    await s3Client.send(
      new PutObjectCommand({
        Bucket: "pdf-outputs-bucket-adi", // << your bucket name
        Key: s3Key,
        Body: pdfBuffer,
        ContentType: "application/pdf",
      })
    );

    // Generate a pre-signed GET URL valid for 1 hour
    const downloadUrl = await getSignedUrl(
      s3Client,
      new GetObjectCommand({
        Bucket: "pdf-outputs-bucket-adi",
        Key: s3Key,
      }),
      { expiresIn: 3600 } // 1 hour
    );

    return {
      statusCode: 200,
      body: JSON.stringify({
        message: "PDF generated and uploaded successfully",
        bucket: "pdf-outputs-bucket-adi",
        key: s3Key,
        downloadUrl: downloadUrl,
      }),
    };

  } catch (error) {
    console.error("Error generating PDF:", error);
    return {
      statusCode: 500,
      body: JSON.stringify({
        error: error.message,
      }),
    };
  } finally {
    if (browser) {
      await browser.close();
    }
  }
};
Step 3: Package the Function Code
Then, create the deployment ZIP with all dependencies bundled:
Compress-Archive -Path index.js, node_modules, package.json, package-lock.json -DestinationPath function-deployment.zip -ForceAs a result, this will create the function-deployment.zip.
Step 4: Create an S3 Bucket for Deployment
Since the deployment ZIP is too large to upload directly to Lambda (exceeds 50MB limit), we’ll upload it to S3 first.
- Go to AWS Console -> S3 -> Create bucket
- Enter a unique bucket name (e.g.,
lambda-deployment-packages) - Select your preferred region (e.g.,
us-east-1) - Keep default settings and click Create bucket
- Open the bucket and click Upload
- Upload
function-deployment.zip - After upload, click on the file and copy the S3 URI (e.g.,
s3://lambda-deployment-packages/function-deployment.zip)
Step 5: Create the Lambda Function
- Go to AWS Console -> Lambda -> Create function
- Choose Author from scratch
- Enter function name (e.g.,
pdf-generator-chromium) - Runtime: Node.js 18.x
- Architecture: x86_64
- Click Create function
After creation, be sure to configure the function:
- Memory: 2048 MB (Chromium requires significant memory)
- Timeout: 1 min (to handle browser startup time)
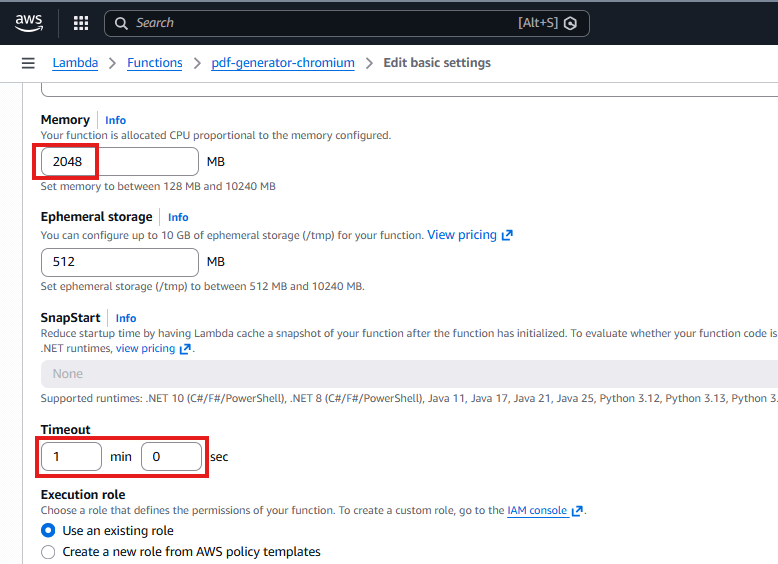
The General configuration panel displays the memory allocation slider set to 2048 MB and timeout field set to 1 minute.
Step 6: Upload the Function Code
- First, in the Code tab, click Upload from -> Amazon S3
- Then, enter the S3 URL of your
function-deployment.zip - Finally, click Save
Step 7: Create an S3 Bucket and Configure IAM Permissions
- First, create an S3 bucket (e.g.,
pdf-outputs-bucket-adi) - Next, go to IAM -> Roles and find your Lambda’s execution role
- Then, click Add permissions -> Attach policies
- Finally, search for and attach AmazonS3FullAccess
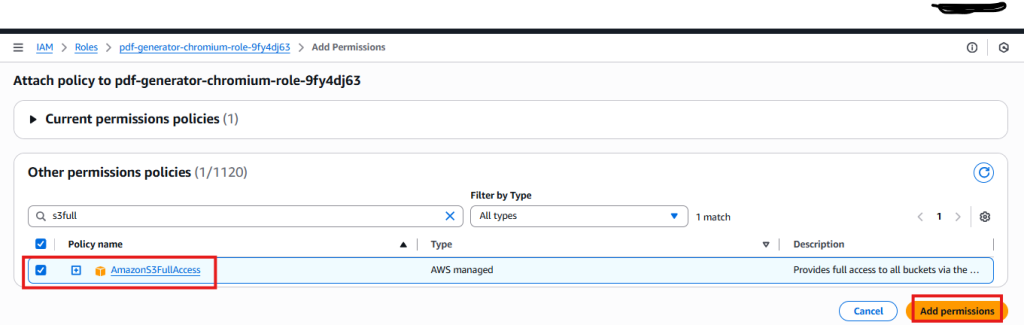
The IAM Role Permissions tab shows AmazonS3FullAccess policy listed under attached permissions.
Step 8: Create an API Gateway Endpoint
- First, go to AWS Console -> API Gateway -> Create API
- Next, choose HTTP API and click Build
- Then, add an integration -> Select Lambda -> Choose your function
- After that, add a route: POST /generate-pdf
- Finally, deploy to the default stage
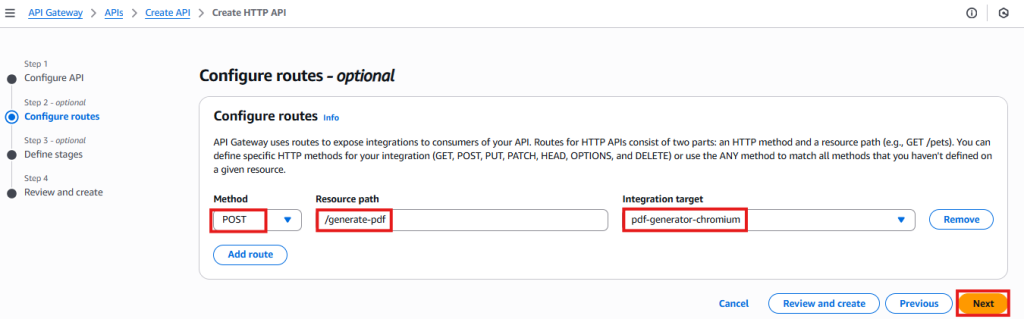
The API Gateway console shows the POST /generate-pdf route configured with Lambda integration and the invoke URL.

Generated API, with highlighted API ID
Step 9: Test the Complete Workflow
Send a POST request using curl (works great in AWS CloudShell). Replace your-api-id with the API ID generated from API Gateway in the previous step:
curl -X POST "https://your-api-id.execute-api.us-east-1.amazonaws.com/generate-pdf" \
  -H "Content-Type: application/json" \
  -d '{
    "invoiceNumber": "INV-2024-001",
    "customerName": "Acme Corp",
    "items": [
      { "description": "Widget A", "quantity": 5, "price": 19.99 },
      { "description": "Widget B", "quantity": 2, "price": 49.99 }
    ]
  }'
Expected Response:
{
  "message": "PDF generated and uploaded successfully",
  "bucket": "pdf-outputs-bucket-adi",
  "key": "pdf-1770451447255.pdf",
  "downloadUrl": "https://pdf-outputs-bucket-adi.s3.us-east-1.amazonaws.com/pdf-1770451447255.pdf?X-Amz-..."
}
Open the downloadUrl in a browser to download the generated PDF.

The terminal shows the curl POST request and the JSON response containing the message, bucket name, key, and pre-signed downloadUrl.
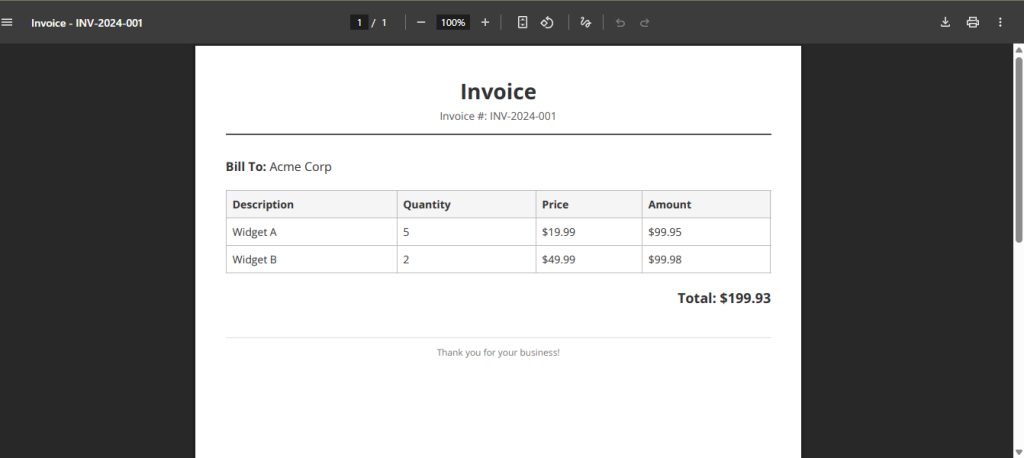
The browser displays the rendered PDF invoice with the header, customer details, items table, and calculated total amount.
6. Challenges of Using Headless Chromium in Serverless Environments
Got your first PDF working? Great. However, before you ship this to production, let’s talk about what you’re signing up for. I’m not trying to scare you off-just giving you the full picture so you can make a smart call.
Cold Start Delays
First, cold starts will make you question your life choices with Chromium in Lambda.
Specifically, when Lambda spins up a new instance of your function (which happens when there’s no warm instance available), it needs to:
- Download and extract your function code
- Initialize the runtime
- Decompress the Chromium binary
- Actually launch the browser
For a Chromium-based function, cold starts can add 5-15 seconds to your response time. Needless to say, that’s a long time for a user waiting for their invoice to download.
Of course, you can mitigate this with provisioned concurrency (keeping instances warm), but that costs money and defeats some of the cost benefits of serverless.
Large Binary Size
Second, Chromium is a full web browser. Browsers are big. Really big. Even compressed:
- ~50 MB compressed (specifically, in the Lambda Layer)
- ~250 MB uncompressed at runtime
As you can see, this eats up almost all of Lambda’s allocation, leaving you barely any room for other dependencies.
Deployment and Maintenance Overhead
Third, getting Chromium running in Lambda isn’t a one-time setup. You’re committing to:
- Lambda Layers – First, you’ll need container images
- Specific Chromium arguments – Second, special args to work in Lambda’s constrained environment
- Version management – Third, when Chromium updates, things can break
- Testing across regions – Finally, layer ARNs are region-specific
Moreover, the fun doesn’t stop after deployment. Browser libraries update constantly, and those updates love to break things. You’ll spend time chasing security patches while praying nothing explodes.
Memory and Resource Constraints
Furthermore, even with 2048 MB of memory allocated, complex pages can cause issues:
- First, pages with many images may exceed memory limits
- Second, heavy JavaScript execution can time out
- Third, multiple concurrent requests compete for resources
Lambda functions are isolated but share underlying infrastructure. Therefore, under heavy load, you might see inconsistent performance.
Scaling Issues with Concurrent PDF Generation
Finally, here’s where things get spicy. Imagine it’s month-end and you need to generate 1,000 invoices for your customers.
If you trigger all those Lambdas simultaneously:
- First, you’ll hit Lambda concurrency limits (default is 1,000 per region)
- Second, many will be cold starts, taking forever
- Third, you’re paying for 1,000 instances all running Chromium
Expensive and slow. Of course, you could add queuing and rate limiting-but now you’re building infrastructure to work around your infrastructure. That’s not a great sign.
The Real Cost
To put this in perspective, let’s do some quick math. A Lambda function with 2048 MB memory running for 10 seconds costs roughly $0.00033 per invocation (varies by region).
That sounds cheap, but at scale, consider this:
- 10,000 PDFs/month = $3.3
- 100,000 PDFs/month = $33
- 1,000,000 PDFs/month = $333
Furthermore, factor in the engineering hours spent maintaining the Chromium setup, debugging cold starts, and fixing random breakages. Suddenly that “cheap” serverless option doesn’t look so cheap.
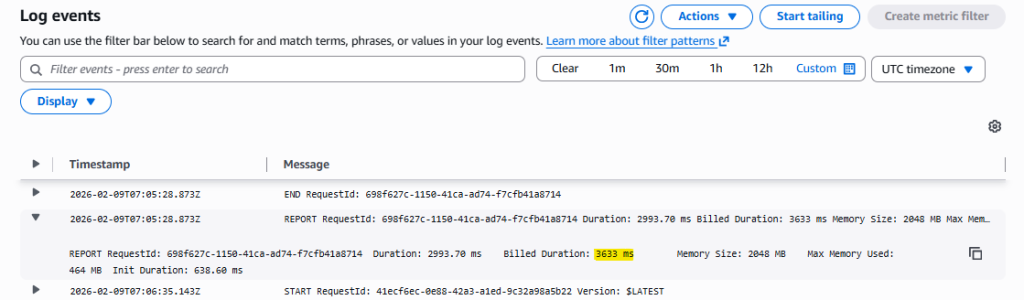
CloudWatch Logs show the INIT_START and INIT_REPORT entries with initialization duration in milliseconds, highlighting the cold start overhead.
7. A Simpler Alternative: Using a PDF Generation API with AWS Lambda
After spending weeks wrestling with Chromium layers, cold starts, and deployment headaches, many teams eventually arrive at the same realization: maybe running browsers in Lambda is the wrong approach entirely.
Introduction to APITemplate
APITemplate is a dedicated PDF generator API service for creating PDFs and images from templates. Instead of running Chromium yourself, you simply make an API call and get back a PDF.
This offers:
- Template editor – First, design PDF templates visually or with HTML/CSS
- REST API – Second, simple HTTP endpoints for PDF generation
- Template variables – Third, inject dynamic data into your templates
- Regional endpoints – Additionally, US, EU, Singapore, and Australia for lower latency
- Async processing – Finally, webhooks for handling large batch jobs
How HTML to PDF APIs Simplify Serverless Workflows
With an API-based approach, your Lambda function becomes dramatically simpler. Here’s the comparison:
Before (with Chromium):
- Receive request
- Build HTML template
- Launch headless browser
- Load content
- Wait for rendering
- Export PDF
- Close browser
- Return response
After (with API):
- Receive request
- Send data to PDF API
- Return the PDF URL
Say goodbye to browser management, complex layers, and cold start nightmares. Your Lambda function is just making an HTTP call-which takes milliseconds, not seconds.
This approach is especially powerful when you create reusable templates in APITemplate’s dashboard. You design the template once, then your Lambda function just passes in the variable data for each PDF. The PDF generator API handles all the rendering complexity. You can even automate this with Make.com or n8n integrations.
8. Architecture: AWS Lambda + APITemplate.io
Now, let’s see what the architecture looks like when you stop fighting with browsers and just use an API instead.
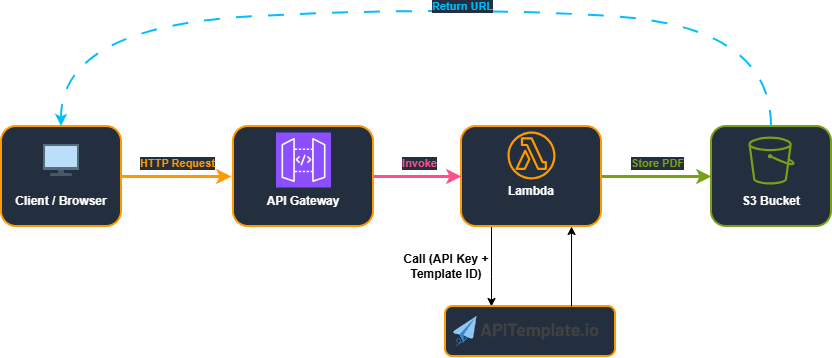
This diagram shows the simplified flow: Client -> API Gateway -> Lambda -> APITemplate.io API -> S3 -> Return URL, with no browser running inside Lambda.
Lightweight Serverless Flow
The request flow:
- Client sends request – First, JSON data (invoice details) arrives via API Gateway
- Lambda validates input – Then, it ensures required fields are present
- Lambda calls APITemplate.io – Next, it sends data to render the PDF
- APITemplate.io returns PDF URL – Subsequently, a temporary download link is provided
- Lambda downloads the PDF – After that, it fetches the actual PDF bytes
- Lambda uploads to S3 – Then, it stores the PDF with proper ContentType
- Lambda returns signed URL – Finally, client receives a secure, time-limited download link
Why This Architecture Is Solid
Importantly, notice what’s different from the Chromium approach:
- No Chromium binaries – First, no 250MB deployment packages
- No Lambda Layers – Second, simple deployment with just
requestslibrary - Fast execution – Third, no browser startup time
- Private S3 storage – Additionally, PDFs aren’t publicly accessible
- Secure signed URLs – Furthermore, time-limited access (1 hour)
- Clean separation – Finally, APITemplate handles rendering, Lambda handles orchestration
As a result, your Lambda function could run with 128-256 MB of memory and complete in 2-5 seconds.
Why This Model Scales Better
When you’re not running browsers in Lambda, scaling essentially stops being a problem:
Concurrency: First, Lambda functions making HTTP calls can easily handle thousands of concurrent requests. You’re not constrained by browser memory requirements.
Cost: Second, a 128 MB function running for 1 second costs a fraction of a 1536 MB function running for 10 seconds. Even with API costs factored in, you often come out ahead at scale.
Reliability: Third, APITemplate.io infrastructure is purpose-built for PDF generation. They’ve already solved the cold start problem, the browser versioning problem, and the scaling problem.
Speed: Finally, no browser startup means users actually get their PDFs quickly. We’re talking 2-3 seconds instead of waiting 10-15 seconds wondering if something broke.
9. Step-by-Step: HTML to PDF Using APITemplate (Python)
Similarly, let’s build a complete Lambda function that uses this PDF generation API to convert HTML to PDF using the APITemplate.io HTML API, stores the result in S3, and returns secure download links.
Prerequisites
- First, sign up for an APITemplate.io account at APITemplate – view pricing plans
- Next, create an HTML invoice template using Jinja2 syntax in the template dashboard
- Finally, get your API key and template ID
Step 1: Create Your HTML Template in APITemplate.io
First, in the dashboard, create an HTML template using Jinja2 variables:
<!DOCTYPE html>
<html>
<head>
  <meta charset="UTF-8">
  <title>Invoice - {{ invoice_number }}</title>
  <style>
    body { font-family: Arial, sans-serif; margin: 40px; color: #333; }
    .header { text-align: center; border-bottom: 2px solid #555; padding-bottom: 10px; margin-bottom: 30px; }
    .header h1 { margin: 0; font-size: 28px; }
    .customer-details { margin-bottom: 20px; font-size: 16px; }
    .items-table { width: 100%; border-collapse: collapse; margin-bottom: 20px; }
    .items-table th, .items-table td { border: 1px solid #bbb; padding: 8px; text-align: left; }
    .items-table th { background-color: #f5f5f5; }
    .total-section { text-align: right; font-size: 18px; font-weight: bold; margin-top: 20px; }
    .footer { margin-top: 40px; text-align: center; font-size: 12px; color: #777; }
  </style>
</head>
<body>
  <div class="header">
    <h1>Invoice</h1>
    <p>Invoice #: {{ invoice_number }}</p>
  </div>
  <div class="customer-details">
    <strong>Bill To:</strong> {{ customer_name }}
  </div>
  <table class="items-table">
    <thead>
      <tr><th>Description</th><th>Quantity</th><th>Price</th><th>Amount</th></tr>
    </thead>
    <tbody>
      {% for item in items %}
      <tr>
        <td>{{ item.description }}</td>
        <td>{{ item.quantity }}</td>
        <td>${{ "%.2f"|format(item.price) }}</td>
        <td>${{ "%.2f"|format(item.amount) }}</td>
      </tr>
      {% endfor %}
    </tbody>
  </table>
  {% set computed_total = 0 %}
  {% for item in items %}
    {% set computed_total = computed_total + (item.quantity * item.price) %}
  {% endfor %}

  <div class="total-section">
    Total: ${{ "%.2f"|format(total if (total is defined) else computed_total) }}
  </div>

  <div class="footer">
    Thank you for your business!
  </div>
</body>
</html>
Key Jinja2 syntax:
{{ variable }}– Insert a value{% for item in items %}– Loop through arrays{{ "%.2f"|format(value) }}– Format numbers to 2 decimal places
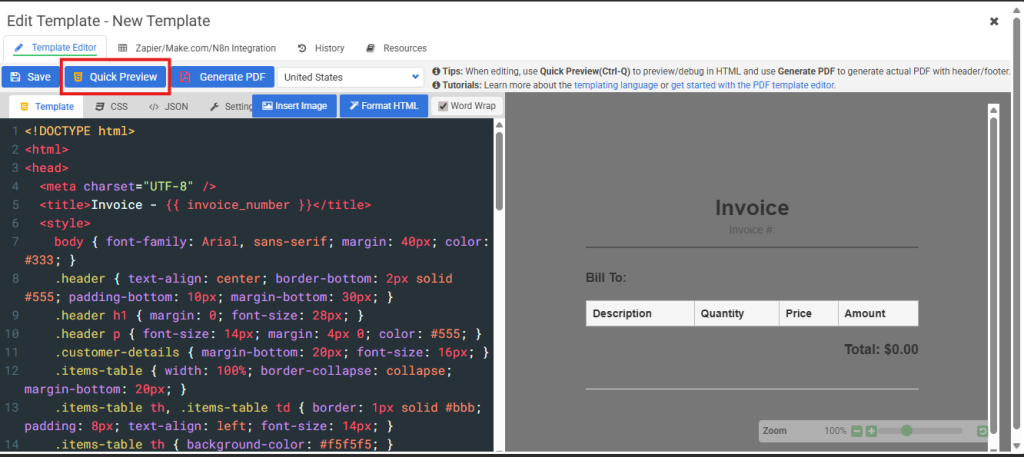
The APITemplate.io editor displays the HTML code panel on the left with Jinja2 variables and the live PDF preview on the right.
Step 2: Get Your API Key and Template ID
From the dashboard:
- Copy your API Key from the API Integration tab.
- Copy your Template ID from the template details in Manage Templates (e.g.,
27777b23c9c6d240)
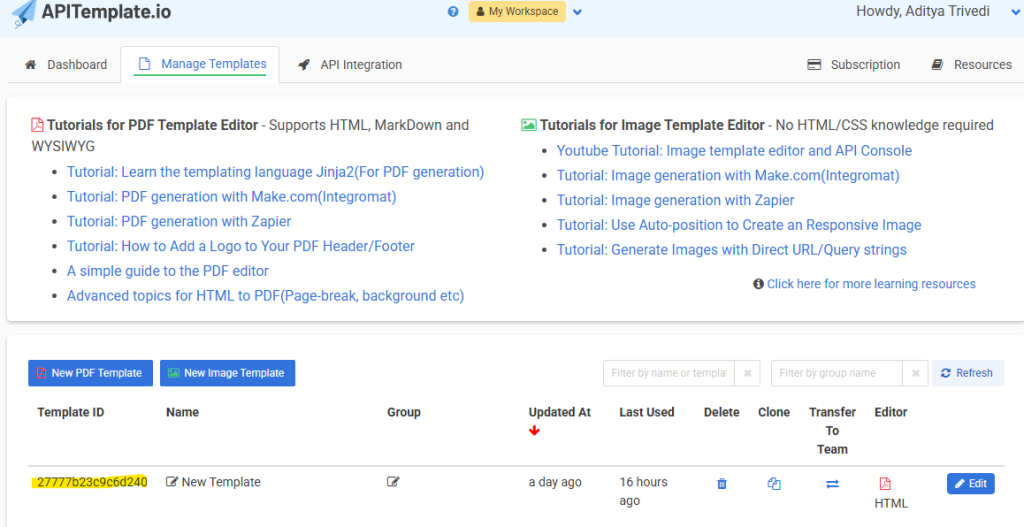
The Manage Templates page shows the template details section displaying the template ID.
Step 3: Project Structure
pdf_api_package/
- lambda_function.py    # Main handler
- requests/             # requests library (installed via pip)
- other dependencies...
Step 4: Create the Lambda Function Code
lambda_function.py:
import json
import os
import requests
import boto3
from datetime import datetime

API_KEY = os.environ.get("APITEMPLATE_API_KEY")
TEMPLATE_ID = os.environ.get("APITEMPLATE_TEMPLATE_ID")
PDF_S3_BUCKET = os.environ.get("PDF_S3_BUCKET")
APITEMPLATE_ENDPOINT = "https://rest.apitemplate.io/v2/create-pdf"

s3_client = boto3.client("s3")

def lambda_handler(event, context):
    try:
        body = json.loads(event.get("body", "{}"))

        # Validate request
        if not body.get("invoiceNumber") or not body.get("customerName") or not body.get("items"):
            return {"statusCode": 400, "body": json.dumps({"error": "Missing required fields"})}

        # Validate config
        if not API_KEY or not TEMPLATE_ID or not PDF_S3_BUCKET:
            return {"statusCode": 500, "body": json.dumps({"error": "Missing configuration variables"})}

        # Prepare invoice data
        invoice_data = {
            "invoice_number": body["invoiceNumber"],
            "customer_name": body["customerName"],
            "items": [
                {
                    "description": item["description"],
                    "quantity": item["quantity"],
                    "price": item["price"],
                    "amount": item["quantity"] * item["price"]
                }
                for item in body["items"]
            ],
            "total": sum(item["quantity"] * item["price"] for item in body["items"])
        }

        # Call APITemplate.io API to generate PDF
        url = f"{APITEMPLATE_ENDPOINT}?template_id={TEMPLATE_ID}"
        headers = {"X-API-KEY": API_KEY, "Content-Type": "application/json"}
        response = requests.post(url, headers=headers, json=invoice_data, timeout=30)

        if response.status_code != 200:
            return {"statusCode": response.status_code, "body": json.dumps({"error": response.text})}

        api_json = response.json()

        # The API returns JSON with a "download_url" field- the real PDF link
        pdf_link = api_json.get("download_url")
        if not pdf_link:
            return {"statusCode": 500, "body": json.dumps({"error": "PDF link not found in API response", "response": api_json})}

        # Fetch the actual PDF bytes
        pdf_response = requests.get(pdf_link, timeout=30)
        if pdf_response.status_code != 200:
            return {"statusCode": pdf_response.status_code, "body": json.dumps({"error": "Unable to download PDF from APITemplate.io", "detail": pdf_response.text})}

        pdf_bytes = pdf_response.content

        # Create a unique S3 key
        timestamp = int(datetime.utcnow().timestamp() * 1000)
        s3_key = f"pdf-{body['invoiceNumber']}-{timestamp}.pdf"

        # Upload the real PDF bytes to S3
        s3_client.put_object(
            Bucket=PDF_S3_BUCKET,
            Key=s3_key,
            Body=pdf_bytes,
            ContentType="application/pdf"
        )

        # Generate a pre-signed URL valid for 1 hour
        signed_url = s3_client.generate_presigned_url(
            "get_object",
            Params={"Bucket": PDF_S3_BUCKET, "Key": s3_key},
            ExpiresIn=3600
        )

        return {
            "statusCode": 200,
            "body": json.dumps({
                "message": "PDF generated and uploaded successfully",
                "bucket": PDF_S3_BUCKET,
                "key": s3_key,
                "downloadUrl": signed_url
            })
        }

    except Exception as e:
        return {"statusCode": 500, "body": json.dumps({"error": str(e)})}
Step 5: Package the Lambda Function
Create the deployment package (PowerShell):
# Create package directory
mkdir pdf_api_package

# Install dependencies into the package
pip install requests -t pdf_api_package

# Copy your Lambda function
copy lambda_function.py pdf_api_package/

# Create the deployment ZIP
cd pdf_api_package
Compress-Archive -Path * -DestinationPath ../deployment.zip -Force
cd ..
As a result, this will create the deployment.zip.
Step 6: Create an S3 Bucket and Upload Deployment Package
- First, go to AWS Console -> S3 -> Create bucket
- Next, enter a unique bucket name (e.g.,
lambda-deployment-packages) - Then, select your preferred region (e.g.,
us-east-1) - Keep default settings and click Create bucket
- Once created, open the bucket and click Upload
- Upload
deployment.zip - Finally, after upload, click on the file and copy the S3 URI
Step 7: Setting Up the Lambda Function
- First, go to AWS Console -> Lambda -> Create function
- Next, choose Author from scratch
- Then, enter function name (e.g.,
pdf-generator-apitemplate) - Select Runtime: Python 3.11 or later
- Click Create function
- In the Code tab, click Upload from -> Amazon S3
- Enter the S3 URI of your
deployment.zip - Finally, click Save
Step 8: Configuring Lambda Environment Variables
Next, in Lambda -> Configuration -> Environment variables, add:
| Variable Name | Value |
|---|---|
APITEMPLATE_API_KEY | Your API key (keep secret!) |
APITEMPLATE_TEMPLATE_ID | Your template ID (e.g., 27777b23c9c6d240) |
PDF_S3_BUCKET | Your S3 bucket name (e.g., pdf-outputs-bucket-adi) |
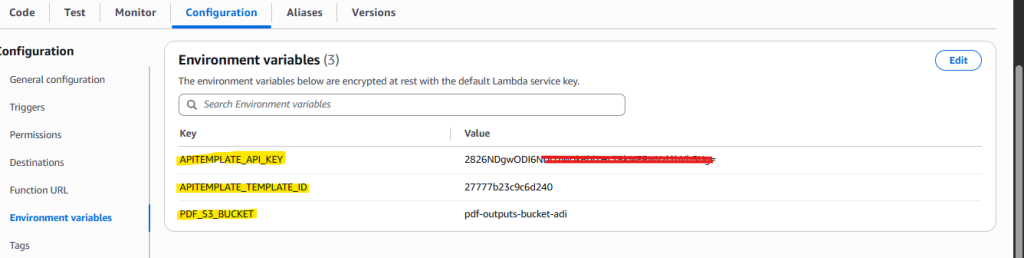
The Lambda Environment variables panel shows APITEMPLATE_API_KEY (value blurred), APITEMPLATE_TEMPLATE_ID, and PDF_S3_BUCKET configured.
Step 9: Configure Lambda IAM Permissions
- Go to IAM -> Roles and find your Lambda’s execution role
- Click Add permissions -> Attach policies
- Search for and attach AmazonS3FullAccess
Step 10: Create API Gateway Endpoint
- Go to AWS Console -> API Gateway -> Create API
- Choose REST API or HTTP API
- Create a POST method at
/generate-pdf - Integration type: Lambda Proxy
- Select your Lambda function
- Deploy to the default stage
Step 11: Test the Complete Workflow
Send a POST request using curl. Replace your-api-id with the API ID generated from API Gateway in the previous step:
curl -X POST "https://your-api-id.execute-api.us-east-1.amazonaws.com/generate-pdf" \
  -H "Content-Type: application/json" \
  -d '{
    "invoiceNumber": "INV-2024-002",
    "customerName": "ACME Test",
    "items": [
      { "description": "Widget A", "quantity": 3, "price": 10.00 },
      { "description": "Widget B", "quantity": 1, "price": 7.50 }
    ]
  }'
Expected Response:
{
  "message": "PDF generated and uploaded successfully",
  "bucket": "pdf-outputs-bucket-adi",
  "key": "pdf-INV-2024-002-1738956123456.pdf",
  "downloadUrl": "https://pdf-outputs-bucket-adi.s3.amazonaws.com/pdf-INV-2024-002-...?X-Amz-..."
}
Finally, open the downloadUrl in a browser to download and view the PDF.

The terminal displays the curl POST request and the JSON response containing the success message, bucket, key, and pre-signed downloadUrl.
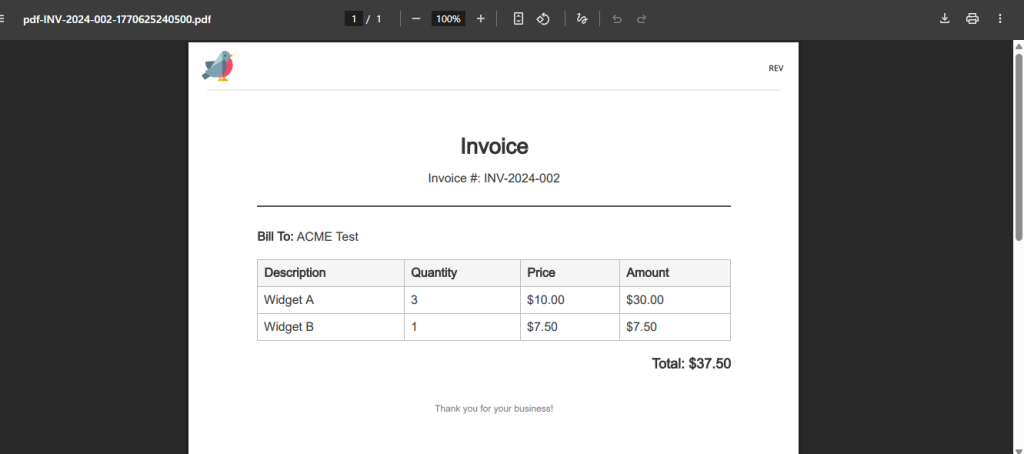
The browser shows the rendered PDF invoice with the styled header, customer details, items table, and total.
Note: The free/trial plan adds a watermark (bird logo and “REV” text) to generated PDFs. Upgrade to a paid plan to remove the watermark for production use.
10. Headless Chromium vs APITemplate: Which Should You Use?
Alright, now let’s cut through the noise and compare these two HTML to PDF approaches directly.
Comparison Table
Factor Headless Chromium APITemplate.io Setup Complexity High- Lambda Layers, specific configs Low- Just API calls Lambda Memory 1536-2048 MB minimum 128-256 MB sufficient Cold Start Time 5-15 seconds < 1 second PDF Generation Time 5-15 seconds 2-5 seconds Deployment Size ~250 MB < 10 MB Monthly Cost (10K PDFs) ~$25 + engineering time ~$15-30 (API pricing) Scaling Complex (concurrency limits, memory) Simple (API handles it) Customization Full control over rendering Template-based with variables Maintenance Ongoing (browser updates, bugs) Minimal (API versioning) Learning Curve Steep Gentle The Bottom Line
Choose Headless Chromium if:
- First, you need complete control over the rendering environment
- Second, you have very specific browser automation needs beyond PDF generation
- Third, cost is critical at very high volumes (millions of PDFs)
- Finally, you have the engineering resources to maintain it
Choose APITemplate.io if:
- First, you want to ship quickly without infrastructure headaches
- Second, your team is small and can’t dedicate time to maintenance
- Third, you need reliable, fast PDF generation
- Additionally, you’re okay with template-based generation
- Finally, you value predictable pricing and performance
Final Thoughts
It looks simple until you try to do it at scale. It’s one of those “how hard can it be?” problems that turns into weeks of work. Whether you go with basic HTML to PDF conversion or a full PDF generator API, serverless architecture handles the scaling-but your choice of rendering approach will make or break the project.
Whether you wrestle with headless browsers or take the easy route with an API, the key is matching your approach to what you actually need-not what you might need someday. In other words, don’t over-engineer for hypothetical scale, but don’t under-engineer for the traffic you’re actually getting.
Above all, start simple. Measure what matters. Then, iterate based on real data, not assumptions.
Ready to Simplify Your PDF Generation?
If you’re tired of wrestling with headless browsers and want to focus on building your application instead of managing infrastructure, try APITemplate.io for free. Get started with 50 free PDFs per month-no credit card required.
Additional Resources
APITemplate Resources:
- APITemplate.io – PDF Generation API
- HTML to PDF API Documentation
- APITemplate.io Pricing Plans
- Complete Guide to PDF Generation for Developers
- Top PDF Generation APIs for 2025
- Best HTML to PDF Converters
AWS & Technical Resources:
- AWS Lambda Documentation
- Puppeteer Documentation
- @sparticuz/chromium GitHub
- AWS Lambda Layers Documentation
Did you find this guide helpful? Share it with other developers facing the PDF generation challenge!