Creating and managing PDF documents have become a necessity in web development. These PDF documents are often used for tasks like generating invoices, reports, receipts, user-specific documents, etc.
PDF (Portable Document Format) is a widely used file format because of its ability to preserve document formatting across different devices and platforms. This ensures that the content appears exactly as intended which makes it ideal for professional documents such as contracts, invoices, manuals, and forms.

Why do we need PDFs? The primary reason is their versatility and reliability. PDFs are platform-independent, meaning they look the same on any device, whether it’s a smartphone, tablet, or desktop computer. This consistency is essential for official documents where precise formatting and presentation matter.
PDFs also support a wide range of content types, including text, images, tables, forms, and even interactive elements like buttons and hyperlinks. They can also be secured with encryption, digital signatures, and permissions, which makes them a suitable choice for storing sensitive information.
In web development, the ability to generate PDFs using JavaScript has numerous advantages. It offers different ways to generate PDF documents by using external libraries and built-in methods.
This article explores four popular methods to generate PDFs with JavaScript, focusing on four key approaches: using the html2pdf library, the jsPDF library, the pdfmake library, and the built-in window.print() method. We will discuss the pros and cons of each approach and provide working code snippets to help you generate your desired PDF document.
If you are looking for ways to convert HTML to PDF on the server side in Node.js using Puppeteer, jsPDF, Playwright, or html-pdf, you can visit our other article: Convert HTML to PDF in Node.js with 4 Popular Libraries.
Let’s get started!
1. Benefits Of Using JavaScript To Generate PDFs
JavaScript offers a simplified way to create PDF documents directly from your web application. It allows for easy integration with HTML documents giving you real-time control over the layout and design of the document.
Here are some benefits of using JavaScript to generate PDF documents:
- Quick Response to User Actions: Generating PDFs on the client side gives users the ability to download documents quickly. This increases user experience and minimizes wait times, as there’s no need to communicate with a server.
- Decrease in server load: When you manage the PDF creation process in the user’s browser, you reduce the processing work on the server. This benefits applications with a high number of users as it helps manage the load effectively, hence scaling the application better.
- Reduced server-side costs: Generating PDF documents on the client side significantly reduces the workload and computational power on the server. This approach can help lower computational costs.
- Offline Support: Client-side PDF generation works independently of an internet connection, making it suitable for applications that require an offline operation. Users can create and save PDFs locally without needing to connect to a server.
- Improved Privacy and Data Security: Generating PDFs on the client side ensures that sensitive data remains on the user’s device and is not transmitted to the server. This helps comply with data privacy laws and regulations by keeping sensitive information local.
- Simplified Workflow and User Control: Creating PDFs on the client side provides users with greater control over the generation process. This allows for a more straightforward process and also gives the advantage of customizing your documents instantly and in real time.
- Dynamic Customization and Live Previews: Generating PDFs on the clients can help users view and adjust PDF previews before finalizing the document. This is valuable in applications where the layout and content need to be customized according to user preferences.
2. Four Methods to Generate PDFs in JavaScript
There are different libraries and methods available for generating PDFs with JavaScript. In the following sections, we will discuss the html2pdf library, the jsPDF library, the pdfmake library, and the built-in window.print() method, along with examples of how to use each one.
i. jspdf
jspdf is a popular JavaScript library used for generating PDF documents directly in your web browsers. This library provides a straightforward way to create and download PDFs on the client-side.
It can also be integrated with JavaScript frameworks such as React, Angular, and Vue. Here are some of the pros and cons of using the jspdf library:
| Pros | Cons |
|---|---|
| It handles the creation of PDFs in the browser, hence reducing server load | It performance varies across different browsers. |
| It is easy to use and allows you create and manage PDF documents with minimal efforts | It is resource intensive, especially when generating complex PDFs in the browser. |
| It integrates with popular frameworks such as Vue, React, and Angular | It does not function in environments where JavaScript is disabled. |
| It allows the use of custom fonts. | It may not support all advanced features, such as complex layouts, encryption, etc |
You can install the jspdf library by using the following command:
npm install jspdf --saveIf you do not want to install, you can use it directly via CDN. Here’s an example on how to create a PDF using the jspdf library:
<!DOCTYPE html>
<html lang="en">
<head>
<meta charset="UTF-8">
<meta name="viewport" content="width=device-width, initial-scale=1.0">
<title>Generate PDF Invoice</title>
</head>
<body>
<button id="generate-invoice">Generate Invoice PDF</button>
<script src="<https://cdnjs.cloudflare.com/ajax/libs/jspdf/2.4.0/jspdf.umd.min.js>"></script>
<script src="<https://cdnjs.cloudflare.com/ajax/libs/jspdf-autotable/3.5.14/jspdf.plugin.autotable.min.js>"></script>
<script>
document.addEventListener("DOMContentLoaded", function() {
const { jsPDF } = window.jspdf;
document.getElementById('generate-invoice').addEventListener('click', function() {
const doc = new jsPDF();
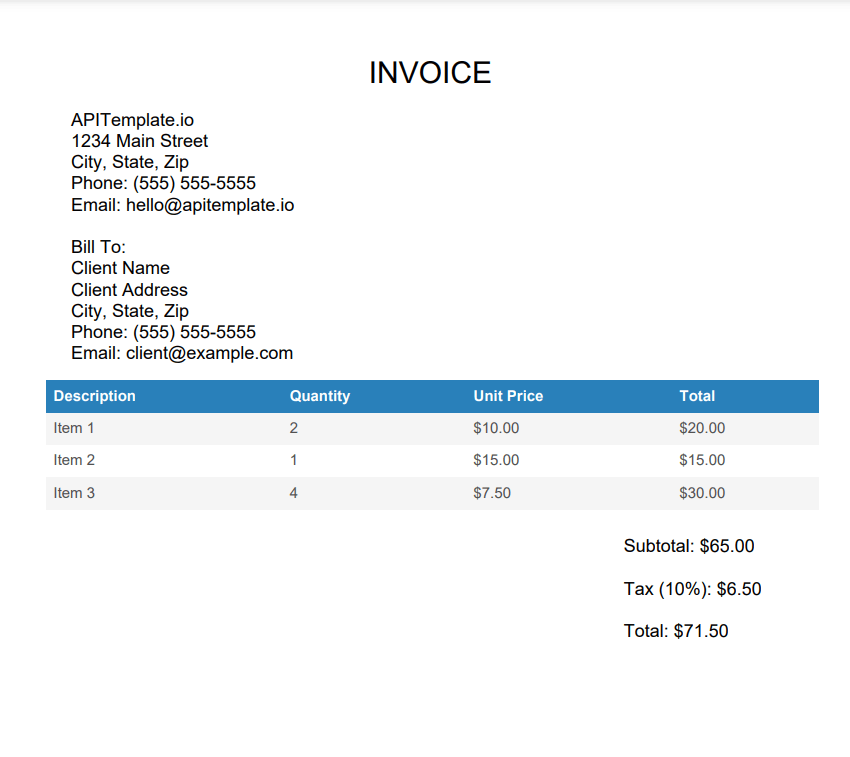
// Invoice Header
doc.setFontSize(20);
doc.text("INVOICE", 90, 20);
// Company Information
doc.setFontSize(12);
doc.text("APITemplate.io", 20, 30);
doc.text("1234 Main Street", 20, 35);
doc.text("City, State, Zip", 20, 40);
doc.text("Phone: (555) 555-5555", 20, 45);
doc.text("Email: [email protected]", 20, 50);
// Client Information
doc.text("Bill To:", 20, 60);
doc.text("Client Name", 20, 65);
doc.text("Client Address", 20, 70);
doc.text("City, State, Zip", 20, 75);
doc.text("Phone: (555) 555-5555", 20, 80);
doc.text("Email: [email protected]", 20, 85);
// Invoice Table
doc.autoTable({
startY: 90,
head: [['Description', 'Quantity', 'Unit Price', 'Total']],
body: [
['Item 1', '2', '$10.00', '$20.00'],
['Item 2', '1', '$15.00', '$15.00'],
['Item 3', '4', '$7.50', '$30.00']
],
});
// Invoice Total
let finalY = doc.previousAutoTable.finalY; // The y position after the table
doc.setFontSize(12);
doc.text('Subtotal: $65.00', 150, finalY + 10);
doc.text('Tax (10%): $6.50', 150, finalY + 20);
doc.text('Total: $71.50', 150, finalY + 30);
// Footer
doc.setFontSize(10);
doc.text('Thank you for your business!', 20, 280);
doc.text('Please make the payment by the due date.', 20, 285);
// Save the PDF
doc.save('invoice.pdf');
});
});
</script>
</body>
</html>
ii. html2pdf
When it comes to generating PDFs directly from HTML content, html2pdf.js is a user-friendly library that leverages html2canvas and jsPDF to produce high-quality PDFs in the browser.
Here are some of the pros and cons of using html2pdf:
| Pros | Cons |
|---|---|
| It converts HTML to PDF with minimal code. | Its performance varies across different browsers |
| It easily integrates with html2canvas which ensures web contents are rendered accurately. | The final PDF might not be consistent across all systems |
| Its simple API allows for easy integration with web applications. | It may struggle on devices with less powerful processors and less RAM. |
| It has extensive settings for margins, page size, and orientation. | It lacks some advanced PDF features available in server-side solutions. |
Below is an example of how to use html2pdf to generate a simple PDF receipt.
<!DOCTYPE html>
<html lang="en">
<head>
<meta charset="UTF-8">
<meta name="viewport" content="width=device-width, initial-scale=1.0">
<title>Generate Receipt PDF</title>
<style>
#receipt {
width: 80mm;
padding: 10mm;
margin: auto;
background: #fff;
font-family: Arial, sans-serif;
}
h1, h2, h3, p {
margin: 0;
padding: 0;
}
.header, .footer {
text-align: center;
margin-bottom: 20px;
}
.content {
margin-bottom: 20px;
}
.content table {
width: 100%;
border-collapse: collapse;
}
.content table th, .content table td {
border: 1px solid #ddd;
padding: 5px;
}
.content table th {
background-color: #f4f4f4;
}
</style>
</head>
<body>
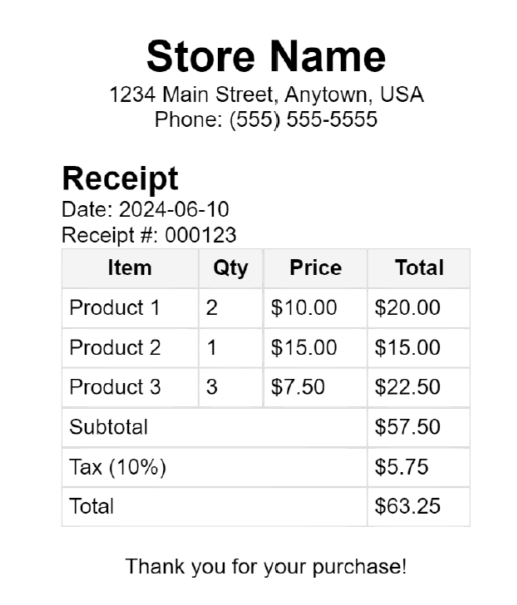
<div id="receipt">
<div class="header">
<h1>Store Name</h1>
<p>1234 Main Street, Anytown, USA</p>
<p>Phone: (555) 555-5555</p>
</div>
<div class="content">
<h2>Receipt</h2>
<p>Date: 2024-06-10</p>
<p>Receipt #: 000123</p>
<table>
<thead>
<tr>
<th>Item</th>
<th>Qty</th>
<th>Price</th>
<th>Total</th>
</tr>
</thead>
<tbody>
<tr>
<td>Product 1</td>
<td>2</td>
<td>$10.00</td>
<td>$20.00</td>
</tr>
<tr>
<td>Product 2</td>
<td>1</td>
<td>$15.00</td>
<td>$15.00</td>
</tr>
<tr>
<td>Product 3</td>
<td>3</td>
<td>$7.50</td>
<td>$22.50</td>
</tr>
</tbody>
<tfoot>
<tr>
<td colspan="3">Subtotal</td>
<td>$57.50</td>
</tr>
<tr>
<td colspan="3">Tax (10%)</td>
<td>$5.75</td>
</tr>
<tr>
<td colspan="3">Total</td>
<td>$63.25</td>
</tr>
</tfoot>
</table>
</div>
<div class="footer">
<p>Thank you for your purchase!</p>
</div>
</div>
<button id="generate-pdf">Generate PDF</button>
<script src="<https://cdnjs.cloudflare.com/ajax/libs/html2pdf.js/0.9.0/html2pdf.bundle.min.js>"></script>
<script>
document.getElementById('generate-pdf').addEventListener('click', function () {
const element = document.getElementById('receipt');
html2pdf(element, {
margin: 1,
filename: 'receipt.pdf',
image: { type: 'jpeg', quality: 0.98 },
html2canvas: { scale: 2 },
jsPDF: { unit: 'mm', format: 'a4', orientation: 'portrait' }
});
});
</script>
</body>
</html>
Tips: If you want to generate images from HTML, you can learn more about html2canvas
What is html2canvas? html2pdf.js uses html2canvas to capture HTML content as an image. html2canvas is responsible for rendering the HTML element into a canvas element, which is then used by html2pdf.js to create the PDF. This combination allows for high-quality, pixel-perfect conversion of HTML content into PDF format.
iii. pdfmake
pdfmake is a flexible library for creating PDF documents in JavaScript. It allows you to define the content and layout of your PDFs using a simple JSON-based structure.
pdfmake is built on top of pdfkit, which provides an easy-to-use API for generating complex PDFs on both the client and server sides.
Pros and Cons of pdfmake
| Pros | Cons |
|---|---|
| It can generate complex documents with various styles and layouts. | The JSON structure can be complex for beginners. |
| It works on both client and server sides. | It can be slower for generating large documents. |
| It is a standalone library that does not require other libraries. | Users need to define their own templates for common documents. |
| It supports custom fonts, images, tables, and more. | Some features might behave differently across browsers. |
Below is an example of how to use pdfmake to generate a simple boarding pass ticket.
<!DOCTYPE html>
<html lang="en">
<head>
    <meta charset="UTF-8">
    <meta name="viewport" content="width=device-width, initial-scale=1.0">
    <title>Boarding Pass PDF</title>
    <script src="https://cdnjs.cloudflare.com/ajax/libs/pdfmake/0.1.70/pdfmake.min.js"></script>
    <script src="https://cdnjs.cloudflare.com/ajax/libs/pdfmake/0.1.70/vfs_fonts.js"></script>
</head>
<body>
    <button id="generate-pdf">Generate Boarding Pass</button>

    <script>
        document.getElementById('generate-pdf').addEventListener('click', function () {
            var docDefinition = {
                content: [
                    { text: 'Boarding Pass', style: 'header' },
                    { text: 'Flight Details', style: 'subheader' },
                    {
                        columns: [
                            { text: 'Flight: ABC123' },
                            { text: 'Date: June 20, 2024' }
                        ]
                    },
                    {
                        columns: [
                            { text: 'From: New York (JFK)' },
                            { text: 'To: London (LHR)' }
                        ]
                    },
                    { text: 'Passenger Details', style: 'subheader' },
                    {
                        columns: [
                            { text: 'Name: John Doe' },
                            { text: 'Seat: 12A' }
                        ]
                    },
                    { text: '', margin: [0, 20, 0, 0] }, // Space to move QR code down
                    { qr: 'ABC1234567890', fit: 100, alignment: 'center' },
                    { text: 'Scan QR Code at Airport', alignment: 'center' }
                ],
                styles: {
                    header: {
                        fontSize: 22,
                        bold: true,
                        alignment: 'center',
                        margin: [0, 0, 0, 20]
                    },
                    subheader: {
                        fontSize: 16,
                        bold: true,
                        margin: [0, 10, 0, 5]
                    }
                }
            };

            pdfMake.createPdf(docDefinition).download('boarding_pass.pdf');
        });
    </script>
</body>
</html>
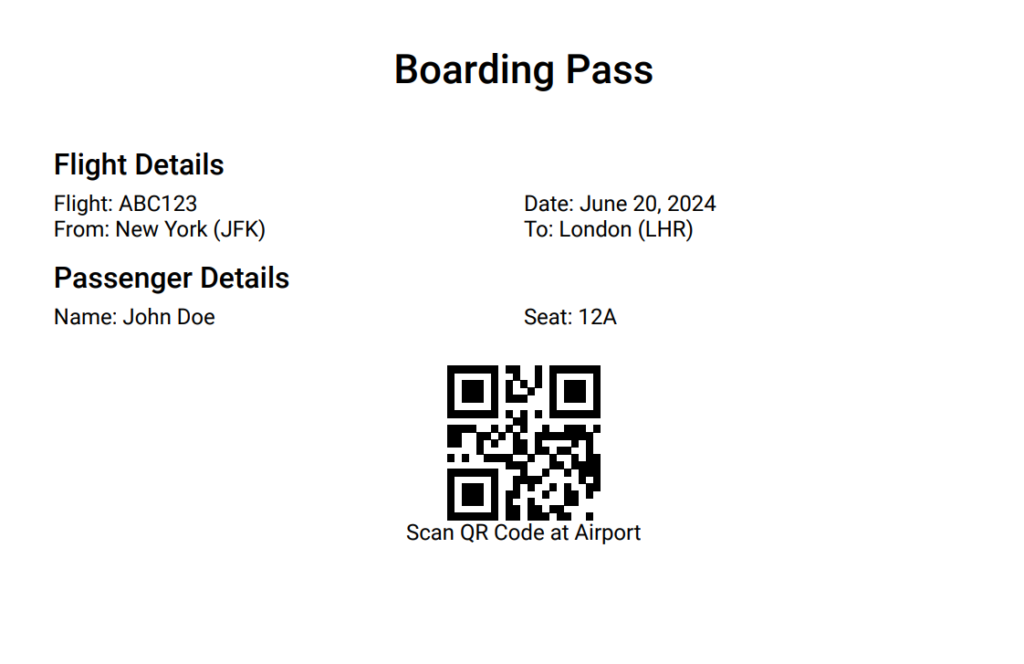
Check out our existing tutorial to learn how to add dynamic QR codes to your PDF.
iv. Generating PDFs Using the Print JavaScript Method
The window.print() method is a straightforward way to generate PDFs from web pages using the browser’s built-in print functionality. This method does not require any external libraries and can be triggered by a simple HTML element, like a button or a link.
How to Use window.print()?
When a user clicks the element, the window.print() function is called, which opens the browser’s print dialog. From there, the user can choose to print the document to a PDF.
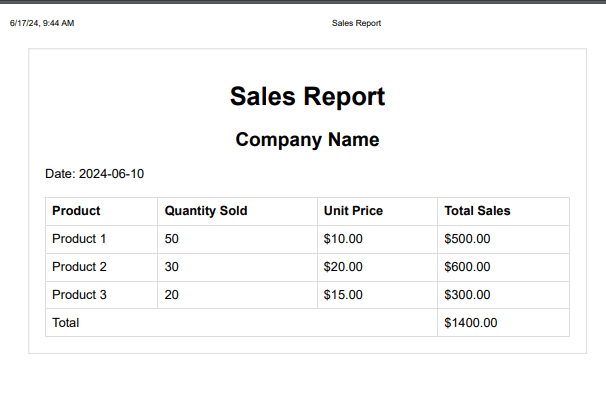
Here’s an example of how to create a printable sales report using window.print():
<!DOCTYPE html>
<html lang="en">
<head>
    <meta charset="UTF-8">
    <meta name="viewport" content="width=device-width, initial-scale=1.0">
    <title>Sales Report</title>
    <style>
        body {
            font-family: Arial, sans-serif;
            margin: 0;
            padding: 0;
        }
        .report-container {
            padding: 20px;
            margin: 20px;
            border: 1px solid #ddd;
            background-color: #f9f9f9;
        }
        h1, h2, h3 {
            text-align: center;
        }
        table {
            width: 100%;
            border-collapse: collapse;
            margin-top: 20px;
        }
        table, th, td {
            border: 1px solid #ddd;
        }
        th, td {
            padding: 8px;
            text-align: left;
        }
        th {
            background-color: #f4f4f4;
        }
        .no-print {
            display: none;
        }
    </style>
</head>
<body>
    <div class="report-container">
        <h1>Sales Report</h1>
        <h2>Company Name</h2>
        <p>Date: 2024-06-10</p>
        <table>
            <thead>
                <tr>
                    <th>Product</th>
                    <th>Quantity Sold</th>
                    <th>Unit Price</th>
                    <th>Total Sales</th>
                </tr>
            </thead>
            <tbody>
                <tr>
                    <td>Product 1</td>
                    <td>50</td>
                    <td>$10.00</td>
                    <td>$500.00</td>
                </tr>
                <tr>
                    <td>Product 2</td>
                    <td>30</td>
                    <td>$20.00</td>
                    <td>$600.00</td>
                </tr>
                <tr>
                    <td>Product 3</td>
                    <td>20</td>
                    <td>$15.00</td>
                    <td>$300.00</td>
                </tr>
            </tbody>
            <tfoot>
                <tr>
                    <td colspan="3">Total</td>
                    <td>$1400.00</td>
                </tr>
            </tfoot>
        </table>
        <button class="no-print" onclick="window.print();">Print PDF</button>
    </div>
</body>
</html>
Pros and Cons of Javascript Print method
| Pros | Cons |
|---|---|
| It does not require additional libraries or dependencies. | Different browsers may render the print output differently, leading to inconsistencies. |
| It is simple and quick to set up for basic printing needs. | It has less control over the PDF generation process than specialized libraries. |
| It takes advantage of the browser’s native print functionality. | Users must interact with the print dialog, which may not be ideal for all applications. |
4. Comparison of All Four Methods
We’ll compare four popular options: jsPDF, html2pdf, pdfmake, and using the Print JavaScript Method.
This comparison will help you decide which tool or method best fits your project’s needs based on features, ease of use, and performance.
| Feature/Method | jsPDF | html2pdf | pdfmake | Print JavaScript Method |
|---|---|---|---|---|
| Basic Description | Client-side library for creating PDFs | Combines html2canvas and jsPDF for rendering HTML to PDF | Powerful PDF generation library supporting complex layouts | Uses the browser’s print functionality to save HTML as PDF |
| Ease of Use | Moderate | Easy | Moderate | Very Easy |
| Complex Layouts | Limited | Limited | Advanced | Basic |
| Customization | High | Moderate | High | Limited |
| Dependencies | None | html2canvas, jsPDF | None | Browser built-in |
| Text Handling | Good | Good | Excellent | Basic |
| Image Handling | Basic | Good | Advanced | Basic |
| Performance | Good | Moderate | Good | Good |
| Browser Compatibility | All major browsers | All major browsers | All major browsers | All major browsers |
| Additional Features | Plugins for additional functionality | Supports automatic page breaks | Rich styling options, table support | None |
| Community Support | Strong | Strong | Moderate | Minimal |
| Use Cases | Simple reports, invoices | Converting web pages to PDF | Complex reports, documents | Quick conversion of HTML content to PDF |
When it comes to generating PDFs in the browser, the choice of tool or method depends on the specific requirements of your project.
jsPDF is a solid choice for simple PDF creation with basic layout needs and good performance.
html2pdf is user-friendly and great for converting existing web pages to PDFs with moderate complexity.
pdfmake shines in handling complex layouts and providing advanced customization options, making it ideal for detailed documents.
Finally, using the Print JavaScript Method is the easiest way to convert HTML content to PDFs, albeit with limited customization.
5. Problems With Generating PDFs in Browsers
Just like all good things in life, there is always a tradeoff. It is important to weigh the benefits against the potential drawbacks of generating your PDF documents in browsers.
Here are some of the problems you may want to consider:
- Browser Compatibility: Client-side PDF generation varies across different browsers. It is important to consider the performance and user experience of each browser when generating PDF documents.
- Feature Limitations: Some external libraries for generating PDFs on the client side may lack advanced features that are available on the browser. Some of the features may be encryption for security purposes, complex layouts, customized fonts, etc.
- Inconsistency in Rendering: The appearance of the final PDF may vary across systems, as different browsers may interpret the PDF generation code differently, leading to inconsistencies in layout and formatting.
- Regulatory Compliance Challenges: Compliance requirements are important especially when handling data on the client side. It is important to consider these requirements to avoid potentially raising legal concerns.
- Mobile Device Limitations: Mobile devices often have less powerful processors and RAM compared to desktops, which can result in poor performance and usability issues when generating PDFs client-side
- Accessibility in NoScript Environments: Client-side PDF generation may not work in situations where JavaScript is disabled or blocked. This can limit the accessibility and functionality of an application.
6. Cloud-based PDF Generation API
Apitemplate.io is a cloud-based PDF generation API that allows users to create PDFs from HTML templates with dynamic data. It offers an easy-to-use API that integrates seamlessly with various applications and workflows.
It has a built-in WYSIWYG editor that allows you customize your template however you like. It’s particularly useful for generating invoices, reports, and other documents that require consistent formatting and dynamic content.
Here are a few steps to help you get started:
- Signup/Login to APITemplate.io: Sign up for an account on APITemplate.io following our easy steps. You only need to have a valid email to get started. If you already have an account, then login to get started.
- Choose a Template: Select from our wide range of pre-defined templates that suit your needs.
- Send JSON Data: Use our already existing JSON data or prepare your own JSON data. This data will populate the template fields.
- Make an API Request: Use our API endpoint to send the JSON data and template ID. Our system will generate the PDF based on the provided information.
Here are some of our notable features:
- Generate Template-based PDF: With Apitemplate.io, you can generate a template-based PDF, eliminating the need to write your HTML content from scratch. We offer a solution that allows you to take advantage of pre-defined templates using our API. Our API will generate the PDF based on the provided information. Our API currently supports various programming languages like PHP, Python, Node.js, C#, and more. For more information, check out our existing article for a complete guide on HTML to PDF conversion
- Generate PDF from website URL: Our API allows you to create PDFs directly from a URL. This feature comes in handy when you need to convert web pages or online resources into PDFs quickly. By simply passing the URL to our API, you can easily convert the web page into a PDF document. If you want to know how to create a printer-friendly web page, there is an existing guide that teaches you how to do this with CSS!
- Generate PDF from custom HTML content: APITemplate.io supports generating PDF documents from an existing HTML content. How does this work? It takes in your HTML and CSS code as the payload data and uses this to generate your PDF. Pretty cool right? We have an existing guide that shows you how you can convert HTML to PDF using node.js and also generates PDF from website URLs.
7. Conclusion
Generating PDFs in the browser can be a viable solution for many applications, but it’s not without its challenges. Libraries like jspdf, html2pdf, and pdfmake are available to streamline this process, but they also come with limitations and can vary in their performance across different browsers and devices.
For a more reliable and feature-rich solution, consider using a cloud-based PDF generation API like APITemplate.io.
With APITemplate.io‘s PDF Generation API, you can easily create high-quality PDFs from HTML templates with dynamic data. It’s a great tool for generating invoices, reports, and other documents that require consistent formatting and dynamic content.
So why wait? Sign up for APITemplate.io today and start generating your PDFs with ease and efficiency!